Hey there, good progress. One comment that I have on the slave clutch, the bore inside the cover and the outside surface of the piston are "working" surfaces and machined to a specific tolerance. You may already know that, but I would not go too crazy about polishing them, just a good scrape and perhaps ultrasonic to remove the crystalized fluid is all. Also, the push rod is teflon coated so what I did with mine I soaked it in Evaporust which chemically cleaned it well. No abrasives on that one...

Re-baking my ST1300 (Almost full redoing)
- Thread starter leondante
- Start date
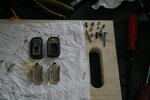
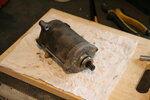
Today was the time for the starter. The dust you see is a tiny bit of copper with carbon, so it can create shortcircuits that takes power from it and creates heat and when it gets stuck between the copper contacts of the rotor creates more shortcircuits and erratic behavior, mainly power losing.
A good cleaning and checking it all and good to go back to its place. Also I changed the o-ring for a new one.
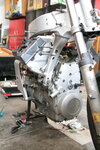
Finished installing the things on the lower part, reinforced the sensor wire with some gasket sealing, as it was getting bad, after some good deep cleaning so it gets well adhesion over it.
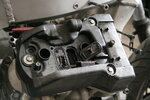
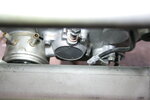
I found that one of the four valves of the exhaust gas to suck the oil gases was broken, so exhaust gas was going inside the oil pan. I'm going to buy that thing.
Also the gaskets of the valve covers are a bit cracked, I'm buying that too whenever I can.
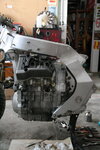
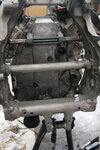
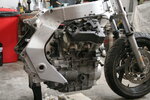
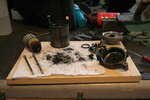
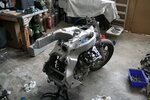
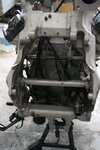
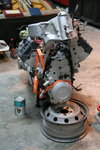
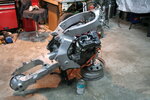
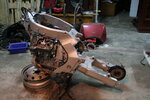
I'm adding some pictures of the engine clean. I have to clean the front fork and wheel yet.
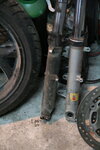
The front fork is getting the seals and oil changed, and cleaned inside.
A good cleaning and checking it all and good to go back to its place. Also I changed the o-ring for a new one.
Finished installing the things on the lower part, reinforced the sensor wire with some gasket sealing, as it was getting bad, after some good deep cleaning so it gets well adhesion over it.
I found that one of the four valves of the exhaust gas to suck the oil gases was broken, so exhaust gas was going inside the oil pan. I'm going to buy that thing.
Also the gaskets of the valve covers are a bit cracked, I'm buying that too whenever I can.
I'm adding some pictures of the engine clean. I have to clean the front fork and wheel yet.
The front fork is getting the seals and oil changed, and cleaned inside.
Attachments
-
 IMG_8367.JPG124.6 KB · Views: 70
 -
 IMG_8375.JPG111.3 KB · Views: 63
 -
 IMG_8379.JPG123.2 KB · Views: 59
 -
 IMG_8383.JPG119.2 KB · Views: 55
 -
 IMG_8390.JPG82.3 KB · Views: 52
 -
 IMG_8407.JPG136.3 KB · Views: 54
 -
 IMG_8411.JPG140.6 KB · Views: 59
 -
 IMG_8416.JPG115.3 KB · Views: 53
 -
 IMG_8420.JPG104.8 KB · Views: 53
 -
 IMG_8427.JPG124 KB · Views: 74
Hey there, good progress. One comment that I have on the slave clutch, the bore inside the cover and the outside surface of the piston are "working" surfaces and machined to a specific tolerance. You may already know that, but I would not go too crazy about polishing them, just a good scrape and perhaps ultrasonic to remove the crystalized fluid is all. Also, the push rod is teflon coated so what I did with mine I soaked it in Evaporust which chemically cleaned it well. No abrasives on that one...
Thank you for the information.
I agree that you have to be cautious when using sand paper for cleaning things like a piston and cylinder. I go to the same point, usually less, than the three stones tool you use to refurbishing cylinders. They don't eat almost nothing, around 0,05 mm, with the sole purpose of storing fluids for lubrication of the walls. I'm thinking about that when I "clean" any wall of a piston or cylinder. Anyways the damage will be always less than whan I'm cleaning, as I never "erase" the stain I'm cleaning, just smooth it so the whole thing doesn't get stuck on it. When I see that the couple slides well, and there's no residue of the corroed part, I think it's good to go. What I really care about it's the union between the sea, the piston and the cylinder wall. There is where the magic happens and where the pressure is beared. As long as the piston and cylinder slides without getting stuck, can be said that they are OK, somehow.
About the push rod, I didn't notice the teflon, and used steel wool just on the tip because it had a bit of that kind of rust the brake fluid makes with the aluminium. But didn't go crazy anyways, so I wouldn't say it's bad. I would swear there was not sign of teflon at all on that rod. I smeared grease all around the zone inside (not inside the cylinder) so any brake fluid or humidity doesn't mess up the aluminium if it gets there, as it already did.
For cleaning rust, I use drain cleaner, an strong acid that usually dettatch the oxygen from the metal, leaving you with clean metal and metal dust. Do not works on aluminium, as it eats the aluminium and other things softer than steel. Is a risk anyone should think about before using such a measure, but when it works it's amazing.
Thanks again for the information.
The dust you see is a tiny bit of copper with carbon,
On the starter... I secure the rotor shaft opposite to the commutator (the coppery thing) in my electric drill and secure drill in a vice, get a long strip of 120/220 grit sandpaper and with the drill on low speed I wrap the sandpaper around the commutator for a good clean. If there are ridges from the brushes I use a semi-fine file to remove. At the end I use a needle or screwdriver blade to clean in between commutator contact strips, then blow with compressed air.
WOW! You've torn it down further than I've ever torn any of mine down!
It's looking good!
It's looking good!
You certainly know how to get “into” an ST!!!!
On the starter... I secure the rotor shaft opposite to the commutator (the coppery thing) in my electric drill and secure drill in a vice, get a long strip of 120/220 grit sandpaper and with the drill on low speed I wrap the sandpaper around the commutator for a good clean. If there are ridges from the brushes I use a semi-fine file to remove. At the end I use a needle or screwdriver blade to clean in between commutator contact strips, then blow with compressed air.
I use a small steel wire brush to clean those contact strips until fresh copper is seen. I try not to eat too much, just enough to see good copper again. I use a cutter blade to clean the dust between the contact strips, until clear and clean resin shows up again (or whatever thing they use to isolate the contacts is used). I literally have seen that dust emmiting light because shortcircuits, so I clean it the best I can. I use gasoline and a tootbrush to dissolve and get out the dust and it work extremely well. Then I grease all the needed points just enough not to get it into all the other parts and that's it.
Thank you for sharing ideas, I'll have those in mind.
Last edited:
Today was a great day.
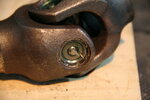
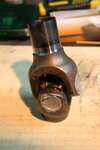
The Cardan joint (Don't know the name in English, I can't find it in the workshop manual. Cardan was the dude that invented it.) was very bad. The old grease was out of it, inside was dry. It had not any play, so it was the time for rescue it. Without any play (almost), it can be used a lot more of kms. But not without grease. Without lubrication, I estimate around 20K kms more. With lubrication, more than 70K kms. So I wanted to put grease inside the damn thing whatever it takes.
It comes pressed and closed with bad intentions so it cannot be lubricated periodically. You must break it to open it or things like that. This part dies because lack of grease, and nothing else, and making it NOT lubricable makes me extremely angry. It can last three times than now if you can lubricate it. But I have an idea. Using a syringe with a small needle and very hot lithium grease I could put it inside it under the rubber seal.
The idea was a full fail. The grease did not melt, did not go inside and the small amount that got inside was really far from enough.
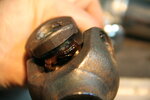
As I'm very hard headed, I thought a more agressive measure. I have a manual grease pump from Aliexpress that works pretty well. It has a 1 cm conic needle that injects a 1mm diameter thread of grease with very good pressure. If I could stick that thing at the right place I could flood the stuff with grease. So I got a good bit and put it in my 9 gears, also chinese, table drill.
The idea was a nice failure. The final caps of the needle bearings in the thing are absurdily hard. So I tried again, with an expensive, new, good, HARD bit of steel with cobalt. The damn thing did not even a sad scratch to the surface. The bit bended to one side, then to the other, nothing. Not even a jiggle from a tickle.
Going ahead harder, next idea. Cutting the punched marks that hold the thing in place so I can push the body outside of it with my sweet 12 ton cheapnese manual press. So... When trying to cut it I noticed that the dremel disk made a mark over the cap of the thing when trying to eat one of the punches. Nice! I tried making a cross over the center of one cap and then drilling it with my only and best 3mm cobalt bit. For some reason the bit was nothing to it but the cutting disk of the dremel was working pretty well.
SUCCESS! The drill suffered, but made it well and troughout the damn adamantium thing. Just at the very last hole, the bit break, on time for ending the task. So, after more work and ideas and flooding it with gasoline for a deep cleaning many times (a lot of dark souls came out of the damned, dry stuff), I get to successfuly flood the thing using that small hole on each of the four needle bearings to the point of getting all the dirt out and getting nice and clean grease out of the rubber seal in the opposite side. I took punching a bit hard the pump so it could get some pressure inside, because it was coming out from the new holes besides the rubber sealing. I used a good lithium grease.
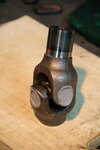
A good cleaning againt but just the cap with gasoline (without getting the grease out this time) so the gasket seal could get good adhesion and the thing was ready. I plugged the fresh holes with gasket seal abundantly and took the extra grease outside it so it doesn't get throwed up inside when spinning.
So I cleaned the outer rubber dust cover, greased finely the thing to avoid corrosion, put Molykote Molibdenium grease to the respective splinted? parts and all ready to mount the rear thing (I forgot the name again) and the wheel and the final drive, blablabla.
Tomorrow.
Maybe.
Please correct my English if you see any errors. I want to learn more.
The Cardan joint (Don't know the name in English, I can't find it in the workshop manual. Cardan was the dude that invented it.) was very bad. The old grease was out of it, inside was dry. It had not any play, so it was the time for rescue it. Without any play (almost), it can be used a lot more of kms. But not without grease. Without lubrication, I estimate around 20K kms more. With lubrication, more than 70K kms. So I wanted to put grease inside the damn thing whatever it takes.
It comes pressed and closed with bad intentions so it cannot be lubricated periodically. You must break it to open it or things like that. This part dies because lack of grease, and nothing else, and making it NOT lubricable makes me extremely angry. It can last three times than now if you can lubricate it. But I have an idea. Using a syringe with a small needle and very hot lithium grease I could put it inside it under the rubber seal.
The idea was a full fail. The grease did not melt, did not go inside and the small amount that got inside was really far from enough.
As I'm very hard headed, I thought a more agressive measure. I have a manual grease pump from Aliexpress that works pretty well. It has a 1 cm conic needle that injects a 1mm diameter thread of grease with very good pressure. If I could stick that thing at the right place I could flood the stuff with grease. So I got a good bit and put it in my 9 gears, also chinese, table drill.
The idea was a nice failure. The final caps of the needle bearings in the thing are absurdily hard. So I tried again, with an expensive, new, good, HARD bit of steel with cobalt. The damn thing did not even a sad scratch to the surface. The bit bended to one side, then to the other, nothing. Not even a jiggle from a tickle.
Going ahead harder, next idea. Cutting the punched marks that hold the thing in place so I can push the body outside of it with my sweet 12 ton cheapnese manual press. So... When trying to cut it I noticed that the dremel disk made a mark over the cap of the thing when trying to eat one of the punches. Nice! I tried making a cross over the center of one cap and then drilling it with my only and best 3mm cobalt bit. For some reason the bit was nothing to it but the cutting disk of the dremel was working pretty well.
SUCCESS! The drill suffered, but made it well and troughout the damn adamantium thing. Just at the very last hole, the bit break, on time for ending the task. So, after more work and ideas and flooding it with gasoline for a deep cleaning many times (a lot of dark souls came out of the damned, dry stuff), I get to successfuly flood the thing using that small hole on each of the four needle bearings to the point of getting all the dirt out and getting nice and clean grease out of the rubber seal in the opposite side. I took punching a bit hard the pump so it could get some pressure inside, because it was coming out from the new holes besides the rubber sealing. I used a good lithium grease.
A good cleaning againt but just the cap with gasoline (without getting the grease out this time) so the gasket seal could get good adhesion and the thing was ready. I plugged the fresh holes with gasket seal abundantly and took the extra grease outside it so it doesn't get throwed up inside when spinning.
So I cleaned the outer rubber dust cover, greased finely the thing to avoid corrosion, put Molykote Molibdenium grease to the respective splinted? parts and all ready to mount the rear thing (I forgot the name again) and the wheel and the final drive, blablabla.
Tomorrow.
Maybe.
Please correct my English if you see any errors. I want to learn more.
Attachments

Last edited:
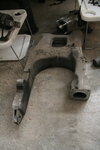
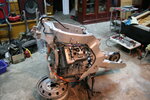
Thing was, again, nasty. I can't believe how it was. Sadly the pictures doesn't show in a fairly way how gunked it was. PO did drive over fresh asphalt and the swing arm (I remembered the part name!) had gunk and pebbles stuck here and there over the top part. First a good hot water with workshop floor degreaser and then my lovely magic potion (gasoline) did its miracle of dissolving all the gunk like it was candy for very hot water. I love gasoline and the more I know it, more I am in deep love of it. No wonder some rats want to take it out of us, it's powerful and filled with possibilities of creating, fixing and making things move.
I just finished deep cleaning and greasing the gearshift thing, the oil cooler tubes, the clutch hoses... All that needed to be installed previously the swing arm and the final drive and wheel. Things fell very slow, but are going ahead without stop. I think I'm taking three months for finishing it, if I have not money issues for buying the parts that I would need. By the moment just a PAIR valve is really bad and need replacement. Also some oil, brake fluid, the common things. The fork seals too, they have to be new.
Cheers.
Attachments
Last edited:
Well, I almost forget what the hell I've been doing until now.
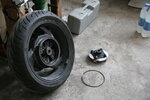
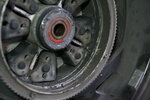
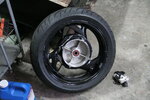
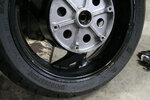
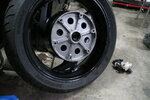
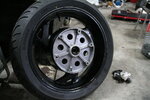
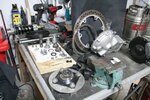
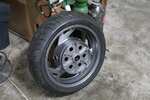
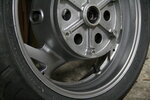
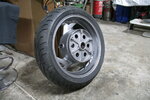
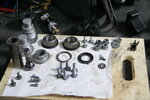
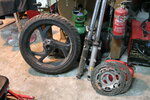
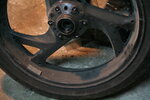
I cleaned the small parts for installing the swing arm and the wheel. And, of course, the wheel itself.
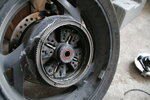
All the bearings, oil seals, the ABS crown, the brake disk, the brake caliper support, blablalbah...
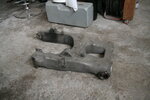
The brake caliper support (or however it's called...) I thought it was black. Damn I was wrong. Anyways, I spent like an hour or more just brushing the cursed blacked out of our dimension with I-already-don't-know-how-many-freaking cups of gasoline until thing get to be aluminium colour again. Pictures speak by themselves. I'm impressed for the heavy amount of dirtyness this motorcycle has. But more because I am blessed with success in my effort of cleaning and restoring all good for a new long riding life. I really like whan I'm seeing. Even if I have to get a new used engine, this motorcycle is in sweet point of life, really in good shape despite the 100K kms of dirty and hot city riding it has had.
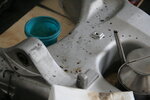
The wheel... It was black because the dirtyness. After hours cleaning, I got it back again to normality. The painting was bad to the point I wanted to paint it again or get out all the painting. So I searched for a good paint stripper, but before going to buy it, an expensive one that would be good with aluminium, I tried with a bottle of acetone I had around my lot of weird stuff. The thing worked instantly and really well, almost, again, like sugar under hot water. So I didn't use paint stripper at all, and as I kinda like the original colour, I just cleaned it and that's how it will stay by the moment.
I dissasembled the disk brake and ABS crown and spent, even again, a lot of brushing for cleaning the buried parts. This motorcycle was never, EVER, washed. I think is the first hobo motorcycle I've know in my life.
The ABS crown had a lot of stuck dirt between the teeth hard as small rocks, but I've had more desire to clean it so now is shiny (but not abused) everywhere.
(No metal parts were damaged in any of these processes).
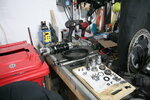
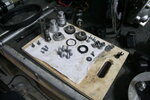
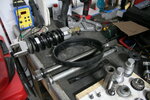
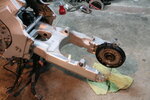
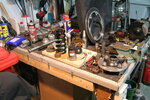
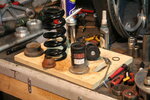
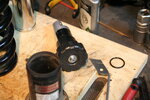
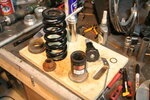
The suspension regulator was clearly broken, as it only started to work at the top 20% of its career. So, I'm changing the tube, that is clearly bad, and I'm opening and refurbishing the master and slave cylinder of the rear suspension regulator, and I hope brake fluid DOT4 works well because I've not any blinker fluid anymore so I'm using the DOT4 for that hydraulic regulator. I have a 12 ton press that I'll use in order to get down the slave cylinder, to take out the circlip that hold it in place and open it slowly without making the spring fly along my head from side to side. So, I'll check how it's inside and if I can open it for cleaning it I'll do it. Then I will be able to mount the swing arm and go to the front fork. I can mount the suspension stuff later, despite I would have to take again the shock absorber in order to properly get out all the air from inside it when connecting the master cylinder.
I cleaned the small parts for installing the swing arm and the wheel. And, of course, the wheel itself.
All the bearings, oil seals, the ABS crown, the brake disk, the brake caliper support, blablalbah...
The brake caliper support (or however it's called...) I thought it was black. Damn I was wrong. Anyways, I spent like an hour or more just brushing the cursed blacked out of our dimension with I-already-don't-know-how-many-freaking cups of gasoline until thing get to be aluminium colour again. Pictures speak by themselves. I'm impressed for the heavy amount of dirtyness this motorcycle has. But more because I am blessed with success in my effort of cleaning and restoring all good for a new long riding life. I really like whan I'm seeing. Even if I have to get a new used engine, this motorcycle is in sweet point of life, really in good shape despite the 100K kms of dirty and hot city riding it has had.
The wheel... It was black because the dirtyness. After hours cleaning, I got it back again to normality. The painting was bad to the point I wanted to paint it again or get out all the painting. So I searched for a good paint stripper, but before going to buy it, an expensive one that would be good with aluminium, I tried with a bottle of acetone I had around my lot of weird stuff. The thing worked instantly and really well, almost, again, like sugar under hot water. So I didn't use paint stripper at all, and as I kinda like the original colour, I just cleaned it and that's how it will stay by the moment.
I dissasembled the disk brake and ABS crown and spent, even again, a lot of brushing for cleaning the buried parts. This motorcycle was never, EVER, washed. I think is the first hobo motorcycle I've know in my life.
The ABS crown had a lot of stuck dirt between the teeth hard as small rocks, but I've had more desire to clean it so now is shiny (but not abused) everywhere.
(No metal parts were damaged in any of these processes).
The suspension regulator was clearly broken, as it only started to work at the top 20% of its career. So, I'm changing the tube, that is clearly bad, and I'm opening and refurbishing the master and slave cylinder of the rear suspension regulator, and I hope brake fluid DOT4 works well because I've not any blinker fluid anymore so I'm using the DOT4 for that hydraulic regulator. I have a 12 ton press that I'll use in order to get down the slave cylinder, to take out the circlip that hold it in place and open it slowly without making the spring fly along my head from side to side. So, I'll check how it's inside and if I can open it for cleaning it I'll do it. Then I will be able to mount the swing arm and go to the front fork. I can mount the suspension stuff later, despite I would have to take again the shock absorber in order to properly get out all the air from inside it when connecting the master cylinder.
Attachments
-
 IMG_8459.JPG139.1 KB · Views: 65
 -
 IMG_8461.JPG121.4 KB · Views: 62
 -
 IMG_8481.JPG134.7 KB · Views: 51
 -
 IMG_8486.JPG124.1 KB · Views: 45
 -
 IMG_8488.JPG115.9 KB · Views: 45
 -
 IMG_8492.JPG130.6 KB · Views: 45
 -
 IMG_8496.JPG124.7 KB · Views: 46
 -
 IMG_8498.JPG118.5 KB · Views: 46
 -
 IMG_8500.JPG121.8 KB · Views: 49
 -
 IMG_8502.JPG114.8 KB · Views: 49
 -
 IMG_8504.JPG147 KB · Views: 49
 -
 IMG_8506.JPG132.1 KB · Views: 47
 -
 IMG_8508.JPG150.5 KB · Views: 47
 -
 IMG_8510.JPG162.6 KB · Views: 46
 -
 IMG_8514.JPG124 KB · Views: 47
 -
 IMG_8515.JPG110.6 KB · Views: 49
 -
 IMG_8517.JPG141.5 KB · Views: 45
 -
 IMG_8519.JPG135 KB · Views: 46
 -
 IMG_8521.JPG131.7 KB · Views: 71
I’ll agree with the last sentence here (and the others as well for that matter but especially this last sentence). Since you don’t know for sure where it’s coming from, get it running and get it to leak where it will and then correct the problem areas. If you start taking things apart that don’t need to be taken apart, the very least you’ll do is create a bunch of work and expense that didn’t need to occur.There's only a couple places where oil leaks occur on a st1300.
Waterpump - when the waterpump fails there will be coolant and/or oil seep out of the small round or square hole at the bottom-front-right side of the engine and air flow will typically push that all over the engine. It might also leak out of the waterpump housing section.
Hose connections - there are several in the top valley of the engine that, if loose, can also mimic a waterpump failure and again, airflow will make it look like the entire engine is leaking.
Valve checks - sometimes someone will get the rubber flap that covers the top of the engine between the valve cover gasket and engine and that can cause a major leak quickly - that isn't a mechanical failure and simply a user error and happens fast enough it's usually fixed quickly.
I would clean the engine, get it all together and get it running and THEN see if it leaks. You can't tell much from a non-running bike.
I’ll agree with the last sentence here (and the others as well for that matter but especially this last sentence). Since you don’t know for sure where it’s coming from, get it running and get it to leak where it will and then correct the problem areas. If you start taking things apart that don’t need to be taken apart, the very least you’ll do is create a bunch of work and expense that didn’t need to occur.
Maintenance is done in order to avoid further damage to things that can be fixed before getting seriously broken. That's what I'm doing by the moment. I'm checking stuff, cleaning and lubricating them, and fixing what seems to be broken or close to getting broken.
I found a bearing broken in the rear wheel. It was the transmission hub, the one that takes the power from the final drive and put it in the rubber cushions inside the wheel. It had the balls "jail" broken and it was going to get worse soon. I found it just in time for changing it. So, after thinking a bit, I decided to change all the rear ball bearings and the couple at the front wheel. Not so expensive and very safe to have them new after 100K kms. Also It's the best moment, as I have all dissasembled and the motorcycle will not be needed for some time. I'm really needing it safe and for long use in some months, so better to do it just now.
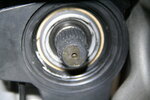
The rubber boot between the swing arm and the engine did not coupled good at the engine side, it's too big (did that happened to your bike?) so I made a small "clip" with a very thick piece of universal oil gasket paper, like 1.5 or 2 mm. The invented "clip" get inside the metal lip at the engine side and the rubber boot also has like a lip that keeps it closed tightly, and I like how it went, really better than expected. Good thing that the material used behaves well with grease, water, heat, oil, blablabla. And being kinda paper shouldn't damage the rubber neither the aluminium. See the picture attatched.
I dissasembled the shock absorber, just enough to check it and fix the regulator. All the thing was really dirty, full of sand inside. I really don't know where the heck this dude went with the bike, but wouldn't surprise me to discover him riding on the beach in the back in a scene of the "Pirates of the Caribbean" movie like the plane in the movie "Troy", seeing how full of trash the motorcycle is inside.
I'm ordering the bearings tomorrow, maybe, I have those in my cart already in a nice on-line store for that stuff I found. I have to put some other rubber seals there too before ordering. I'm checking the front stuff previously to add all the other things I would need, if I found any, but for sure the front fork seals are getting into that shopping cart.
Things are going nicely ahead. Soon I'm starting the brake calipers and pipes. After that, I'm going with the wiring salad.
Attachments
Last edited:
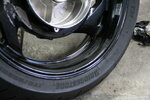
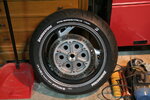
Today I wasn't planning on painting the letters white on the tyres, but something just snapped and I went for it. I did have doubts about if that would be a good idea. Doubts were out fast after just some words painted. Doubts were full murdered after seeing it finished. I used an oil based paint pencil bought specifically for this purpose some time ago. It's a chinese cheap paint, but never tried it before, so I want to see how this goes with time and kms. By now it looks amazing for me, full bad mule.
I was not sure about dissasembling the steering. At the end it was a good idea to do it. It was clearly with bumps when moving it, an important nut was loose (maybe because wearing caused by 100K kms of use), it was clearly loose having in mind that the workshop manual says it should have around 2kg of force to star moving... The only good thing inside there was the grease.
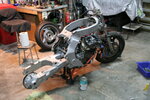
I'm doing the front wheel, front fork and steering these days. As soon as I could, I'll buy some parts so I can resume mounting things. I still have to create the tool to tighten the lock nut of the pivot of the swing arm and maybe one for the steering nut (Maybe? For sure I'll need that...).
Most stuff is getting tightened with torque measuring wrench. On just not-that-important few things I'm not using that tool for the job.
I was not sure about dissasembling the steering. At the end it was a good idea to do it. It was clearly with bumps when moving it, an important nut was loose (maybe because wearing caused by 100K kms of use), it was clearly loose having in mind that the workshop manual says it should have around 2kg of force to star moving... The only good thing inside there was the grease.
I'm doing the front wheel, front fork and steering these days. As soon as I could, I'll buy some parts so I can resume mounting things. I still have to create the tool to tighten the lock nut of the pivot of the swing arm and maybe one for the steering nut (Maybe? For sure I'll need that...).
Most stuff is getting tightened with torque measuring wrench. On just not-that-important few things I'm not using that tool for the job.
Attachments
-
 IMG_8541.JPG141.1 KB · Views: 52
 -
 IMG_8546.JPG130.4 KB · Views: 53
 -
 IMG_8548.JPG165.4 KB · Views: 41
 -
 IMG_8550.JPG126.5 KB · Views: 39
 -
 IMG_8554.JPG114.2 KB · Views: 43
 -
 IMG_8556.JPG137.8 KB · Views: 46
 -
 IMG_8558.JPG154 KB · Views: 44
 -
 IMG_8563.JPG150.9 KB · Views: 40
 -
 IMG_8572.JPG142.9 KB · Views: 53
I used to fill in the lettering on my 1970 CB750 Dunlops. Had to buy it in small tins since the pens weren't available back then. The paint lasted the life of the tires, no fading or flaking. Considering doing it on my ST's.
Your rework is progressing well. Before and after photos perfectly demonstrate why owners should periodically remove her skirts and clean the crap (literally) off everything. Otherwise, it builds up, cooks on quite hard and actually conceals real problems.
Good Work!
Your rework is progressing well. Before and after photos perfectly demonstrate why owners should periodically remove her skirts and clean the crap (literally) off everything. Otherwise, it builds up, cooks on quite hard and actually conceals real problems.
Good Work!
Last edited:
Could also alternator o-ring be guilty for such foggy oil contamination? Or in case o-ring fail overall contamination pace would differ?Most oil leaks on the 1300 come from the valve covers leaking into the V and out the oil drain hole. Do an oil leak search on this forum. Also I don't believe that the gasoline has hurt your gaskets. Remember that proper diagnosis is the way to start every job.
Agree with your statement, for valve covers - as main source.
---
@leondante keep pushing mate!
++ for Cardan instead of U-joint =)
Could also alternator o-ring be guilty for such foggy oil contamination? Or in case o-ring fail overall contamination pace would differ?
Agree with your statement, for valve covers - as main source.
---
@leondante keep pushing mate!
++ for Cardan instead of U-joint =)
Inside the V was dirty but not greasy. I'm sure there was not any oil leak around there, as it was full of dirt and small rocks because a lost screw plugged the drain somehow and they cannot get out of there. I should be full of gooey mess but it wasn't.
Share: