What did you do with your ST1100/ST1300 today?

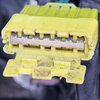
I had to troubleshoot a fuel pump that wouldn’t come on with the ignition switch. Got a 12 flash code and started to investigate, and found this! I am supposed to leave on a trip a week from Saturday. Haha! Glad it didn’t happen 3000 miles from home

Damn Mice.. now I am in full
panic mode.. if you happen to have an injector harness let me know!
 

Attachments

  • 1A919967-D6DC-46EE-AD18-A27FA2502C67.jpeg
    1A919967-D6DC-46EE-AD18-A27FA2502C67.jpeg
    151.8 KB · Views: 47
  • 13EE1F6A-3017-4F5D-9E42-26BBD0DCC315.jpeg
    13EE1F6A-3017-4F5D-9E42-26BBD0DCC315.jpeg
    152.8 KB · Views: 48
  • C70F1AA3-CD40-48A2-B398-E2A0BCD983D5.jpeg
    C70F1AA3-CD40-48A2-B398-E2A0BCD983D5.jpeg
    108.1 KB · Views: 44
  • 0FE54D60-363A-4321-B2EB-42DD7672734E.jpeg
    0FE54D60-363A-4321-B2EB-42DD7672734E.jpeg
    99.7 KB · Views: 44
Removed my mufflers for replacing their clamps. Since they were off I brought em in the house and polished up the visible stainless. Put them back on and then did the exhaust on my F150. I'm not a young man any more. This day was exhau, er, tiring!
 
Nice and clean installation. :cool:

Thanks. I was initially thinking about doing the under the mirror mount (which would have been a better location), but I hate cutting into the any part of the mirror housing. This was an easy and inexpensive solution. It's just two M6 x1.0 bolts (75mm length) and make two 2.5 inch spacers. The length of the bolts and spacers would depend on the size of your light bracket. Remove the top mounting screw for the side fairing and mount your light there. And no fairing was harmed during this installation.
 
Last edited:
Took the ST1300 out for an hour and half ride. I was just going to check the comfort on my Russell seat and get some gas for a short ride but just wanted to keep going and going. Made a nice loop into the countryside and back around to home. Just in time to go pick up my youngest from school, otherwise I might have made it a midnight return. The seat was more comfortable than I remember, I didn't get gas as I had enough for the ride back home. First time I just wanted to keep going in a while, the temp for me was perfect between 55-60F indicated on the bikes temp reading. What a great bike!
 
Today I stood there and admired it. Air cleaner, drive oil and clutch/brake fluid are recent. It has new tires, brake pads, water pump, all water hoses, fork oil, motor oil and coolant. It’s been a marathon two weeks of gasket scraping, problem solving, cursing and aches and pains. And it feels great!
 
Replaced the rear wheel bearings and flange bearings on my 07 ST1300. Not bad but had over 151,000 miles since last change at 115,000 miles.
I forgot to mention that I replaced the rubber dampers and O-rings in the rear hub, I was surprised at how hard and worn the rubber was.

I took it for a 100 mile test ride today with the new rear bearings and replacement front wheel and new front tire as my front bearing on the right side had disintegrated, road like a new bike.
 
Yesterday I disassembled, cleaned and lubed the windshield mechanism. At sixteen years the caked old lube was inhibiting instead of helping. Thankfully the gear is still like new, cables not so much. It works smooth and quiet though.
 
... threw some curse words at it... the RHS fork tube to be exact...
Bugger is seeping again, hence it ain't the seals, the fork tube is worn down (and indeed it's very shiny in that area...)
Off to check part suppliers...
 
Used a ScotchBrite pad to sand away a ton of white powdery aluminium corrosion from almost every alloy surface, as part of my brother's mistreatment of the bike was leaving it in the salt air near the beach for two years. Plenty of surface rust on steel too.

Believe it or not, this is the final drive casing after the worst was removed.

20230609_165822.jpg

Dumb question time - I prised open the top of the yellow ground cap and it looked ok, but does the connector split in two like most? It looks like it should, but I couldn't see how to open it.

20210922_152548.jpg 20230604_144905.jpg

And is there a second yellow ground cap somewhere? I found this photo but couldn't identify the location. Wondering if this is somewhere under the fuel tank?

ground cap.jpg

Thanks!
 
Last edited:
Used a ScotchBrite pad to sand away a ton of white powdery aluminium corrosion from almost every alloy surface, as part of my brother's mistreatment of the bike was leaving it in the salt air near the beach for two years. Plenty of surface rust on steel too.

Believe it or not, this is the final drive casing after the worst was removed.

20230609_165822.jpg

Dumb question time - I prised open the top of the yellow ground cap and it looked ok, but does the connector split in two like most? It looks like it should, but I couldn't see how to open it.

20210922_152548.jpg 20230604_144905.jpg

And is there a second yellow ground cap somewhere? I found this photo but couldn't identify the location. Wondering if this is somewhere under the fuel tank?

ground cap.jpg

Thanks!
Cant tell you if that is a ground block but that pic looks to be from the top of the engine, behind the fuel injection system
 
The yellow (and purple) blocks do separate, but they're very tight.

Be careful, I'm 99% sure that the yellow block behind the throttle bodies is a +12V block, and the purple block is the ground block...
 
Back
Top Bottom