Rear brake issue

Talking about installing the rear wheel, and using the word grease got my attention :rofl1:
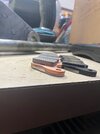
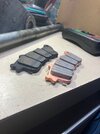
You can use a very little amount of grease on the brake pad pin if you want, but I find that just collectings dirt etc.
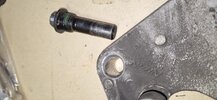
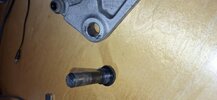
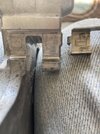
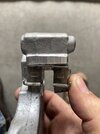
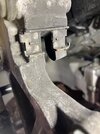
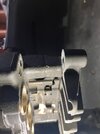
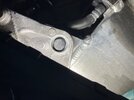
Grease on the stopper plug will get squeezed out the first time you hit the brakes.
Grease on the axle won’t hurt anything, just don’t use paste on any of these parts other than the splines.
I find antiseize works better on the axle, and will remain there.
If you’ve ever pulled an axle out and found two rusty rings on it, that is where grease used to be, and is metal to metal wear from the bearing races.
When you use antiseize you will never find that.
It’s not in the service manual, but I use antiseize on the stopper plug to it’s a glancing blow every time it contacts it, and the steel plug does not damage the soft aluminum bracket as much.
YMMV.
 
Here's a few pics and measurements of my Stopper Plug and Bracket. These measurements are a little rough, and I can slightly rock the plug in the middle of elongation. The flat part of the elongation is uniform and I can move the venear cliper along with no change. That dimension is probably is closer to 0.557"
The chamfer edge is uniform in width so I would think that if the elongation is getting longer, I'd expect to see some narrowing of the chamfer at the end.
 

Attachments

  • 1000027391.jpg
    1000027391.jpg
    44.5 KB · Views: 17
  • 1000027392.jpg
    1000027392.jpg
    44.6 KB · Views: 21
  • 1000027393.jpg
    1000027393.jpg
    30.4 KB · Views: 20
  • 1000027394.jpg
    1000027394.jpg
    34.9 KB · Views: 22
Last edited:
Your rear caliper mounting bracket is damaged and should be replaced!
I would love to see a couple pictures of the pad retaining clip from the right side as mounted, and facing straight on, to see how worn the bracket is at that point.
Can you wiggle or move the clip up and down at all?
The spiral flutes inside the caliper bracket hole where the plug sits indicate that the axle/stopper plug were either torqued in the wrong sequence, or the stopper plug got loose and danced around etc.
It’s also a sign that your SMC may have either been failing, or failed putting pressure on the stopper plug.
Has your SMC been replaced at any time?
If so, you should have replaced the rear caliper bracket as well.
I would suggest you not operate your bike with that bracket for safety reasons.
 
Does your clip look like the first picture, or the 2nd two pictures?
There should be no gap/space/movement in the clip at all.
And if you can remove it, the bracket should be replaced.
 

Attachments

  • 70752171906__A3C68AAB-7C24-4FCD-B5DF-573B121AD56B.jpeg
    70752171906__A3C68AAB-7C24-4FCD-B5DF-573B121AD56B.jpeg
    130.4 KB · Views: 14
  • 69196544436__3ECA1780-264E-40DF-BEBE-E24988E54A4C.jpeg
    69196544436__3ECA1780-264E-40DF-BEBE-E24988E54A4C.jpeg
    136.1 KB · Views: 14
  • 69196541543__D31DD5A5-06EA-4E9D-A292-F4B9BAD78A8E.jpeg
    69196541543__D31DD5A5-06EA-4E9D-A292-F4B9BAD78A8E.jpeg
    105.1 KB · Views: 14
Rotating the stopper bolt back from fully threaded in, there is no visible change in the elongated hole fore and aft gaps, I don't have dial indicator but this observation along with holding a steel ruler tip against the inside of the swing arm, it looks like the stopper bolt flat section is straight.
Putting the stopper bolt backward into the bore at the same depth that would normally occur it can rock very slightly, I'd say there might be a thousandth or two clearance.
With the axle, bracket and stopper bolt assembled, the bracket can not be pivoted from the axle.
The original pads have worn very evenly but not quite perfectly; a little more so toward one end.
 

Attachments

  • image0 (1).jpeg
    image0 (1).jpeg
    124.6 KB · Views: 21
  • image0.jpeg
    image0.jpeg
    123.2 KB · Views: 19
  • image1 (1).jpeg
    image1 (1).jpeg
    95.9 KB · Views: 20
  • image1.jpeg
    image1.jpeg
    89.4 KB · Views: 20
  • image0 (2).jpeg
    image0 (2).jpeg
    75 KB · Views: 19
  • image1 (2).jpeg
    image1 (2).jpeg
    103.4 KB · Views: 20
Your reply sounds like your trying to convince yourself, or you already have convinced yourself, that all your parts are good, so I won't try to convince you otherwise. With that said however, I see a small gap on the top side of the silver clip, that would indicate that the clip is moving under pressure (which also causes the flutes in the bracket) I'm sure if you were to clean things up, you would probably see it also, maybe not.
You don't have to convince me that your parts are good enough, I'm not the one with brake issues.
And after replacing too many of these to count, I know damage when I see it.
Not trying to impose my will on anyone, so with that, I wish you good luck solving your bikes brake issues.
Ride safe.
 
Actually that's not the case at all. No offence and not challenging the expertise of someone that has dealt with these issues probably hundreds of times and I appreciate all your help.
Just throwing it all out there, there's an elongated hole in my bracket. A new bracket is either round or elongated to some extent. That hole is glazed and looks knurled and bright at both ends which looks like the stopper bolt has pressed into it on both ends. So I need to know does a new bracket have a round hole or an elongated hole, and if it is elongated, how much worse is mine.
The red line I've drawn is the long axis of the oblong, the pic of stopper bolt in the oblong shows virtually a compliant fit perpendicular to that line, and the uniform oblong shaped chamfer suggest the hole might initially be oblong and the clearances might exist to enable contraction and expansion along that line. If the hole is initially round, I would expect the wear to reduce or at least slightly distort the chamfer at each end.
If the bracket is shifting fore and aft that much, and none of it is attributable to difference in temperature to the swing arm, where is the corresponding shift in the corresponding stopper bolt to swing arm end occuring; could the combined axle to swing arm bore clearance and bearing clearance take up that much slack, if so, have I already compromised other components.
Didn't want to clean the clips yet in case the grit and glaze might shed some light on anything.
I haven't checked either upper or end clip to see if they are tight.
No glazing or evidence or wear on the axle, bit of grey grease wasn't as much as I thought at first, maybe just what was applied to the seals somewhere along the line.
Both bearings roll smoothly, seem good.
Some small amount of clearance between the swing arm bore and the axle but seems round will have a harder look tomorrow [next month] see if there's any evidence that the axle could have been shifting or creeping.
Both the stopper bolt and the axle nut were probably torqued close to the correct values but the lesson there is use torque wrench when dismantling wouldn't hurt.
Prior to dismantling, I checked the rear caliper temperature by hand more than once during every ride and no excessive heat.
Did the SMC check periodically on the stand seemed to work correctly and release.
Everything seemed to be working perfectly before I took it apart, [edited - wrong, not perfectly] but maybe I'm only another millimeter from twisting the rear caliper.
[Added] Could never get the number of turns on the center stand upon releasing the rear brake since day one; maybe a half or slightly better turn at best but lay off the brakes for a while during a ride and zero heat.
 
Last edited:
The last few words of your post would strongly suggest that your SMC is NOT working correctly.
Did you ever consider that your not getting heat because the pistons are not moving correctly?
They can not only drag the rear wheel, causing heat, but they can also prevent the pads from returning to the correct position etc.
The Flutes in your bracket clearly indicate that the SMC was causing issues.
You should be able to get 2-3 full rotations of the rear wheel, with one firm push downward with your foot on the rear wheel.
Alot of folks don't understand how to do the function test correctly, and just read online, or watch a video of what someone's opinion of how to do it is.
I've seen folks push the SMC bracket forward "to stop the rear wheel" hard enough to push the bike off the centerstand!
And just because the wheel slowed down, and then stopped, they felt it passed the test.
Its also possible that you can push a defective SMC hard enough to even cause the rear wheel to slow down and stop, and, release because the piston is stuck in the bore and not moving correctly etc.
Think of the SMC bracket like you would the brake lever. If you put your thumb against it and pushed, hydraulic pressure, when working correctly would INSTANTLY cause the brakes (wheel) to abruptly stop, and then when you barely release your thumb pressure, it should spin freely again (if the piston, or return port isn't clogged up, and working properly).
You should be able to place your thumb on the rearward (towards the engine) flat spot on the SMC and press with thumb pressure enough to cause everything to either work correctly, or not.
I can use my thumb and index finger to grasp the upper bolt head, and back of the SMC and PINCH it enough to lock up the brakes, and then release them when a system is working correctly.
You may want to re-think your SMC testing routine.
Bottom line, the flutes you see are damage, you must decide what caused it.
Your over thinking the "Hole" being round or elongated, they are cast, and that is the shape they are cast in, however, those flutes were not there, when it was new and working correctly, or as I like to think, before it showed damage.
Find the cause of failure, instead of throwing solutions at a problem.
 
Back
Top Bottom