Transforming IGOFARs ST1300 . . . to Shuey's!

Looking good Shuey!

I tried the FZ-1 fuseblock years ago, but my horns are 20amp and they didn't play well together, so I went back to the Bluesea Fuse block (x6).

DSC00462.JPG

I've had the Quartet harness on all my bikes. I use it for the outlet on my riser, that powers my tankbag.

I also use it as a "relay on" switch for my fork lights.
 
Can these grips be powered through the quartet harness?
Thanks.
I hadn't heard of this brand before.
Yes, mine are attached via the quartet harness and have worked fine since spring.

I need to pull the left grip and attempt to re-glue it as it's loose on the bar :cautious:
 
Catching up . . .

Bike-Quip (England)
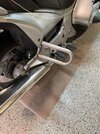
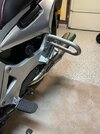
Saddle Bag Tip-Over Bars


The ST1300 designers did a really good job of including the Tip-Over-Wings. If/when the bike falls over they keep the front and sides of the bike from hitting the ground. However . . . with the saddle bags attached, the bags become the 2nd point of contact and accordingly become scratched and/or broken. Adding saddle bag tip-over bars protects them and the rest of the bike.

I used to get these from Bygdog (on our site), but he is definitely 'out of the Tip-Over Bars business.'
These are just as good, really solid and bolt right on without any adjustments.
I think they're a must for any ST owner.

Shuey


Tipover Guard Right Side.jpg

Tip over bars right.jpg

Tip Over Bars Left.jpg


PS: I'll try to remember to add another picture showing the bars with the saddle bags mounted.
 
The 1100 police bikes had something similar, didn't they?
Those might not be available now, but could give someone some ideas.
 
Catching up . . .

Bike-Quip (England)
Saddle Bag Tip-Over Bars


The ST1300 designers did a really good job of including the Tip-Over-Wings. If/when the bike falls over they keep the front and sides of the bike from hitting the ground. However . . . with the saddle bags attached, the bags become the 2nd point of contact and accordingly become scratched and/or broken. Adding saddle bag tip-over bars protects them and the rest of the bike.

I used to get these from Bygdog (on our site), but he is definitely 'out of the Tip-Over Bars business.'
These are just as good, really solid and bolt right on without any adjustments.
I think they're a must for any ST owner.

Shuey


Tipover Guard Right Side.jpg

Tip over bars right.jpg

Tip Over Bars Left.jpg


PS: I'll try to remember to add another picture showing the bars with the saddle bags mounted.
What size bolts did you need ? I’ve got some on order. Excited to install them!!
 
St1100's rest on the tip bars and the tires, Tupperware stays off the ground. How I know this got lightly rear ended at a stop light, luckily no damage.
 
St1100's rest on the tip bars and the tires, Tupperware stays off the ground. How I know this got lightly rear ended at a stop light, luckily no damage.
The ST1300s also come to rest on the tip-over wings and the two tires, but . . . sometimes on landing the side case will also get damaged as the "fall" comes to a stop.
Shuey
 
Well . . . it's been awhile, but finally got around to completing an install of a Tire Pressure Management System (TPMS). In 2008 after an enjoyable ride on the last ferry from Ocracoke to Cedar Island. The sun was setting, perfect temperature, dry roads and NO traffic after being the first one off the ferry. Heading east and north towards New Bern, NC, I'm on a long dark stretch and the bike starts to 'shimmy" in a growing intensity. It's a new experience and it was approaching unrideable when lights appeared ahead of a lone gas station. It was closed, but had lots of lighting. Yep, you guessed, tire going flat. Found a rather large nail and had what I needed to make the repair and continue on my way. In hindsight, it would have been nice to know ahead of time that the leak was starting and how fast it was loosing air.

So, since then, nearly all my riding has included a Tire Pressure Monitoring System (TPMS). Time to install one on this bike.

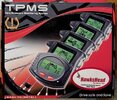
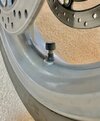
I currently REALLY LIKE the Hawkshead system. It's rechargeable (lasts months of constant use before recharging is needed). Simple to use with valve stem sensors that are small, battery powered and use standard easy to replace button batteries available nearly everywhere (drugstores for sure).

Hawkshead TPMS.jpeg Hawkshead TPMS Sensor.jpeg


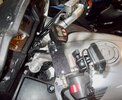
So, where to mount the Monitor? I wanted a spot that a flashing red light would easily attract my attention and not interfere with anything else. My first TPMS 4 bikes ago was mounted with velcro to the clutch reservoir cap. It worked ok, but wasn't easy to see (hidden behind a RAM mounted GPS) and created a problem when needing to service the reservoir. I've never been partial to having a dash shelf, but if I had one, it'd be a great spot to place a monitor. I decided to fabricate a mounting plate to bolt onto the top of the reservoir with a short extension to mount the Monitor in a more visible "in your face" location.

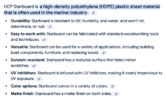
First I needed a material to create the mounting plate. Having had several boats I was familiar with HDP Starboard.
TPMS HDP Starboard.png
Obtained from Crutchfield, 24" x 24" x 3/8" HDP Starboard Plastic Sheet. . . $20.00 (800) 319-2606

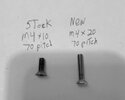
I also needed to account for the additional 3/8" of Starboard being mounted on top of the reservoir cap. Purchased two replacement tapered bolts.
TPMS Resevoir Bolt Specs.jpeg Bolts purchased at ACE Hardware for a few cents each.
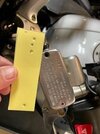

Now, I got to work. Note that I have a very limited selection of tools, but used what I have on hand.

First, I made a paper template for the desired mounting plate. Bolt holes need to be EXACT!
TPMS Template and Resevoir.jpeg

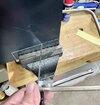
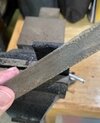
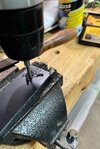
Fabricate the mounting plate. I used my vice, a coping saw, hand file and drill.
TPMS Mark Cut Lines HDP Stazrboard 1-4%22.jpeg TPMS Coping Saw Cuts.jpg

TPMS Filing the cut edges of HDP Starboard.jpeg TPMS Drill holes per template.jpeg
After drilling the holes, I drilled a 2nd time to create the taper for counter sinking the bolts.


Here's the end result with the HawksHead mounting bracket attached to the new mounting plate.
TPMS  Mounting platform assembled w-Monitor.jpeg

The finished result looks like this:
TPMS Completed mounting platform.jpeg

TPMS Mounted Side.jpeg


Some care should be taken when bolting everything together to maintain an even pressure on the reservoir cap to ensure the rubber seal is evenly seated to maintain the integrity of the reservoir. This is the 4th bike I've used this mounting technique on without a single incident. It's solid.

Questions? Happy to attempt to answer as best I can.

Shuey
 

Attachments

  • TPMS Clutch Fluid Resevoir.jpeg
    TPMS Clutch Fluid Resevoir.jpeg
    40 KB · Views: 4
  • TPMS Template on HDP Starboard.jpeg
    TPMS Template on HDP Starboard.jpeg
    23.7 KB · Views: 5
Last edited:
You don't want a rubber valve stem, they will crack/ break.
 
Great idea Shuey. Might give it a try. Thanks for the idea.

I've had trouble finding those specific button batteries anywhere locally. At least for a fair price... (think watch batteries at jewelry store) Not at Walmart etc. No problem on Amazon.
 
Great idea Shuey. Might give it a try. Thanks for the idea.

I've had trouble finding those specific button batteries anywhere locally. At least for a fair price... (think watch batteries at jewelry store) Not at Walmart etc. No problem on Amazon.
I've bought replacement batteries almost exclusively at Walgreens and CVS. As to price . . . they're all expensive now. They last about 2 years mounted on the bike. Supposedly they'll last longer if you take the valve sensors off the tires when you're not riding (thinking winter storage?). I'm lazy and just leave them on all the time. When I want to ride, I want to ride . . . RIGHT NOW! :thumb:

Shuey
 
Back
Top Bottom