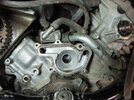
ST1100 Anti-Freeze Leak

It just seems strange to me that the water pump would be leaking 'from the top' instead of the 'bottom'.
I only had such a leak once, years ago (on my prev owned '92 ST1100)...
It did drip down on the LHS of the clutch case, pretty much the spot you've market there...

The shaft drain bore does vent into that area, the backside of the t/belt housing...
there is an enlarged exposure on the ST-riders like posted above (# 9 & # 10)

Replacing the O-ring below mentioned metal pipe is something I'd always avoided; IIRC is it a bear to remove and clean...
Well, I cleaned up the area and then stuffed a paper towel just above that spot, and the anti-freeze is coming from that spot - that upper gasket.
So that metal pipe does not appear to be the source.
Looks like for sure now it is the water pump.
Another question - Do you have to remove the clutch cover to do this?
I 'tested' a bit on my 'smoking' engine sitting on a dolly and I could get the black plastic covers off with a little 'tug'.
And it looks like I can remove the timing belt without removing the clutch cover.
I know the 'manual' says to, but obviously the less I have to remove the less I have to put back! ;)
 
And it looks like I can remove the timing belt without removing the clutch cover.
Yep, just pry the plastic cover out there and leave the clutch cover where it is.
For installation you'll have to snap/break off a section of a rib preventing it from slipping over the bolt holding the crank sided t/belt pulley.
Adam had posted a pic of the offending section in his article:
(you might even try to Dr.Emel that off before removal, but end up with plastic debris inside; compressed air should take care of that though)

attachment.php


(full STory here: https://www.st-owners.com/forums/threads/st1100-timing-belt-replacement.15389/)

To ease the job I also smeared a dab of silicone grease along the rubber gaskets of the cover, snaps right in, it only conflicts on named bolt.
 
More questions for someone who has replaced a ST1100 water pump (since the Honda Service Manual is pretty cryptic) -
Do you have to remove the exhaust headers?
Do you have to drop the oil pan (IIRC no courtesy of @wjbertrand)?
Do the valve covers have to be removed or just the front section of them?

I know the radiator and the clutch cover has to be removed.
Anything else I am missing?
I've changed the cam belt on my ST1100 but in 150,000 miles never had to mess with the water pump on either my ST1100 or ST1300. I didn't remove the clutch cover, you can wiggle the belt cover off with the CC in place, but I dremmeled some clearance before I tried to reinstall it.
 
Martin - More questions -
BTW, I've read your old write up about changing the timing belt and it was extremely helpful - written simply so my simple mind could understand it! ;)
Do you need to completely remove the bolt through the 'tensioning' pulley (14510-MT3-003) before you remove the water pump?
It does not appear to be bolted into the pump but rather the bolt goes through the pump.
What is the best way to 'extract' the water pump once all bolts are removed?
I don't want to pry too hard in the wrong places and break something.
I've got everything lined up just as it should be so that's not an issue at this point.
 
Hi Phil,
Which ST is having this issue and at what mileage?

Thanks
Frost - 97 ABSII at 140,000+ miles.
Timing belt was changed at 100,000 by a Honda shop and supposedly the water pump and pulleys checked.
But then the same shop supposedly did the same thing for SweetTreat and her water pump went south at 130,000+ and roached the engine.
Of the four, she's been a bit more 'problematic' than the other three. ;)
Got her used at 22,020 miles.
 
Martin - More questions -
BTW, I've read your old write up about changing the timing belt and it was extremely helpful - written simply so my simple mind could understand it! ;)
Do you need to completely remove the bolt through the 'tensioning' pulley (14510-MT3-003) before you remove the water pump?
It does not appear to be bolted into the pump but rather the bolt goes through the pump.
What is the best way to 'extract' the water pump once all bolts are removed?
I don't want to pry too hard in the wrong places and break something.
I've got everything lined up just as it should be so that's not an issue at this point.
I'll have to type my response quickly before getting deleted again... happens a lot recently... :rolleyes:

By this picture the spanner pulley bolt goes right through the pump plate into the engine case...

ST1100Clutch-12.jpg

once the case vent, spanner, all other bolts and the one cam pulley case are removed, all that holds the pump assy in is the adhesion of the scale buildup around the O-ring... can't recall much issue getting it out...

ST1100Clutch-13.jpg

And you're right, being already that deep into it, it seems a good idea to deal with the water pipe while at it...
Martin - Great pictures - thank you very much!
 
@ST1100Y Martin - I removed the pulley with no issues but I can't get the water pump budge.
I have tripled checked that all of the bolts are out but pump will not move at all.
Any recommendations about where/how to pry to get it loose?
I sure don't want to damage anything else trying to get the pump out!
As shown on the pics are there also two alignment dowels; age, exposure, corrosion... :unsure:
It needs to be pulled off parallel from the engine case for like 4mm...
I'd take a piece of wood and a mallet to give it a few (reasonable) pounds around that O-ring line, preferable on the enforced spots those M6 bolts were inserted...
 
@ST1100Y Martin (again) - I pulled the carbs and took a big wooden dowl and smacked it with a hammer from the back.
It finally came loose but it appears that you have to remove the frame piece that goes across the front (in front of the water pump) to get the pump out.
Or am I missing something?
From what I can find, the Service Manual is 'silent' about it.
Most of the 'videos' have the engine out and sitting on a holder.
 
I honestly can't remember if I had that sub-frame out, I do guess so; but it ain't much of an affair, had it out on other occasions, just take those bolts out, the bike doesn't collapse ;)
 
You don’t need to remove the front frame crossmember if you removed the left reduction gear, shroud etc (as shown in one of the posted pictures). BTDT

John
 
Last edited:
@ST1100Y @John OoSTerhuis - Well, I removed the bolts and could move the cross member enough out of the way to get the pump out.
Next question - How in the world do you get the metal tube that the lower radiator hose hooks to out of the housing?
There's an o-ring in there I would like to replace and the o-ring under the housing while I am in this deep.
I cannot find anything in the HSM that talks about replacing the o-ring on the metal tub but it shows it as a part number - 91315-MT3-003.
Also, HSM says 'lube' the rubber gasket on the back of the water pump - I presume silicone o-ring lube would be fine?
That would complete all 'coolant' o-rings being replaced plus the water 'necks'.
I'm going to replace the timing belt and the two pulleys although the belt only has 40,000+ miles on it and the pulleys look fine.
I figure when I'm done, with a new water pump, new pulleys and new belt I shouldn't have to touch all of this for 100,000 miles.
By then the bike will have 1/4 million miles on her and me or her may not even be running by then ... ;)
 
Last edited:
I was on vacation and just now reading through this, glad you're able to get this far.

As John mentioned, the usual way to get the water pump out and back in is to remove the left side cam gear, as shown in one of the pictures, then the pump comes up and out. But, since you went the other way, that saved you the trouble of scraping off the old paper gasket between the cam gear and its mount, and ordering a new one.

regarding the metal tube, many of us have just left that thing alone, its a PITA to work on when doing the hoses under the carbs, because the radiator is still in place for that job. But since you have the radiator off you will have easy access to it, the screw that holds it in place is also visible in the pictures above, just down and to the left from the removed cam gear.

One other thing to mention, when you get it all back together and start looking at the timing belt alignment, its possible you'll find that its not exactly dead on the alignment marks. A couple of us have seen this, and its not critical, but it is a bit confusing when you see it. When I did my timing belt, I also replaced the water pump and all the pulleys, not everyone does that, which might explain why some see the odd timing and some don't, IDK. Anyway, what happened on mine is no matter how I tried, the timing marks on the two cam gears wouldn't align perfectly with the marks. It was about 1/2 tooth off. Is it possible that the threads in the water pump housing where the upper pulley attaches were a tiny bit off? Or the new pulley slightly different diameter? Or the new timing belt a little off? Whatever the cause, my symptom was if I aligned one cam gear to the indicator line the other side was 1/2 tooth off. The only thing between the two cam gears is the pulley and the belt, so it had to be something in that system, but I never was able to get both sides to align with the marks. Since I had to choose one way or the other, I chose to align it such that if the timing belt ever did stretch a bit (which I doubt anyway) it would eventually align where it should be if it were perfect. Mine's been like that for the last 10 years, runs the same, so its not a big deal if yours doesn't align perfectly, so keep that in mind if that happens to be the case.
 
Thanks for the tip on the timing marks as I will watch it when I put it back together.
The tube assembly is easy enough to get out once the water pump is out.
Although the parts diagrams show that the 'tube' is separate from the housing, I do not see anyway short of 'destruction' on getting them apart to replace the o-ring. It almost looks like the tube is pressed into the housing as there is a metal lip. There is nothing in the HSM, Clymers, or anywhere I can find that talks about replacing the tube o-ring. I'll just replace the o-ring under the housing and call it good at this point. I did not have to remove the crossmember, just unbolting it gave me enough wiggle room to get the water pump out. I find it strange that the HSM says apply motor oil to the rubber water pump gasket. I am thinking silicone o-ring lubricant would be better. Besides HSM did not specify if it had to be fully syn, semi-syn or dino .... :biggrin:
 
Back
Top Bottom