New bike (2016-VFR1200X), need advice on a "repair" I need to make

Joined
Jul 19, 2013
Messages
321
Location
Chatham, Ontario, Canada
Bike
2003 ST1300A
I've attached a picture of my new ride that I picked up in Ottawa last week. I rode it home and had a chance to get used to the DCT.
2016 VFR1200X DCT. 35000 km. Good condition. Tires worn out (Pilot Road 6), but they stick good. SW Motech bags and driving lights, engine guards, and footpegs.

1726538836897.jpeg

I've ordered an aftermarket seat (Touratech), as 8 hours on a stock Honda seat was a little too much. I also ordered a new, larger CalSci windscreen. Grip puppies already added.

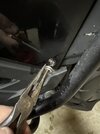
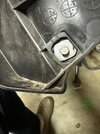
Although supposedly mint condition (according to seller) I'm in the midst of fixing the driving lights that don't work. Which means I need to get into the left side fairing where I believe the connections are made. This leads to the bigger problem as the fairing bolt highlighted in the one picture does not undo. It spins, slowly and quite reluctantly, and the parts get hot if you do it long enough, but no "unscrewing". I believe it is crossed threaded together (so it is screwed, both literally and figuratively).
1726538943017.jpeg

If you look at the parts fiche here I believe it is part # 33 and # 1. With # 33 being the outer cowling bolt and # 1 being the "nut" cast or fitted into a slot in the next cowling behind.


They look like these:
1726538864571.png1726538879455.jpeg

So, my ask is, how do I get this piece undone? Do I pry it open and try to cut the bolt with a oscillating multi tool? There is not a lot of room and I'm not even sure I can get in there to cut it. I took the other side apart, no problems, but also no solutions.

Mike
 
Last edited:
Could you get enough 'purchase' behind the head of the bolt to slip a hacksaw blade in there and cut the head off?
Maybe using a fork like tool to pry the plastic in a little bit to gain some working room?
Or if you have a Dremel with the right attachment, carefully grind off the bolt head?
 
Could you get enough 'purchase' behind the head of the bolt to slip a hacksaw blade in there and cut the head off?
Maybe using a fork like tool to pry the plastic in a little bit to gain some working room?
Or if you have a Dremel with the right attachment, carefully grind off the bolt head?
That's what I'm thinking. I'm not sure if there is room. Grinding the head off from the front is fraught with issues of marring the fairing...but maybe.
 
Here's what I was talking about for a 'fork' tool (technically know as trim rivet remover) -


These are pretty common and if you could slip one behind the head of the bolt you could probably work a hacksaw blade between it and the head of the bolt.
Or cut a piece of thin metal and put the slot in it to slide behind the head of the bolt so you could grind without marring the fairing.
 
Can you pull off a panel on the right side and reach through with something to stop the offending piece from spinning?
Maybe try some penetrating oil on the fastener as well.
Actually, prising the bolt head out slightly should put more tension on the nut and maybe stop it spinning as easily.
 
If you have a compressor you can try using high speed air wrench that the nut might have enough resistance to allow the bolt to come loose. Perhaps a drill with high speed may do the same thing.

Edit: you just want to tap it momentarily to “unlock” it. As OBO mentions below you don’t want to spin and melt the plastic panel
 
Last edited:
I'd grind off the head as suggested using a die grinder and air compressor, after taping up the fairing and guard.
 
Those nuts on an oblong washer tend to spin. They are usually held in place by two raised bit of plastic on the part. The impact when loosening or tightening tends to deform them by either bending or melting. Rapid spinning from an impact will only melt the plastic further and damage the cover. If you can't get something in behind to hold it, you'll have to drill it out or grind the head off. You'll also have to contend with using superglue and baking soda (or something similar) to build up the plastic to hold a new nut for the new bolt to go in - unless you use a plastic push rivet or a well nut to replace the OEM part.
 
On my wife's VFR800F I had a similar issue. But instead of a metal nut it had the expanding rubber well nuts with a brass threaded insert in the well nut. Someone prior to us over thightened the screw and when trying to remove it just would spin.

I used a series of small drills and drilled out the head of the screw. Start small with light pressure. You do not want the screw to spin. It will melt the plastic cover. You don't have to drill very deep. Just enough to get past the head of the screw in to the shank of the screw. Take your time and is good high speed drills that are sharp. We Remember LIGHT PRESSURE. If it spins you are pushing too hard. Also make sure it doesn't get too hot while drilling.
 
I'm wondering if you could remove other pieces, in order to get to the back of that nut to keep it from spinning?

There are 2 such fasteners on the front fender of the ST1300, with the raised plastic bumps designed to hold the nut from turning.

It's not ideal, particularly when the bolt and nut try to mate for life.
 
I'm wondering if you could remove other pieces, in order to get to the back of that nut to keep it from spinning?

Yes, maybe a long needle nose plier slid in from the side would hold the nut so it does not spin.

Once you get it off I'd just epoxy the new nut in place vs. trying the rebuild the plastic tabs. Or maybe plastic weld the nut in place. for
 
I'm wondering if you could remove other pieces, in order to get to the back of that nut to keep it from spinning?

There are 2 such fasteners on the front fender of the ST1300, with the raised plastic bumps designed to hold the nut from turning.

It's not ideal, particularly when the bolt and nut try to mate for life.
Based on the spinning I perceive has happened already as I used my DeWalt tool on the part to try and remove it, I'm sure I'll now have to rebuild the bumps or holding materials. Or weld the nut into place etc. When I get in there, I'll see what I can do.

This is the outside part of the stack to be able to get at the next layer. The fact that Honda does make parts that interact so tightly makes it hard to even get between the two parts, let alone behind to "grab on". I'll give it another try, but I've ordered new bolts and nuts. I had to special order the nut (out of supply at most places). I guess I could replace with non stock parts (but my I'll have to wait to achieve this multi-layered fix now). Grrrr.

This part is the outside part, so I cannot see how to better get behind it...yet.

Thanks for the relies and keep them coming.
 
Last edited:
This is the other side of Honda's (usually) exemplary "fit and finish."
While attractive on the outside, dismantling can often be a pain, with interlocking tabs, these hidden nuts, and all the other that makes them look good.
I've said many times, I only wish the designers and engineers were forced to take their designs apart for routine maintenance. Only then, might we see truly user-friendly machinery.
 
Usually any model released is some kind of compromise between engineering, design and finance teams, so there is that consideration.
Fastener failures are not uncommon when the hands of a PO were involved, just sayin'.
 
Fastener failures are not uncommon when the hands of a PO were involved, just sayin'.
This is true, but "qualified" and "certified" moto-mechanics working for dealers are not immune from this fastener failure fenomenon, either.
How many of us have retrieved a bike from service, only to find out later one or more bolts and fasteners have been cross-threaded and stripped?

EDIT: or even left off...?
 
Last edited:
Here's what I was talking about for a 'fork' tool (technically know as trim rivet remover) -


These are pretty common and if you could slip one behind the head of the bolt you could probably work a hacksaw blade between it and the head of the bolt.
Or cut a piece of thin metal and put the slot in it to slide behind the head of the bolt so you could grind without marring the fairing.
Yes, I do have some trim tools to try that with.

Thanks.
 
NEXT Request:

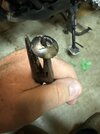
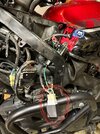
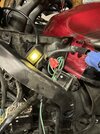
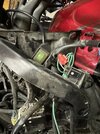
I looked at all the connections and they seem good. The switch still lights up (see photos), but the lights still don't light.

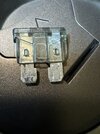
The switch has always lit up. BUT...I did find a 2 amp fuse blown behind the panel. I thought, AHA, this is easy...not so much. Fuse replaced, still no light from the lights.

I undid all the connections and pushed back together. I looked at everything, even the other fuse near the battery, it's good.

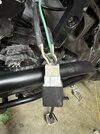
I was unable to unclip the connector from the relay I had a screwdriver in pushing the latch and trying to separate, perhaps just too tight.

So I have to ask, is the relay the likely problem? Anyone? Other ideas, things to check?

This link will take you to the page for the install instructions. It looks like it was done properly.
 

Attachments

  • IMG_5402.jpeg
    IMG_5402.jpeg
    179.2 KB · Views: 42
  • IMG_5409.jpeg
    IMG_5409.jpeg
    194.5 KB · Views: 38
  • IMG_5410.jpeg
    IMG_5410.jpeg
    163.8 KB · Views: 36
  • IMG_5411.jpeg
    IMG_5411.jpeg
    166 KB · Views: 37
  • IMG_5413.jpeg
    IMG_5413.jpeg
    128.9 KB · Views: 38
Back
Top Bottom