She hasn't hit me for that yet. Plenty of room.
I get hit all the time, when I'm leaning through a corner... "Do you really have to lean that far over?" I don't tell her the truth, that it has a lot to do with the weight on the bike!


She hasn't hit me for that yet. Plenty of room.
I'm gonna tell!I get hit all the time, when I'm leaning through a corner... "Do you really have to lean that far over?" I don't tell her the truth, that it has a lot to do with the weight on the bike!

One last comment. Should you take these off, don't remove both bolts on one side at the same time. The frame can slip and it will require two people or a jack and some wood blocks to line everything up again. This doesn't happen every time, but its easier to loosen both bolts, remove one, pivot the bar to one side, replace the bolt and then take out the other one. The original bolts were shorter than the ones supplied by Bygdawg with his bars. Check for interference on the inside of the frame as you snug them up if you don't have the OEM bolts. I don't know how long they were, or I would have posted that.
I would think that to get the strength of the curved bars, your plate would have to be fairly thick - around 1/2". Cutting that stuff is not easy - btdt with a porta band saw - while heating solid rod with a propane or air acetylene torch cherry red and bending it around a plywood form is not difficult. Grinding a thick plate to a round profile along the edge will take a bit of work though that's not mandatory. All in all, the GW and Bygdawg bars seem to be the best of a series of compromises.Although it would add more weight, I'm surprised someone didn't make a set of "bars" out of some flat plate set back almost against the side cases. Should be easier than bending tube for many folks.
I think they were originally designed for use without pillion pegs. Other designs early on were aimed at LEO use and pegs were usually removed. I agree it would seem to be easy to redesign them for two up use when people started complaining.I would think that to get the strength of the curved bars, your plate would have to be fairly thick - around 1/2". Cutting that stuff is not easy - btdt with a porta band saw - while heating solid rod with a propane or air acetylene torch cherry red and bending it around a plywood form is not difficult. Grinding a thick plate to a round profile along the edge will take a bit of work though that's not mandatory. All in all, the GW and Bygdawg bars seem to be the best of a series of compromises.
I do agree with you, however, that there is no reason why Bygdawg could not have moved his loop closer to the side cases. These were made specifically for the ST, not another bike and would have left more room for the pillion rider's feet.
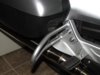
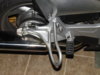
I recognized the problem & came up with this design & made it in my garage .:
I recognized the problem & came up with this design & made it in my garage .:
Outstanding! Let me know if you'd be interested in building a pair for an 1100, if it's even possible to mount them. Black is good.I recognized the problem & came up with this design & made it in my garage .:
+1 on all points.dduelin said:IMHO: Source a set of Goldwing bars, four 10 mm x 40 mm bolts and install them. Best value, best room for pillion feet, IMO best looking. Keep your money.
I recognized the problem & came up with this design & made it in my garage .:
Not so much ….did it on a vise , bending by hands with pipe / ( leverage ) , drill press for holes & then welding with a ~1958 Forney arc welderVery nice - you must have one heck of a garage.
Not much you can do with those, they way they are put together puts the lower part close to the foot peg. Goldwing bars with staggered bolt holes free up a couple of inches by moving the lower part close to the saddlebag.
IMHO: Source a set of Goldwing bars, four 10 mm x 40 mm bolts and install them. Best value, best room for pillion feet, IMO best looking. Keep your money.
Moto-Charlie and St1300biker,So - A couple of questions please:
Thanks
- Does it matter which year Goldwing bars? I'm guessing they should be from a GL1800 pre-2018. Is that correct?
- I also see reference in some posts to an adapter plate. Do I need to buy an adapter plate or are the Goldwing bars a direct bolt on (with the correct bolts)?
Moto-Charlie and St1300biker,
Source pre 2018 Goldwing bars but since used ones rarely give the year I don't know if 2001-2010 bars vs 2012-2017 bars make a difference. There was a model refresh between 2010 and 2012 (there was no 2011 Goldwing). The bars have different part numbers side to side and also 2001-2010 or 2012-2017. I think installed early model run bars but I have no way of knowing now.
An adapter plate is not necessary to mount the bars but if adapters are not used the bars need a little finesse to install. On a Wing the fixing bolts for these bars are 8 mm so the holes need to be enlarged to pass a 10 mm bolt and the hole centers of the bars are slightly further apart than the hole centers in the passenger step. This has caused angst for some posters. What I did (like others before me) was place the open end of the U between the jaws of a padded vise and push the ends together until the hole to hole distance is correct. I then wrapped the bar in cloth to prevent scratching the chrome. Take a hose clamp and tighten it around the bar in order to hold it compressed. Take one of the original bolts out and loosely bolt one end of the bar to the bike. Rotate the bar into position for the other bolt and note that the hole to hole distance opened up a little bit when the bar was taken out of the vise. Uhh, now it doesn't fit both holes in the bike, the holes in the bars are too far apart. Uhh, OK. Take the bar back off and put it in the vise again and over-correct for the hole to hole distance so when the bar comes out of the vise and relaxes against the hose clamp the holes will line up close enough to start both bolts. It's not hard to do but a vise or a large clamp is necessary to compress the ends of the Goldwing bars together and a little trial and error may be involved.
Overall I'd recommend the MCL extenders with the Big Dawg bars. However, even though I upgraded the rear shock with a Race Tech spring and valve kit to compensate for the weight of a pillion I still had feedback from her when the outside of her boot toes contacted the pavement on a tighter turn. I'm not sure if she kept her toes tucked in or had them angled out. There was never any issue with our feet getting in each others way and one big advantage of the MCL peg extenders is the increase in leg room for the pillion which was much appreciated by my missus.That's encouraging to know. I assume there is no ground clearance issue when leaned over while cornering. Is that a fair statement?