I have a 2007 ABS model. I have owned it since 2013 and it came with heated grips that I was told were factory equipment. I don't know this to be the case, but the grips have always worked well, but recently went dead on me. I wonder if anybody has any suggestions on this issue, assuming that they are factory equipment.

You are using an out of date browser. It may not display this or other websites correctly.
You should upgrade or use an alternative browser.
You should upgrade or use an alternative browser.
ST1300 Heated Grips
- Thread starter Marcomalo
- Start date
Terminator2
Site Supporter
My 2006 has new factory grips that I installed 2023. Does your controller light up? If no, check quartet harness fuse (blown?) on left side of bike near steering neck. If controller does light up, then check if you have voltage (engine running @ 3k rpm) at right heated grip wire (white/green stripe). Comment on results for further instructions. ")
If they were factory equipment, they were likely powered by the quartet harness, and optional wiring harness that plugged into a mult-pin connector on the bike and split into 4 separate plugs to power grips, gps/phone, radio, etc. You can start trouble shooting from either end, I like starting at the source. Check the fuses. I'd also want to find the connector that supplies power to the grips and verify that there is voltage at that connector. Then continue downstream checking as you go. Here is some info on the q-harness. If one of your grips is dead, you can always use this power source for your new grips (i.e. the quartet harness).
 www.st-owners.com
ST1300 Articles
OP
OP
I see an oblong shape white fuse holder that I would have never noticed, but I don't know how to get hold of it to check the fuse. It seems to be a two hand job and I can't get both hands on it.My 2006 has new factory grips that I installed 2023. Does your controller light up? If no, check quartet harness fuse (blown?) on left side of bike near steering neck. If controller does light up, then check if you have voltage (engine running @ 3k rpm) at right heated grip wire (white/green stripe). Comment on results for further instructions.
OP
OP
Thanks, all. This is starting to sound like a cold-weather maintenance job. I'll get by until then.
Thanks, all. This is starting to sound like a cold-weather maintenance job. I'll get by until then.
That's what the OEM controller looks like. It fits in a cut out on the top of the left fairing. Is it what you have?
As prompted before, does the controller light up when you turn it on? That's should be your starting point.


OP
OP
That is exactly what I have and it does not light up.
Terminator2
Site Supporter
Bike engine has to be running ( I run engine 2k-3k rpm) to get it to green light when you push the arrow on button once or twice. If no operate, I usually remove left fairing/plastic to access the fuse that you mentioned in white holder (5amp glass type fuse).
.
.
OP
OP
Thanks. When the weather gets too cold to ride I will take care of this. I need to do some other maintenance anyway.Bike engine has to be running ( I run engine 2k-3k rpm) to get it to green light when you push the arrow on button once or twice. If no operate, I usually remove left fairing/plastic to access the fuse that you mentioned in white holder (5amp glass type fuse).
.
jfheath
John Heath
Good luck. Just a warning - Do not put a multimeter set to ohms on any of the connections to that control panel. It will put a voltage across sensitive components which will destroy them. Not from experience, but from reading the instructions many years ago.
The Honda grips are wired in series. There is a connector- mid handlebar - that joins the two together. The connectors are those sturdy Honda type - they take some effort to push together. The waterproof case seems to seal before the male and female oarts mate properly. Possible that someone didn't have the required oomph and left the terminals just touching. And now they have separated.
The Honda grips are wired in series. There is a connector- mid handlebar - that joins the two together. The connectors are those sturdy Honda type - they take some effort to push together. The waterproof case seems to seal before the male and female oarts mate properly. Possible that someone didn't have the required oomph and left the terminals just touching. And now they have separated.
Last edited:
OP
OP
Thanks. I will bring this thing into my work area when the weather turns and take the plastic off so I can get to the components. I will then most likely ask advice from all the knowledgeable folks on the forum. I am a serious rider, but I ain't much of a mechanic. I'm pretty careful about messing with stuff I don't fully understand.Good luck. Just a warning - Do not put a multimeter set to ohms on any of the connections to that control panel. It will put a voltage across sensitive components which will destroy them. Not from experience, but from reading the instructions many years ago.
The grips are wired in series. There is a connector- mid handlebar - that joins the two together. The connectors are those sturdy Honda type - they take some effort to push together. The waterproof case seems to seal before the male and female oarts mate properly. Possible that someone didn't have the required oomph and left the terminals just touching. And now they have separated.
jfheath
John Heath
I once took a look inside the ECU of my ST1100 - wondered if it had water/corrosion in there - being tucked up behind the mirror bracket (ish). I needn't have bothered. All of the circuit board and the electronic components were sealed in a 'bath' of what looked like epoxy resin. Once fried, it is going to stay fried. But always worth a look.
- Joined
- Nov 10, 2007
- Messages
- 1,319
- Age
- 62
- Location
- Vancouver, British Columbia, Canada
- Bike
- 1&2&3-2005 ST1300ABS
That sounds like a fuse on the quartlet harness or a fuse behind the left side cover.That is exactly what I have and it does not light up.
OP
OP
Thanks, Al.That sounds like a fuse on the quartlet harness or a fuse behind the left side cover.
On this side of the pond we would call that 'potting'.I once took a look inside the ECU of my ST1100 - wondered if it had water/corrosion in there - being tucked up behind the mirror bracket (ish). I needn't have bothered. All of the circuit board and the electronic components were sealed in a 'bath' of what looked like epoxy resin. Once fried, it is going to stay fried. But always worth a look.
jfheath
John Heath
Potting ? I've not heard that term before except in a snooker, billiards or horticultural sense- is that the sealed epoxy bath ?
The word may have the same meaning here too. I don't know any electronic experts to talk to. Just me, and I am overwhelmed by it most of the time. I can bluff my way through when I hear a distinctive crack and immediately say - ah yes, that was the LED blowing. I'm very expert in that.
The word may have the same meaning here too. I don't know any electronic experts to talk to. Just me, and I am overwhelmed by it most of the time. I can bluff my way through when I hear a distinctive crack and immediately say - ah yes, that was the LED blowing. I'm very expert in that.
No worries John,
This isn't the first example of how two countries are separated by a common language!
From Wikipedia. https://en.wikipedia.org/wiki/Potting_(electronics)
"In electronics, potting is the process of filling a complete electronic assembly with a solid or gelatinous compound. This is done to exclude water, moisture, or corrosive agents, to increase resistance to shocks and vibrations, or to prevent gaseous phenomena such as corona discharge in high-voltage assemblies."
OP
OP
I just took the plastic off and started looking. The problem was a loose wire, slipped free from a connector. Grips now work fine.Thanks, Al.
Thanks to all who commented.
Subject: Honda OEM Heated Grips
I went from completely dead to fully functional heated grips.
If you are interested…
2006 ST-1300 “Deluxe”, 170.000kms ish.
This is winter, yes I am in Montreal, Canada, and it is the best time to do major maintenance on the bike..
This year, one of the subjects was the unfunctional heated grips.
Symptom
In the last few years I noticed that the grips didn’t work well. Couldn’t set the maximum without the controller power indicators starting to flash. (First symptom).
That was followed by a continuous drop in heat capability. Down to nonfunctional. In other word dead!
Analysis
Since I had to remove the plastic for other maintenances, it was time to handle this problem.
BTW, I am a seasoned retired power electronic designer. This is my domain! And I have time to “play”
Analysis
First thing first: Unmount the controller from the fairing and test it on the bench with a simulated load (a 12V bulb) Works absolutely fine. Cut-off voltage is around 12.7V. The level where the controller is set to stop working. This is important to know.
Cut-off is nice and clean, no flashing.
Right there, it confirms my first impression that, for some reason, there are increasing voltage drops during operation, on the bike.
Took a scope to look at the operation (the grip controller is a PWM controller) and monitored the voltage directly across the controller power input and ground, on the bike, during operation. And yes, there it is, a total of around 1.2V drops at the controller when ON.
There is almost the same amount of drop on the plus side and the minus side, for a total of 1.2V
Note the test was supported by a battery maintainer capable of simulating a charging system in operation. Test voltage is maintained at 13.7 volts at the battery terminal. (Could’n run the bike in my garage, door closed. Hey, it is winter…)
Corrective actions
This is the bad part. There are so many connectors and other electrical connections that it is almost impossible to pinpoint the failure location. The connectors directly involved (located in front of the frame, near the fork) were visually inspected. Nothing really apparent. No corrosion anywhere.
I also notice that, when the Emergency Flashers are on, there is a similar drop, at the Grip’s controller. Common circuit…
A very quick check on the fuse blocks revealed nothing.
More you check, the scarier it becomes. Where is the problem, if there is one?
Design flaw?
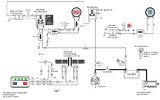
Wiring Diagram
After spending almost 3 days deciphering the wiring diagram and making a correlation between the 2003 diagram and the actual 2006 version (they are not the same, but similar enough to get a minimal understanding.) I decided to bypass the problem.
At least for the heated grips.
I didn’t want to create more problems by dismantling too many connectors/harnesses if it is unnecessary.
Afterall, this is an 18 year old bike…
Solution
Bypass the whole circuit and power the heated grips controller directly from the battery terminal for the + side and directly to the frame for the - side, close to the grips controller.
Of course, the new circuit must be controlled by the ignition key/main relay. And fully protected. I have also checked and confirmed the charging system before winter storage. A nice 13.7V
End
Works perfectly fine. Full power and kicks off à 12.7V (Vbat). No flashing. Almost too hot!!
And, why not? I also added a voltmeter, and a double USB charger connected to the ACC circuit.
If interested, the improved diagram is attached, including in the diagram some valuables notes.
I went from completely dead to fully functional heated grips.
If you are interested…
2006 ST-1300 “Deluxe”, 170.000kms ish.
This is winter, yes I am in Montreal, Canada, and it is the best time to do major maintenance on the bike..
This year, one of the subjects was the unfunctional heated grips.
Symptom
In the last few years I noticed that the grips didn’t work well. Couldn’t set the maximum without the controller power indicators starting to flash. (First symptom).
That was followed by a continuous drop in heat capability. Down to nonfunctional. In other word dead!
Analysis
Since I had to remove the plastic for other maintenances, it was time to handle this problem.
BTW, I am a seasoned retired power electronic designer. This is my domain! And I have time to “play”
Analysis
First thing first: Unmount the controller from the fairing and test it on the bench with a simulated load (a 12V bulb) Works absolutely fine. Cut-off voltage is around 12.7V. The level where the controller is set to stop working. This is important to know.
Cut-off is nice and clean, no flashing.
Right there, it confirms my first impression that, for some reason, there are increasing voltage drops during operation, on the bike.
Took a scope to look at the operation (the grip controller is a PWM controller) and monitored the voltage directly across the controller power input and ground, on the bike, during operation. And yes, there it is, a total of around 1.2V drops at the controller when ON.
There is almost the same amount of drop on the plus side and the minus side, for a total of 1.2V
Note the test was supported by a battery maintainer capable of simulating a charging system in operation. Test voltage is maintained at 13.7 volts at the battery terminal. (Could’n run the bike in my garage, door closed. Hey, it is winter…)
Corrective actions
This is the bad part. There are so many connectors and other electrical connections that it is almost impossible to pinpoint the failure location. The connectors directly involved (located in front of the frame, near the fork) were visually inspected. Nothing really apparent. No corrosion anywhere.
I also notice that, when the Emergency Flashers are on, there is a similar drop, at the Grip’s controller. Common circuit…
A very quick check on the fuse blocks revealed nothing.
More you check, the scarier it becomes. Where is the problem, if there is one?
Design flaw?
Wiring Diagram
After spending almost 3 days deciphering the wiring diagram and making a correlation between the 2003 diagram and the actual 2006 version (they are not the same, but similar enough to get a minimal understanding.) I decided to bypass the problem.
At least for the heated grips.
I didn’t want to create more problems by dismantling too many connectors/harnesses if it is unnecessary.
Afterall, this is an 18 year old bike…
Solution
Bypass the whole circuit and power the heated grips controller directly from the battery terminal for the + side and directly to the frame for the - side, close to the grips controller.
Of course, the new circuit must be controlled by the ignition key/main relay. And fully protected. I have also checked and confirmed the charging system before winter storage. A nice 13.7V
End
Works perfectly fine. Full power and kicks off à 12.7V (Vbat). No flashing. Almost too hot!!
And, why not? I also added a voltmeter, and a double USB charger connected to the ACC circuit.
If interested, the improved diagram is attached, including in the diagram some valuables notes.
Attachments
Andrew Shadow
Site Supporter
I don't have any heated grips let alone the Honda ones. My only comment is that your charging volts of 13.7 seems low to me, it usually tests at over 14. The controller turns off the grips below a preset value to protect the battery. You tested that at 12.7 V but I would still wonder if your charging voltage was part of the issue.
Share: