Installation of Gear shift indicator: 6th gear no more!

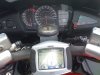
If you're comfortable removing other body work, getting the instruments out and apart isn't too difficult.

It's explained well in the manual, except for the two little screws I mentioned above. And there is one thing to be careful of: On the back of the instrument panel, right in the center, there is a plastic peg, about 3/8" in diameter, that fits into a rubber grommet on the metal structure to position the panel. This peg is hollow. Do not put side loads on it or you'll snap it off. (Mine was already broken when I took it apart.)

If you do snap it off, it's easy enough to repair. Cut a nail to just the right length to fit in the hollow area, fill the hollow and coat the mating surfaces with epoxy, stick the nail in, and put it back together.

EDIT: Oh, there's one more thing. There's no gap between the instrument cluster and the cover with the clear plastic lens, and therefore no place to run the wire. I ended up drilling a hole. Just to the right of the LCD panel, there's an angled section of plastic that's completely hidden by the dash when it's all put back together. I drilled a 3/8" hole, cut the corners out with a small utility knife to make a square hole just big enough to pass the connector through. Then I sealed the hole with duct tape and RTV. Once it's all back together, it's completely invisible.


Thanks for the tips though i probably get a certified mechanic to do it instead me screwing everything up :p:
 
Sorry for the delay. I installed the unit over the weekend. I have to say on an '08 the install and setup is extremely simple, with the exception of running the wire. The connector to the diagnostic port is extremely large! This makes it almost impossible to snake through your bike. I had to route it in a way I was not comfortable with. This unit should have a small round inline connector within the cable to snake the wire. As a result of routing it in a round about way I almost ran out of cable. I have already gave these comments to the vendor.

With that said, the unit is so simple to program it takes 30 seconds and your done!

If you pull the clutch out while riding it does take 2 seconds before the display only shows a dash, someone asked a question about this.

I have found that if you are going really slow from a higher gear, such as 4, and then downshift the unit displays 5 before showing 3 for a split second. If you downshift while in traffic when your speed is staying constant then the numbers work correctly.

I would recommend this product in a heart beat, IF the person who is going to install it plans on taking apart their bike to route the cable properly. It needs an inline connector, I came close to cutting the cable and installing one myself.

Here is a picture where I mounted it, I might relocated it in the future.
 

Attachments

  • gear indicator.jpg
    gear indicator.jpg
    245.9 KB · Views: 98
I'd buy one, but I'd rather have a 6th gear. Where can I get in line for that?

Kidding aside, if I'm not cranking at least 3,000 rpms I downshift. I do find myself always grabbing for that 6th gear. STill trying to wrap my mind around the fact that 4,000 rpms at 60+mph IS 5th gear.

I do this too. What makes it really hard for me is switching back and forth from the RT that does have 6 gears and a indicator. I want one of these.
 
Communication with the company via email was very quick when I dealt with them. You should contact them.

Pashnit or the company that sells the GPI???

mitch
 
I called Pashnit (tim) and was able to find out all the info I needed...... mine was on backorder....... BUT I recieved it when he said I would... I have not done the install yet....
 
Rather than running the wire back to the ECU, I tapped into the tach wire behind the instrument cluster. Given that the display up front, this was much easier to route.
 
I finished my install of the GPI yesterday and took a little ride. I loved it, the bike should have come this way from the factory. The install went smooth….. I few tips I think would have made it easier if I known:

The location of the speed sensor plug. I traced the wire from the back of the engine up to the right side (sitting on the bike) under the cowl. The connection was tucked behind some vacuum hoses and covered by a weather covering (rubber bell).

I tapped into the tac wire {yellow with green line} at the LARGE plug that is held by, and located under the left cowling.

As, said the install was easy and the programming was completely easy and painless. Great product!
 
I installed the GPI and I would say overall it was a moderatly painfull (but rewarding) process.

I did not catch on to the drawing in the book for the Speed sensor plug and had to trace the wires up the side into a tight area in back of the rubber weather guards. I like the wiring harness for the sensor plug and put a little diaelectric grease on the plug fittings and tied them up and snugged them back into position easily enough.

The Tac wire on the other hand I thought was a little lame. IMHO it should have been routed off the end closer to the GPI so that it could have been plugged into the back of the display (Blue STreak) or the large plug on the LH side of the bike (Klackey). I already had the LH side cover off and with the snap fit wiring connector that came with it I chose to tap it on the LH side due to the amount of space required for the connector. If I did not have the LH side already off I would have chosen to remove the wrap at the back of the weather boot on the display plug and solder and taped the connection there, it would have been clean and easy.

I chose to take apart the instrument cluster and mount it under the MPH like Blue STreak did . I like the look very much. Taking the instrument cluster apart was not as bad as I thought it was going to be, Just keep track of your screws and locations.

While I was digging around during this install I took some time to relocate my Garage door opener from the RH pocket to a better positon tied to the frame.
https://www.st-owners.com/forums/showthread.php?t=8621&highlight=garage+door+opener Original idea from Jeffro, I just had to get it out of the pocket, it works great, easy to install, and cheap.

I also took some time to more securly attach my EZ Pass toll tag to the underside of the front plastic under the windshield. It was there with Velcro already but the tape on the velcro gave out and it would shift slightly. I used some all weather silicon to seal the velcro down and it will hold until the end of time. It triggers toll gates in 3 states and no one knows it is there.http://stwiki.notonthe.net/twiki/bin/view/General/TollTransponders bottom of page for pic where I got the idea.

lastly I took a couple minutes to do the ACL turn signal LED Mod. There is no forgetting your signals with those. https://www.st-owners.com/forums/showthread.php?t=32074
 
Back
Top Bottom