Due to non-existent splines I just swapped ring gears of two final drive units even though I know they are apparently "matched" sets. So now I have an unmatched set. Seems there's lots of measurements and angles involved with helical gears. The ring gear shims (look like a wave washer?) measured the same on both. Anyone have any experience or thoughts on this? If there were to be a problem, how would it manifest itself?

You are using an out of date browser. It may not display this or other websites correctly.
You should upgrade or use an alternative browser.
You should upgrade or use an alternative browser.
Final Drive gears
- Thread starter DeanR
- Start date
Uncle Phil
Site Supporter
Deanr - I would think the only thing that 'matches' them is wear over time since Mother Honda doesn't make 'special' sets for each ST1100. And over time, the replaced set will match as they wear to each other. Which means you really need to ride a lot to speed up the 'matching' process ... ;-)
Don't be suprised if it gets a bit noisy.
If both shims are the same thickness, you may be close. But gears wear and the overall gear contact pattern may have changed.
The ST1100 final drive uses two different shims to control gear contact and backlash. According to the factory manual, there are thirteen pinion gear shims and seventeen ring gear shims, so there is room for adjustment. To be sure, I would check the gear contact pattern. Probably, if the gear contact pattern is excessive, there will be excessive noise and backlash, which will eventually cause gear damage. If the gear contact pattern is too tight, I would expect gear whine, gear burning and damage.
The standard ring gear shim thickness is 1.50 mm
The standard pinion gear shim thickness is 2.00 mm.
I would start with these two shims, then check the gear contact pattern.
The ring gear shim is fairly easy to replace with the correct puller. Removing the pinion gear to replace its shim requires more tools because of the way its bearing is pressed in the housing.
The factory Honda ST1100 manual I have also refers the reader to the Honda Common Service manual for the complete final drive shim selection procedure. They didn't make this easy.
I do know that the Clymer Honda VTX1800 service manual has a complete final drive rebuild procedure, which is similar to the ST1100 final drive. The procedures for checking the gear contact pattern should be very similar, so to save some $$$ you could follow the procedures in that manual to check the gear contact pattern.
Hope this helps.
Dean,
I just bought a '93 as a parts, but think I may try to resurrect it.
Where did you get the final drive Ring Gear? I'm starting to look for both that and the Drive Flange for the wheel side, but not having much luck finding any used.
I'll be following this thread, and looking for other info on the forum on this now.
Peace,
Gord
The 5 pin GL1500 driven flange is the same as the ST1100; I'm running one now. I don't know if the ring/pinion from the GL F/D is the same, but I would not be surprised if it was.
So, someone buy a GL F/D and figure it out already.... Me, I'm gonna be busy heading to the Darkside!
So, someone buy a GL F/D and figure it out already.... Me, I'm gonna be busy heading to the Darkside!
OP
OP
If both shims are the same thickness, you may be close. But gears wear and the overall gear contact pattern may have changed.
The ST1100 final drive uses two different shims to control gear contact and backlash. According to the factory manual, there are thirteen pinion gear shims and seventeen ring gear shims, so there is room for adjustment. To be sure, I would check the gear contact pattern. Probably, if the gear contact pattern is excessive, there will be excessive noise and backlash, which will eventually cause gear damage. If the gear contact pattern is too tight, I would expect gear whine, gear burning and damage.
The standard ring gear shim thickness is 1.50 mm
The standard pinion gear shim thickness is 2.00 mm.
I would start with these two shims, then check the gear contact pattern.
The ring gear shim is fairly easy to replace with the correct puller. Removing the pinion gear to replace its shim requires more tools because of the way its bearing is pressed in the housing.
The factory Honda ST1100 manual I have also refers the reader to the Honda Common Service manual for the complete final drive shim selection procedure. They didn't make this easy.
I do know that the Clymer Honda VTX1800 service manual has a complete final drive rebuild procedure, which is similar to the ST1100 final drive. The procedures for checking the gear contact pattern should be very similar, so to save some $$$ you could follow the procedures in that manual to check the gear contact pattern.
Hope this helps.
What I believe to be the ring gear shim? (#18) just slips right off. No tool involved.
No idea about taking the various measurements and wear pattern. Yes, the common manual was of little help from what I saw.
Looks like the fiche pic did not attach properly
OP
OP
Dean,
I just bought a '93 as a parts, but think I may try to resurrect it.
Where did you get the final drive Ring Gear? I'm starting to look for both that and the Drive Flange for the wheel side, but not having much luck finding any used.
I'll be following this thread, and looking for other info on the forum on this now.
Peace,
Gord
Got a drive and flange that had been in a flood from a member here
OP
OP
Pat, that GW drive looks the same except for the shock mount?The 5 pin GL1500 driven flange is the same as the ST1100; I'm running one now. I don't know if the ring/pinion from the GL F/D is the same, but I would not be surprised if it was.
So, someone buy a GL F/D and figure it out already.... Me, I'm gonna be busy heading to the Darkside!
Have fun with your new tire!!
Couldn't figure out the multi quote thing this time..
What I believe to be the ring gear shim? (#18) just slips right off. No tool involved.
No idea about taking the various measurements and wear pattern. Yes, the common manual was of little help from what I saw.
Looks like the fiche pic did not attach properly
I checked another fiche and part No. 18 is the ring gear shim. When I mentioned in my post about using a puller, I should have mentioned that a puller would be required if the ring gear bearing was still attached to the ring gear. Sometimes, when you remove the ring gear the bearing will come off with it. You then need a puller to remove the bearing to access the shim. Sorry about the confusion here.
If you have the opportunity, check out the Clymer Honda VTX1800 manual as it covers final drive overhaul with procedures on checking backlash and how to perform a gear mesh pattern check. While the VTX1800 final drive is not the same as the ST1100, it appears to be similar, which is typical of most Honda final drives, except for the GL1800.
OP
OP
Yep, the bearings stayed with the housing in both drives. I guess this confirms that the shim does in fact look like a big wave washer. Dealer has none in stock to compare. By the way, these bearings are lubed by the hypoid oil correct? No grease.. Thanks for the info Toolpen.
Dean,
Thanks for this thread!
I have a '93 that has some seriously worn flange and ring bearing.
Toolpen's post has me thinking (yeah... DANGER, DANGER! lol).
I have looked up the parts and find that they are less than $400.00 (by my estimate that includes shipping) for both.
I don't own a machine shop or have any access to presses; but, I wonder if these 2 pieces could be replaced in a shade tree mechanics garage.
Any thoughts?
Thanks,
Mark
Yep, the bearings stayed with the housing in both drives. I guess this confirms that the shim does in fact look like a big wave washer. Dealer has none in stock to compare. By the way, these bearings are lubed by the hypoid oil correct? No grease.. Thanks for the info Toolpen.
Correct. The final drive gears are lubricated by gear oil.
The wave washer is installed between the ring gear and the two smaller bearings pressed into the final drive housing. The wave washer is only available in one thickness.
The ring gear shim is quite large (and flat) and is installed between the ring gear and the very large ring gear bearing that fits into the housing cover. This is the shim (available in several thicknesses) that you would change when correcting the final drive tooth contact pattern.
If you look at a factory Honda parts fiche for the final driven gear (I'm looking at the parts fiche for a 1991 ST1100), note that the wave washer is part No. 16, and the ring gear shim is part No. 18.
Also...
In the ST1100 Honda factory manual I have, on page 12-6, the wave washer is callout No. 22, and the ring gear shim is callout No. 16.
Identifying these washers can be confusing. I hope this helps.
Dean,
Thanks for this thread!
I have a '93 that has some seriously worn flange and ring bearing.
Toolpen's post has me thinking (yeah... DANGER, DANGER! lol).
I have looked up the parts and find that they are less than $400.00 (by my estimate that includes shipping) for both.
I don't own a machine shop or have any access to presses; but, I wonder if these 2 pieces could be replaced in a shade tree mechanics garage.
Any thoughts?
Thanks,
Mark
When you say worn flange, are you speaking about the final driven flange that connect the rear wheel to the final drive unit?
Replacing the large ring gear bearing is not that difficult, though there are a few things to consider:
1. When you remove the ring gear, if the large ring gear bearing remains in the cover, remove the bearing from the cover and then install the new bearing into the cover. When installing the bearing into the cover, you'll need a large driver that fits against the bearing's outer race. Prior to installation I would freeze the bearing and heat the cover.
2. If the large ring gear bearing comes off with the ring gear, remove the bearing from the ring gear and then install the new bearing onto the ring gear. When you install the bearing onto the ring gear, you'll need a driver that fits against the bearing's inner race. I would freeze the ring gear and heat the bearing a bit to help with assembly.
A press is helpful because you want to make sure the bearing enters the cover squarely.
I would also install a new ring gear seal into the cover.
The biggest problem with these final drive units is pressing the bearings into the cover and housing. You want to make sure they start squarely into their bores. The real pain is installing the two smaller ring gear bearings that are pressed into the final drive housing. These can be difficult to align because they are thin and don't want to enter the bore squarely. And when a bearing enters the bore at a slight angle, it can really gouge and damage the bore.
OP
OP
Thanks again Toolpen. Very helpful. Seems that we measured the wave washer, mistaking it for the shim. I have no tool with which to pull the big bearing from the ring gear.. I now understand that the shim lives behind that!
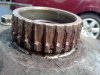
Not being equipped to properly check these helical gears, I'm just gonna go with the straight swap and see how it goes.
Mark, I hope yours don't look like this:
The mating surface in the ring gear looks the same.
Not being equipped to properly check these helical gears, I'm just gonna go with the straight swap and see how it goes.
Mark, I hope yours don't look like this:
The mating surface in the ring gear looks the same.
Attachments
schlep1967
Bill
Ouch! Pictures like that make me want to go home and change my drive fluid ........ again!
But then again that is where the moly goes, Correct? Okay makes me want to do both again.
But then again that is where the moly goes, Correct? Okay makes me want to do both again.
OP
OP
Slosh that moly on there Bill !! This one obviously never saw any. And I also wonder if things were assembled properly as well.
The inner oiled surfaces do look ok.
The inner oiled surfaces do look ok.
Yikes!
Those are ugly!!!!
I figured I'd need a press to do the changes, without one I don't think I'll try it...
Those are ugly!!!!
I figured I'd need a press to do the changes, without one I don't think I'll try it...
Unbelievable!
So, does this thread indicate that there are members needing a final drive unit that is all together and in great shape??? What would it be worth if I could sell mine to you??? As Mark know's my Big 11 is awaiting a final verdict at the stealer...I need to decide to let it go or buy it back for parts! Also I just put a new tire on (14.4 miles in an Avon Storm 2) and serviced the splines with....moly 60 paste before the accident!
So, does this thread indicate that there are members needing a final drive unit that is all together and in great shape??? What would it be worth if I could sell mine to you??? As Mark know's my Big 11 is awaiting a final verdict at the stealer...I need to decide to let it go or buy it back for parts! Also I just put a new tire on (14.4 miles in an Avon Storm 2) and serviced the splines with....moly 60 paste
before the accident!mlheck
Site Supporter
I just happen to spend 8 hours a day lapping ring and pinion gears together to form this matched set that you speak of. I am not a trained gear quality person, but I have lapped several thousand gear sets and may be able to shed a little light here. The gears are not lapped has a flat surface. During the cutting and lapping process a high spot is formed on the tooth of the ring and pinion. This high spot determines where initial contact will be made and how much travel the contact pattern has on the gear tooth. You would be amazed how much the contact pattern moves on the gear tooth based on load. There is also some flex in the housing, the gears themselves, and the bearings. All of these things have to be taken into account when deciding where the contact pattern should be. Now you throw in manufacturing tolerances which can be a couple of thousands for each gear and you have more variables to work with. Just making a hypoid gear set go around doesn't even begin to address all of these issues. If the pattern is flanked in it will burn up the gears, if it is flanked to far out it can cause teeth to break. Then there is also the toe and heal position to worry about.
When a gear set is matched, all of the issues that will affect the wear of the gear set are factored into the matching process. Gears from different gears sets will not have this benefit, and you have no idea where the contact pattern will be. You should always check the contact pattern even on a matched set, because shim thickness and backlash will change the contact position. In a matched set this position can be moved to the proper position by adjusting these shims and backlash. In an un-matched set this may not be possible. To put it in simple terms, mixing gears from different gear sets is like doing an organ transplant on a human without testing for compatibility. You can get lucky and have it work, or it can fail miserably. We re-work or scrap out all mismatched gears.
Hope this helps.
Share: