Trying to get the rear caliper off so i can clean and replace the seals, etc. I have the bolt on the front side off, but I'm assuming i need to remove this pin in order to lift it off? Do i remove that lock nut, or is it welded to the frame? If it's to be removed, is it reverse threaded or regular?

You are using an out of date browser. It may not display this or other websites correctly.
You should upgrade or use an alternative browser.
You should upgrade or use an alternative browser.
Removing the rear caliper. 02 ST1300, NON abs
- Thread starter WJHamel
- Start date
- Joined
- Feb 11, 2006
- Messages
- 8,048
- Location
- Jacksonville
- Bike
- GL1800 R1200RT NC700
- 2025 Miles
- 003167
You don’t have remove that pin at all. Take the muffler off or rotate it down out of the way then pull the caliper outboard. It’ll slide off the pin which stays attached to the caliper bracket.Trying to get the rear caliper off so i can clean and replace the seals, etc. I have the bolt on the front side off, but I'm assuming i need to remove this pin in order to lift it off? Do i remove that lock nut, or is it welded to the frame? If it's to be removed, is it reverse threaded or regular?
OP
OP
Thanks. With the front bolt removed, shouldn't the caliper be able to pivot 90 degrees? I assumed when i removed the front bolt that I coud pivot the caliper on that pin.
OP
OP
I must be missing something because the muffler is nowhere in the way of anything. With the front bolt removed, the caliper rattles around, but i can't lift it up and over the disc. I can't slide the caliper outward, even with the muffler off, because the back side of the caliper hits the back side of the disc.You don’t have remove that pin at all. Take the muffler off or rotate it down out of the way then pull the caliper outboard. It’ll slide off the pin which stays attached to the caliper bracket.
OP
OP
holy *****. I have to remove the wheel to remove the caliper? Yeah, i might as well drop this off to the shop.Remove the wheel. Looks like it needs some cleaning up as well.
docw1
Bill Rankin
Maybe I'm missing something, but I believe you have to remove the rear axle and take the caliper with its attached bracket in one piece. It's not that hard. You don't have to remove the wheel although that does make it easier. n You do have to swing the exhaust out of the way. If you were going to do the brake rebuild yourself, you should be able to do this.
RobbieAG
Robert
You should be able to slide the axle out just enough to get the caliper off (with bracket) and not have to take the wheel off. You do have to drop the mufflers. It'd be best to follow the procedure in the service manual. Most shops are not familiar with these bikes, so your results will be hit or miss. Many shops won't work on bikes older than 10 years old. Some owners have taken their bikes into a shop only to end up with rear brake issues.
Last edited:
- Joined
- Feb 11, 2006
- Messages
- 8,048
- Location
- Jacksonville
- Bike
- GL1800 R1200RT NC700
- 2025 Miles
- 003167
Joe is right and I overlooked that. You don't have to remove the wheel but you have to remove the axle bolt and slide the axle far enough to the right to release the caliper bracket. Then you can lift the bracket high enough to clear the brake rotor.I must be missing something because the muffler is nowhere in the way of anything. With the front bolt removed, the caliper rattles around, but i can't lift it up and over the disc. I can't slide the caliper outward, even with the muffler off, because the back side of the caliper hits the back side of the disc.
- Joined
- May 27, 2021
- Messages
- 1,143
- Age
- 64
- Location
- Coquitlam British Columbia Canada
- Bike
- 2009 ST1300
That pin [post] threads into the [I'm gonna call it] spacer bracket is one point that that the caliper floats on. It's a threaded post with a 13 mm [I think] boss. The band clamp bolts on the right side have to be loosened and the right muffler has to be rotated [or removed] in order to slip the axle bolt out far enough to slide the spacer bracket out, complete with caliper attached.
At which point, you've at least got the wheel dangling in the air, so why not remove it completely, clean up the pistons, and relube / paste the drive gear spline [not sure what they're called]
with the whatever paste is used these days.
[edited] So there I am again; wrong, kinda wrong, and possibly inducing others to make an egregious error. I should have taken a harder look at what I said about that post and either said nothing or indicated don't mess with it. I'm more thinking out loud and trying to figure out how to do it myself.
I still haven't got the wheel off.
Last edited:
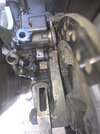
Do NOT remove, or try to remove the guide dowel or you may end up damaging your rear caliper, and or mounting bracket.
Also, the service manual has some incorrect torque settings for the 14mm head caliper bolt, and trying to use those settings WILL damage the $400 plus caliper.
If you have not worked on the calipers or brake system on a Honda ST1300, perhaps you should take a step back and research it a little more before you go any further.
jfheath
John Heath
If you are not up to removing the wheel, then you are probably not up to doing what else is necessary. I see that you have taken the banjo bolts off.
You don't need to take the rear axle out - but you do need to slide it out part way to allow the caliper bracket to be removed from the axle. The axle can then be slid back in to support the wheel.
But. You have to remove the stopper bolt. at the front end of the caliper bracket. To do that you have to swing the left exhaust down slightly. And In order to slide the axle bolt out, you have to swing the right exhaust down slightly.
Ok remove the large stopper bolt that is bolted to the swing arm.
Slide the axle out - catch the spacer and catch the caliper bracket with the caliper atatched.
Actually - you may have difficulty getting the caliper bracket off the brake disc. I see that the pads are tilted at an angle, and that the pad pin has got a spring on it. Who the hell ........ never mind. That is an indication that someone had problems before and they have used a spring to try to get the pads to release. The problem is probably elsewhere.
So before you do any of that little lot, try to get the pad pin out and remove the pads. Make sure that you catch that spring. Find a suitable container to put it in. A rubbish bin is ideal.
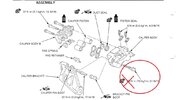
DO NOT remove those slider pins. There are two. The one that you circled and there is another fitted to the caliper bracket.
With the caliper off, the pads out, and the caliper and bracket separated, there is some inspection and cleaning up to do.
0. Let all of the fluid drain out of the caliper
1. Check in the roof of the caliper. There should be a pad spring. Take a good look at the sahpe of it. Like a capital letter H (ish). One side of the H has a wider upright than the other side.A bit like this I-I - Not which side that wider part is - It should be closer to the pistons. I wouldn't be surprised if it wasn't
2. Clean up both slider pins. Refit that misplaced rubber boot. If it is too big to fit then that is because someone has used ordinary grease on the slider pins. It makes the rubber swell. If that has happened, or if it is torn, it will need a new one. If it wont fit, remove it for now and slide the two caliper and the bracket onto their respective slider pins.
The caliper should move easily back and forth without binding on any metal. If it doesn't then there is a serious issue - possibly one of the slider pins is cockeyed
If that is the case, then there is a good chance that you may need a new caliper. That slider pin that bolts into the caliper is incorrectly labelled in one of the service manual diagrams with the torque setting of the Stopper bolt. The slider pin has a torque setting of 27Nm. The Stopper bolt has a torque setting of 69Nm!!!
You should never have to remove the slide pins. But if someone has, it is so very easy to cross thread it - and then (incorrect) 69Nm of turning force to a bolt that clearly isn't up to taking that load - the threads inside the caliper will have stripped. That cannot be fixed - and you need to know that before spending time and money taking out seals and pistons. Hence the need to check that the caliper and bracket slide towards and away from each other easily. If the pin has been cross threaded, it will not be parallel to the other pin and the movement will tighten up at one end of its travel.
3. Check the elongated hole in the caliper bracket. Are there any spiral grease marks or spiral scratches ? Check the smooth shaft end of the caliper bracket stopper bolt. Are there any scuff marks ?
4. Check the fit of the chrome clip that is located on the caliper bracket. It is where the forward end of the brake pads seat. That clip should be a snug fit in the recess. IT will probable have a worn lower part, which means the clip is a very sloppy fit.
5. Check how easy it is to move the pistons in by hand. That will give you some indications as to whether or not the psitons were the reason for the brake drag. But also check the state of the seals. If there is evidence of hardened rubber then that is a sign that the brakes have got really hot and have melted the seals.
Let us know what you find.
While you are pondering about this, take a read of this for some additional information.
 www.st-owners.com
It is a pity that you have no fluid in the system One issue could be to do with brakes on the front forks causing the rear to drag. Someone at sometime has recognised that the rear brake is not releasing and attempted to fix it by putting that spring on the pad retaining pin. The often quoted cause of this is the SMC not operating properly and blocking the return of fluid from the rear caliper.
But it could also be due to the front wheel not being installed properly - the front brakes will then catch on the brake disc and drag slightly - but that will be enough to apply the rear brakes - constantly. "Often Quoted does not mean "this is the correct diagnosis". I've just given one of many examples where there could be another, seemingly unrelated, cause. The point is that you do not know until you investigate. But without fluid in the system it will be difficult to tell whether or not the SMC is behaving properly.
Is this the bike that you bought in 2019 - the silver 02 - or was it 03 ? And is this the first time that you know of that anything has been done with the brakes ?
There's a fair chance that there is a lot of sludge and grunge lurking behind pistons and seals. It is also probable that there is some gunge inside the SMC. You will be able to feel whether the plunger is operating smoothly - now that the fluid is out - but you won't know whether the compensation port is being 'opened' when the plunger / piston returns to its resting position. You need fluid in the system for that OR you need to take the SMC apart (not for the feint hearted). Is it is suspect, a new SMC is the best answer.
So your project is probably a lot more complicated than you were thinking. But it all needs solving otherwise you will have the same issue again.
If you're not up to doing it yourself, you need a dealer that is familar with the ST1300 setup - or with the goldwing, or the VFR. The answer may be to just replace the seals, but you won't know until you cover all of the bases. I'd be expecting a load of work and a hefty parts bill - that way if I'm wrong I'll be quite pleased.
You don't need to take the rear axle out - but you do need to slide it out part way to allow the caliper bracket to be removed from the axle. The axle can then be slid back in to support the wheel.
But. You have to remove the stopper bolt. at the front end of the caliper bracket. To do that you have to swing the left exhaust down slightly. And In order to slide the axle bolt out, you have to swing the right exhaust down slightly.
The exhaust is held by three bolts. 1) The obvious one above the silencer. Leave that 'til last. 2) There is a small nut and bolt that supports the silencer at the front end. Use a ring spanner on the inside of the silencer (to catch the nut). 3) The clamp band that pinches the silencer to the main exaust. Slacken it off. You may need some penetrating oil - You may also need a replacements - I use stainless steel clamps - the originals tend to rust and snap.
With the clamp band slackened, support that part of the exhaust with one hand and twist the silencer so that the silencer exhaust tube rotates within the female part of the exhaust.
Ok remove the large stopper bolt that is bolted to the swing arm.
Slide the axle out - catch the spacer and catch the caliper bracket with the caliper atatched.
Actually - you may have difficulty getting the caliper bracket off the brake disc. I see that the pads are tilted at an angle, and that the pad pin has got a spring on it. Who the hell ........ never mind. That is an indication that someone had problems before and they have used a spring to try to get the pads to release. The problem is probably elsewhere.
So before you do any of that little lot, try to get the pad pin out and remove the pads. Make sure that you catch that spring. Find a suitable container to put it in. A rubbish bin is ideal.
DO NOT remove those slider pins. There are two. The one that you circled and there is another fitted to the caliper bracket.
The caliper bracket should slide away from the caliper on those two pins. You should feel a smooth glide. If you don't then that is another part of the problem. That caliper needs to be able to move easily and smoothly.
I know form the photo that it probably won't move that easily. The reason that I say that, is that the rubber boot that seals against the slide pin is not properly in place. That may mean that the pin is all rusted up.
With the caliper off, the pads out, and the caliper and bracket separated, there is some inspection and cleaning up to do.
0. Let all of the fluid drain out of the caliper
1. Check in the roof of the caliper. There should be a pad spring. Take a good look at the sahpe of it. Like a capital letter H (ish). One side of the H has a wider upright than the other side.A bit like this I-I - Not which side that wider part is - It should be closer to the pistons. I wouldn't be surprised if it wasn't
2. Clean up both slider pins. Refit that misplaced rubber boot. If it is too big to fit then that is because someone has used ordinary grease on the slider pins. It makes the rubber swell. If that has happened, or if it is torn, it will need a new one. If it wont fit, remove it for now and slide the two caliper and the bracket onto their respective slider pins.
The caliper should move easily back and forth without binding on any metal. If it doesn't then there is a serious issue - possibly one of the slider pins is cockeyed
If that is the case, then there is a good chance that you may need a new caliper. That slider pin that bolts into the caliper is incorrectly labelled in one of the service manual diagrams with the torque setting of the Stopper bolt. The slider pin has a torque setting of 27Nm. The Stopper bolt has a torque setting of 69Nm!!!
You should never have to remove the slide pins. But if someone has, it is so very easy to cross thread it - and then (incorrect) 69Nm of turning force to a bolt that clearly isn't up to taking that load - the threads inside the caliper will have stripped. That cannot be fixed - and you need to know that before spending time and money taking out seals and pistons. Hence the need to check that the caliper and bracket slide towards and away from each other easily. If the pin has been cross threaded, it will not be parallel to the other pin and the movement will tighten up at one end of its travel.
3. Check the elongated hole in the caliper bracket. Are there any spiral grease marks or spiral scratches ? Check the smooth shaft end of the caliper bracket stopper bolt. Are there any scuff marks ?
4. Check the fit of the chrome clip that is located on the caliper bracket. It is where the forward end of the brake pads seat. That clip should be a snug fit in the recess. IT will probable have a worn lower part, which means the clip is a very sloppy fit.
5. Check how easy it is to move the pistons in by hand. That will give you some indications as to whether or not the psitons were the reason for the brake drag. But also check the state of the seals. If there is evidence of hardened rubber then that is a sign that the brakes have got really hot and have melted the seals.
Let us know what you find.
While you are pondering about this, take a read of this for some additional information.
Article [13] - ST1300 - Brake Maintenance - Avoiding the Pitfalls | ST1300 Articles
A close hands-on look at the Honda ST1300 braking system. These are personal observations about the things that can go wrong, why they go wrong and what can be done to keep things working sweetly. Updated April 2020 and to address more recent observations, to include information about the SMC...
It is a pity that you have no fluid in the system One issue could be to do with brakes on the front forks causing the rear to drag. Someone at sometime has recognised that the rear brake is not releasing and attempted to fix it by putting that spring on the pad retaining pin. The often quoted cause of this is the SMC not operating properly and blocking the return of fluid from the rear caliper.
But it could also be due to the front wheel not being installed properly - the front brakes will then catch on the brake disc and drag slightly - but that will be enough to apply the rear brakes - constantly. "Often Quoted does not mean "this is the correct diagnosis". I've just given one of many examples where there could be another, seemingly unrelated, cause. The point is that you do not know until you investigate. But without fluid in the system it will be difficult to tell whether or not the SMC is behaving properly.
Is this the bike that you bought in 2019 - the silver 02 - or was it 03 ? And is this the first time that you know of that anything has been done with the brakes ?
There's a fair chance that there is a lot of sludge and grunge lurking behind pistons and seals. It is also probable that there is some gunge inside the SMC. You will be able to feel whether the plunger is operating smoothly - now that the fluid is out - but you won't know whether the compensation port is being 'opened' when the plunger / piston returns to its resting position. You need fluid in the system for that OR you need to take the SMC apart (not for the feint hearted). Is it is suspect, a new SMC is the best answer.
SMC - the front left brake brakcet is mounted on a needle roller bering pivot. When the front brake is applied, the pads grab the front disk, and the caliper tries to rotate forward around with the brake disk. It doesn't get very far, but that movement operates a plunger on the top of the brakcket . That plunger is a master cyclinder - like the one on your clutch or brake lever. It is called a secondary master cylinder - and it operates the rear brakes outer pistons. An important part of all master cylinders is a tiny pressure relief port, so that when the brake lever (or the SMC) is released, the tiny hole (compensation port, or recuperation port) is opened up and any excess pressure in the fluid can escape and fluid returns back to the reservoir and allow the pads to release.
So your project is probably a lot more complicated than you were thinking. But it all needs solving otherwise you will have the same issue again.
If you're not up to doing it yourself, you need a dealer that is familar with the ST1300 setup - or with the goldwing, or the VFR. The answer may be to just replace the seals, but you won't know until you cover all of the bases. I'd be expecting a load of work and a hefty parts bill - that way if I'm wrong I'll be quite pleased.
Last edited:
OP
OP
Yep. I figured that out. I have the caliper off and now realize i need to go buy an air compressor. smdh. You think a 160PSI compressor will blow those pistons out?Joe is right and I overlooked that. You don't have to remove the wheel but you have to remove the axle bolt and slide the axle far enough to the right to release the caliper bracket. Then you can lift the bracket high enough to clear the brake rotor.
Last edited:
- Joined
- May 27, 2021
- Messages
- 1,143
- Age
- 64
- Location
- Coquitlam British Columbia Canada
- Bike
- 2009 ST1300
Just wondering a couple things
First, in a situation where all appears good visually other than worn out pads, would it still be better to disconnect the banjo bolts and completely, disconnect the caliper / bracket assembly, clean the pistons, completely flush the piston bores on the bench, or is there a more practical method that ensures old brake fluid doesn't get pushed back into the system.
If so, just to rephrase a bit from what I'm reading, I could, remove the pads, loosen the left clamp, twist the muffler, remove the forward assembly bolt from the swing arm, loosen the right clamp, twist the right muffler, slide the axle bolt out far enough to slide the assembly up and off the disk then clean the exposed part of the pistons in place.
Second, where to get new preferably better band clamps.
Wouldn't get this far without the help offered on the site, the service manual raises more questions than answers along with misinformation about torque values and so on pointed out here.
Last edited:
OP
OP
I'm removing the caliper completely, disassembling it and replacing the seals and fittings. The bleeding process after reinstalling isn't going to leave any appreciable amount of old fluid in the system. It's pretty much a complete fluid change.Just wondering a couple things
First, if all appears good visually other than worn out pads, would it be better to disconnect the banjo bolts and completely, disconnect the caliper / bracket, clean the pistons, completely flush the piston bores on the bench, or is there a more practical method that ensures old brake fluid doesn't get pushed back into the system.
Second, where to get new preferably better band clamps.
- Joined
- May 27, 2021
- Messages
- 1,143
- Age
- 64
- Location
- Coquitlam British Columbia Canada
- Bike
- 2009 ST1300
I just about already know I'll do the same, I'm certainly going to do a complete fluid change afterward and replace the reservoir fluid before hand. It's not the existing fluid at the SMC I'm concerned with since I've changed the fluid two years ago. It's the risk of getting any fluid moved back from the caliper.
jfheath
John Heath
Air compressor - it doesn't take much pressure.
But the outer pistons will not come all the way out unless the 3 caliper joing bolts are removed.
I can suggest an order.
Put a piece of wood in the caliper where the pads and brake disc go. Maybe 1cm thick.
Apply air pressure to the centre piston banjo bolt hole.
Apply air pressure to the outer piston banjo hole.
All pistons should be out as far as they can go to meet the wood.
Then undo the joining bolts to separate the two halves
Have a large piece of thick rag to prevent the projectile from going across the garage.
Blast out the centre piston. Retrieve it, clean it, mark the position number on the back in felt pen.
Use something to keep the rearward piston in position - closest to the banjo bolt hole, and blast out the forward piston, catching it and marking it. Then blast out the rearward one . You may have to put your finger or something in the forward bore to block the air from the narrow channel linking the forward and rearward bore.
Dont assume that pistons are all the same size. They aren't. It helps if you mark them as you take them off. Eg RF, RM, RR. Rear front, middle, rear.
The joining bolts are supposed to be replaced with new, but they may well clean up and with a spot of thread lock, be good enough to reuse. I don't believe that they are stretch bolts. Someone else may know. Make your own decision, I replaced my brothers recently
I can speak from expensive experience, I removed the main sliding pin bolt thinking it would be quicker to service the calliper that way. Even though I was being careful, I managed to cross-thread it when I refitted it to the calliper; I have some mechanical sympathy and it did not feel like a cross-thread but when everything was tightened down, the two sliding pins were no longer parallel and as the bolts were tightened it just pulled the back pad harder into the disk. I ended up buying a used calliper to fix that.
The torque shown in the service manual is definitely wrong for this application. It's a sliding pin so it is not applying clamping force to anything. Actually should be 27 Nm according to the table in section 1.
The torque shown in the service manual is definitely wrong for this application. It's a sliding pin so it is not applying clamping force to anything. Actually should be 27 Nm according to the table in section 1.
Attachments
Did anyone else spit coffee on the keyboard when they saw his picture?
Bent guide dowel, displaced rubber grommet, what appears to be a damaged rear piston, and wait for it..........
what the heck is that rusty coiled spring on the pad retaining pin????
That picture speaks volumes about how someone (hopefully prior owner) knew absolutely nothing about the brake system, and was trying to jury rig stuff to keep the rear brake from locking up.
I'll bet anyone here a donut and a cup of coffee that the SMC on this bike is completely trashed as well.
Keeping fingers crossed that our OP won't try to ride the bike before its completely gone through and deemed safe.
Share: