Rear brake binding

Take a couple pictures of the following:
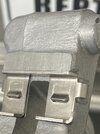
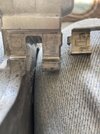
The rear caliper mounting bracket (through the rear tire from the right side) so we can see the forward foot of the brake pad, and how it is seated in the silver clip.
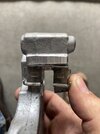
We also need to see the rear caliper mounting bracket/silver clip area up close.
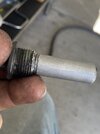
If possible, remove the rear caliper, and take a picture of the HOLE that the stopper plug goes into.
If you see spiral flutes (sand waves) your bracket is damaged.
If the front silver clip is loose, your bracket is damaged.
If the clip is easily removed (falls out)...yup, your bracket is damaged.
On the front left caliper (SMC) while the pivot bearings (lower mounting point) need to be greased, there is alot more to be inspected and checked.
Have you, or anyone else opened up the SMC? if so, you should probably replace it, as it is pre-measured from the factory for the correct depth that the plunger sits/moves.
If you have your body work off the bike, place a hose on the PCV bleeder, crack it open, then while its open, go to the SMC, and press the plunger into the bore as far as you can.
If the piston is not frozen/rusted in the bore, you should be able to move the piston almost 1/2 of an inch (smoothly) If it don't move, your SMC must be replaced.
Stop using a mighty vac, and get a simple one way check valve (motion pro) it will work much better.
reach out and send me a PM if you need further assistance.
Igofar

This is a picture of the rear caliper bracket.
20241027_161558.jpg
There are spiral flutes as described. Does this indicate a damaged bracket.
20241027_160207.jpg
The black around the clip area is Threabond 1521c
20241027_152741.jpg
Shown before disassembly.
 
Last edited:
Sorry for the late reply.
Thank you for posting some pictures, they tell quite a story.
I see a few things that are damaged, and obvious in your pictures.
First, the spring clip that was in the roof of the caliper has a pretty severe witness mark (wear/damage) on one end, which would suggest that the clip was either dislodged, or bent, or both.
Secondly, the small silver clip that fell out of the bracket, is supposed to be crimped/glued into place at the factory, and this clip should not be able to be removed.
Some folks have attempted to "glue" it back into place, however, I will have to disagree with this method, because the reason it came out in the first place is because the caliper mounting bracket was damaged, and the area where the clip sits is no longer holding the clip in the correct position.
The picture with all the grease on it, shows where you "glued" it back into place on the bracket, however, you can see a GAP between the clip and the bracket, which should NOT be there.
Even with your method of replacing the clip, I would think that the clip can still FLEX and move around under the weight of the stopping force, allowing things to bind up and cause issues.
Your recent picture of the "flutes" inside the hole where the stopper plug sits, points out that the bracket is damaged, and should be replaced.
These spirals, or flutes, could have been caused by many different things, such as the axle nut being tightened BEFORE the stopper plug (which is incorrect), the stopper plug becoming loose and bouncing around, or more commonly, when the SMC failed, and applied all the constant pressure of the rear brakes not being able to release, it damaged your rear caliper bracket (inspect the short arm side) and see if it is worn away, allowing the clip to move and dance around.
It is very common that when the SMC fails, it takes out the rear caliper mounting bracket with it.
Every SMC I've replaced (too many to count anymore) I've had to replace the rear caliper mounting bracket as well.
Another common problem that damages the rear caliper bracket, is folks see the 12mm nut on the guide dowel, and think that it is there to remove this part. This part should never be removed from either the caliper, or the bracket. A couple reasons are because it is a steel part, going into aluminum, and the Factory Service Manual has a typo with the INCORRECT torque value, which can/will damage the assembly when used. I believe Mr. Heath pointed this out in many of his fine articles.
When folks try and torque this bolt to the 50 ft lbs indicated, it sinks into the soft aluminum housing, and tilts things, throwing everything off.
One thing that I do, that is NOT suggested in ANY of the service manuals, is "I" paint the stopper plug with a very light coat of antiseize to slow down the wear on the bracket.
"My" thinking on this is because the plug is steel, and the bracket is aluminum, and by design, these two parts "hit" each other when the brake caliper rocks forward, and rather than a hard steel piece, striking, and digging into the soft aluminum part, "I" think coating it with antiseize, allows it to be more of a "glancing" blow instead of a peening blow if that makes sense.
I've been doing this for many years now, and it seems to slow the damage down, and the rear caliper bracket does not show as much wear when inspected.
Again, this is just what "I" do, and is not suggested anywhere. If you decide to do this, it is at your own risk (disclaimer).
Lastly, I know in your area, with all the crap on the roads, you folks like to cover everything with grease. If you have to do that, (I don't recommend it) I would suggest using as little as possible, so it does not collect dirt and road grime.
I will try and attach a few pictures of what the rear caliper mounting bracket should and should not look like when I get back in the house.
 
Here are some pictures.
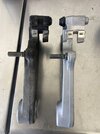
If you look closely at the first picture, you will see that the guide dowel is damaged and bent.
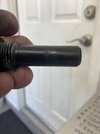
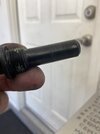
The second and third pictures are showing a "witness" mark on the stopper plug indicating that the assembly was tilted or crooked because of the guide down being bent.
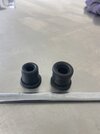
The fourth picture is the rubber boot on the SMC, The one on the left was new, and the one on the right was damaged (swollen) by using brake cleaner or chemical to clean the area, causing the rubber to swell, and started preventing the SMC from working correctly.
the next picture is of a NEW rear caliper mounting bracket, as you can see, there should be NO gap between the bracket and the clip that would allow it to flex/shift/move around.
The next two pictures are of the results of some of these things, the clip moves downward, wearing the bracket away, tilts, and binds and locks stuff up.
The last picture is of "My" method (not approved, or suggested) to keep the steel stopper plug from damaging the rear caliper bracket as much.
Hope this gives you a few more things to inspect and check on your parts, and helps you with your brake issues.
Now, back out in the garage....
Have a great day.
 

Attachments

  • IMG_9010.jpeg
    IMG_9010.jpeg
    117.7 KB · Views: 47
  • IMG_9009.jpeg
    IMG_9009.jpeg
    53.2 KB · Views: 37
  • IMG_9008.jpeg
    IMG_9008.jpeg
    54.8 KB · Views: 39
  • IMG_8927.jpeg
    IMG_8927.jpeg
    66.2 KB · Views: 37
  • 70752171906__A3C68AAB-7C24-4FCD-B5DF-573B121AD56B.jpeg
    70752171906__A3C68AAB-7C24-4FCD-B5DF-573B121AD56B.jpeg
    130.4 KB · Views: 39
  • 69196544436__3ECA1780-264E-40DF-BEBE-E24988E54A4C.jpeg
    69196544436__3ECA1780-264E-40DF-BEBE-E24988E54A4C.jpeg
    136.1 KB · Views: 33
  • 69196541543__D31DD5A5-06EA-4E9D-A292-F4B9BAD78A8E.jpeg
    69196541543__D31DD5A5-06EA-4E9D-A292-F4B9BAD78A8E.jpeg
    105.1 KB · Views: 37
  • IMG_4572.jpeg
    IMG_4572.jpeg
    79.8 KB · Views: 44
Last edited:
Here are some pictures.
If you look closely at the first picture, you will see that the guide dowel is damaged and bent.
The second and third pictures are showing a "witness" mark on the stopper plug indicating that the assembly was tilted or crooked because of the guide down being bent.
The fourth picture is the rubber boot on the SMC, The one on the left was new, and the one on the right was damaged (swollen) by using brake cleaner or chemical to clean the area, causing the rubber to swell, and started preventing the SMC from working correctly.
the next picture is of a NEW rear caliper mounting bracket, as you can see, there should be NO gap between the bracket and the clip that would allow it to flex/shift/move around.
The next two pictures are of the results of some of these things, the clip moves downward, wearing the bracket away, tilts, and binds and locks stuff up.
The last picture is of "My" method (not approved, or suggested) to keep the steel stopper plug from damaging the rear caliper bracket as much.
Hope this gives you a few more things to inspect and check on your parts, and helps you with your brake issues.
Now, back out in the garage....
Have a great day.
Great explanation thanks, this makes more sense now.
I have ordered a new genuine Honda caliper bracket.
20241027_215332.jpgThis is the original stopper bolt, compared to a new one.20241027_215355.jpg
Your help with this is much appreciated, thank you.
 
You can see from your picture that yours has a wear mark on the end on one side, and the center on the other side, which would explain the wear on your spring clip on just one side.
 
Two issues from above.

I've never bought a brand new rear caliper bracket. Just 2 SMCs. Both came with the chrome retainer clip fitted, but neither were glued. I thought this was odd, because the manual states that a particular glue should be used. ThreeBond 1521.

This is a high strength synthetic rubber adhesive, suitable for metals. This clip isn't going to go anywhere without the glue, but I reckon that it serves a more important function than just sticking the parts together. That clip clearly vibrates a lot and wears down the metal in the recess in which it fits. I reckon that the purpose of the glue is to provide a strong flexible layer to prevent the clip and the bracket from coming into direct contact and rubbing against each other - so eliminating the wear. So other glues suitable for metals, with similar strong, flexible properties would probably serve the same purpose. eg perhaps Uhu Max Repair Extreme ?

Someone mentioned using Moly grease on the slider pins. No argument against a smear of that - but often moly based products use a mineral oil base. This tends to cause the boots to swell / expand and they very quickly fail to make a proper seal to prevent water ingress. I use a smear of red rubber grease. A silicone based grease would do the job too - and is what is specified.
 
Last edited:
but often moly based products use a mineral oil base. This tends to cause the boots to swell

True. Another considerent here is that, on a high temp application (such as brake systems) the mineral oil base tends to evaporate quickly due to temperature (similar to bearings where grease gets hard over time), and the molybdenum binds to the metal for continued lubrication. The molybdenum also has high side load force properties whereas other greases may not have that. The small (localized wear) shiny wear marks we can see on some of the sliding pins are due to side load forces.
Ultimately a matter of personal choice.
 
4 & 5 The fluid pressure moves through the SMC from behind the primary seal and activates the 2 rear outer pistons.

What raises questions about this is the lack of a hydraulic diagram in the Honda manual to illustrate rear brake pedal activating the 2 rear outer pistons. Did I miss it?
I only have diagrams for front center and rear center pistons when pushing rear brake.
 
Just an update, I have ordered a new rear caliper bracket.
I am still waiting for this to arrive.
 
Back
Top Bottom