Please help trying to figure out what needs to be fixed here.

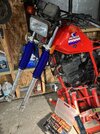
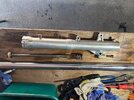
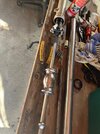
When you replace fork seals, it's a common practice to place a condom or use electrical tape on the end of the fork to keep from damaging the seal etc.
For folks that use things like the seal mate, your actually forcing a sharp edge of plastic next to the seal, then scraping it around the dia. of the seal.
How do you not think that this damages the seal?
You also don't know how much oil is in the fork tubes, and how much leaked out etc.
And why risk using a jury rig fix, only to have them blown completely out on your next ride, far away from home.
I say repair it correctly, in the comfort of your garage, with the correct parts and tools and not deal with it twice later.
There are a couple good articles on fork seal replacement on this forum.
I would steer you away from folks on FB and Youtube video's.
If you have any questions feel free to call me on the white courtesy phone, I'm sure I can explain it in detail so you'll be confident in doing the work yourself.
:WCP1:
 
Quick question, if I try to Seal Saver first, how do I tell how much fork oil is in the forks? Sorry if that seems like a dumb question, but honestly, I've never dealt with forks on a motorcycle before. As I stated, I've done tons of work on my cars and trucks, but motorcycle forks are foreign to me.

I know some fork oil leaked out because it pooled up on the wheel. So, how can I know how much is still left in there?
I can only tell you from my experience with the seal mate. I cleaned the fork very well before I started using it, in the hotel parking lot. I had a leak similar to yours. This was at least 25,000 miles ago. The bike handled well and the ride wasn’t harsh, which made me suspect not much leaked out. When I got home I changed the fork oil but didn’t measure the level as I just drained and pumped it out. The ST1100 has drain bolts on the bottom. Maybe I was lucky? I change the fork fluid every couple of years. Again if your fork is scratched and you can feel it, this will not help. I still haven’t changed the fork seals. I too have never done that job yet, but wouldn’t hesitate to try. Probably jinxed myself.
 
[quoted] The biggest problem that I had was removing the hex socket allen bolt from the bottom of the fork leg. They were stuck fast, and I could feel the hex driver starting to slip.

truer words never spoken, the rest is pretty easy; and patience is a virtue I do not possess. I used the puller shown to pluck the seals, I'm sure I didn't have to but I had it so was a perfect fit.

This is exactly the second fork seal job I've done; first was my 80 YZ 100 over 40 years ago, and the second was my 85 XL600 last year. Obviously way different bikes, but same in the important bit as quoted above. If that step goes sideways, don't even want to think about it.

Right from the outset I had little confidence in removing those allen bolts were going to be nice to me after sitting in there for 39 years... and they weren't.

I used a couple of clamps to firmly brace the outer thing a ma bob to the bench and either found or went out and bought a 3/8 drive x correct size allen socket. Then, I used a 3/8 - 1/2 socket reducer, and 1/2 x 6 or more extension, and 1/2 ratchet. The set up was to be able to easily maintain perfect alignment and apply steady repeatable mild force.

Penetrating oil, flat ended punch / drift tool that fits perfectly [with the most possible contact area] all the way into the hex bolts without making contact with the sides.
Warming [a 1500 heat gun would have been the best, I used Map Gas Torch very carefully monitoring the temperature [bare hand thermometer] to not exceed 140F], Cooling [Ice / Water].

Then read Igofar's post somewhere that talks about steady even lightly applied pressure over long periods of time [and the best penetrating oil, there was no evidence that mine did anything, but might of].

A routine of tapping, warming and cooling while in contact with the oil, cleaning the oil back out, tapping, applying force short of destroying the bolt [what ever that was] over substantial period, gradually walked the bolts out. They feel like they're not moving when they're not moving, and they also feel like they're not moving probably six or seven routines before they start to move.

With the big 1/2 set up it's tempting to try to torque them off. These are tiny little fasteners and metal is mush. The purpose for this is alignment and being able to repeat and control and adjust how much applied force and if you're getting any feedback; you'll know it's not moving, so what, another routine or two.

[edit] missed Larry's comment, do what he says.
 

Attachments

  • fork boots.jpg
    fork boots.jpg
    260.8 KB · Views: 11
  • IMG_4298 - Copy.jpg
    IMG_4298 - Copy.jpg
    197.3 KB · Views: 11
  • IMG_4303.jpg
    IMG_4303.jpg
    174.1 KB · Views: 11
Thanks everyone. I was thinking it was the fork seals too. The problem is that when you look this job up on YouTube, you find videos where it makes the job look like a fighting a bear. Look at this video...the guy struggles in basically every step of the process.


I've done lots of work on my cars, including brakes, suspension, timing belts, etc. I've never done fork seals on a motorcycle before, so it's semi-intimidating.
Lost me when he pulls the calipers, and axle before removing the fender. Struggle through every step of the process indeed!
 
I've done the forks twice now and only had one lower bolt that wouldn't let go (and spun the pieces inside while trying) the second time; reassembling to put 'pressure' on the assembly from the inside helped and eventually it spun off with an impact wrench. Read the multiple threads on this site (I also have write ups and photos from each time) and call Larry if you have any questions. Hopefully we've provided you a better response than those snarky FBers!
 
Quick question, if I try to Seal Saver first, how do I tell how much fork oil is in the forks?
You don't know. Only when you disassemble the fork you can pour it in a cup and see. Watch if the oil is not dripping on the brake. It can affect your stopping distance.
As for the lower bolt - just untight it a bit before disassemble the fotk and while it's under pressure.
 
Back
Top Bottom