Please help trying to figure out what needs to be fixed here.

Joined
Mar 21, 2020
Messages
30
Location
Nebraska
I am looking for help figuring out what needs repaired on my bike. Please see the pics. I posted this situation on the FB groups, but I only got snarky remarks.

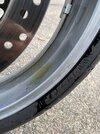
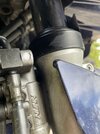
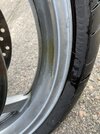
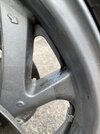
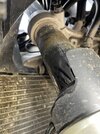
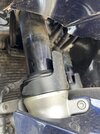
I did not have many opportunities to ride last year. One day last fall, I got all set up for a long ride and found what can be seen in the pics. Basically, there was a oil-like substance pooled up on the wheel. The bike had probably sat for 2 months at this point. At first, I thought it might be brake fluid. But, then I noticed the forks looked a bit wet.

It got me thinking that it might be the fork seals. But, I can't imagine how this would have happened. The only thing that I could think of was that I transported the bike a few months before that. Is it possible that I tightened the straps too tight while on the trailer and then hit a bump, causing the fork seals to blow out? The problem with this theory is that I rode the bike at least once or twice after that and it seemed completely fine. Nothing happened on those rides that would have caused this.

Am I looking at replacing fork seals here? What else could it be? If it is the fork seals, is there a good online video tutorial that you know of? I found a video on Youtube, but it's an hour long and makes the job seem like a royal PITA.

Thoughts?
 

Attachments

  • IMG_1164.jpeg
    IMG_1164.jpeg
    177.6 KB · Views: 107
  • IMG_1169.jpeg
    IMG_1169.jpeg
    135.3 KB · Views: 89
  • IMG_1165.jpeg
    IMG_1165.jpeg
    156.4 KB · Views: 86
  • IMG_1166.jpeg
    IMG_1166.jpeg
    129.5 KB · Views: 101
  • IMG_1167.jpeg
    IMG_1167.jpeg
    136.5 KB · Views: 112
  • IMG_1168.jpeg
    IMG_1168.jpeg
    160.5 KB · Views: 125
It almost looks like a small knick in the surface of the fork on the last picture [?]
[edit / added] It looks like a bit of oil has come out already which might mean that the suspension is softer in one fork. I know after leaking out a lot of oil before replacing the seals covers and boots on my XL, getting the oil level corrected made a big difference. Aside from the everything obvious, how much oil can be lost before it affects how the big bike handles might be a concern.
 
Last edited:
Looks like a fork seal job is in your future and after you clean off the fork tubes it might include new tubes if those are pitted with rust.
 
I have had good luck with a tool called "Seal saver" it's a thin but stiff sheet of plastic that you slide in between tube and seal to clean out the dirt. Made my own out of a dish soap bottle. Only thing you should do is find sand the edges if you make one. YouTube video somewhere shows how to use it.
For some reason forks will start leaking when parked for to long, haven't figured out why.
 
It’s definite a fork and seal job in your future. As said before the tubes look pretty crusted and pitted. While you’re in there consider spring up grades. It’s a tedious job but you will be happy if you make the effort. Tubes, bushings, seals and piece parts. A rebuild for sure.
 
Kinda Crusty for sure. You can count on adding brake pads too as yours are probably contaminated with oil.
You will need to clean up all the oil everywhere especially on the brake discs, when I say clean I mean Sanitary . Since you would be disassembling the forks it will be easier to address the fork tubes then. This problem was caused by Dirty fork tubes being forced into the seals and putting grit between the surfaces. Could have been avoided by simply wiping your fork tubes from time to time.
 
Yeah, what Kiltman said... Many folks don't think about cleaning their forks after a ride. Just takes one bug strike that sits for a long time and turns into something very hard that will compromise the seal. You might get lucky by cleaning and then a seal saver or similar product to clean out any junk embedded in the seal area. But, probably need new seals.
 
Yeah, what Kiltman said... Many folks don't think about cleaning their forks after a ride. Just takes one bug strike that sits for a long time and turns into something very hard that will compromise the seal. You might get lucky by cleaning and then a seal saver or similar product to clean out any junk embedded in the seal area. But, probably need new seals.
I've always wiped them off with an all purpose furniture polish. They probably get neglected on tours though to a certain extent. The Polish (no....polish) has never destroyed the seals but I wipe it off pretty dry too.
Upt.
 
The forks don't look bad to me just need wiped clean. The fork seals are leaking, boths sides the same? I doubt it. When it comes down to it replacing them fork seals is an easy job. Remove the forks from the bike, remove the retatining clip beneath the top seal and pull the forks apart and pull the seal out.

Lot's of threads here that cover it.

No big deal, I've rode my bike 5,000 miles with worse leaks than that fork.

The most often wiped clean part on my bike is the top of the fork tubes. Monthly at most.
 
Thanks everyone. I was thinking it was the fork seals too. The problem is that when you look this job up on YouTube, you find videos where it makes the job look like a fighting a bear. Look at this video...the guy struggles in basically every step of the process.


I've done lots of work on my cars, including brakes, suspension, timing belts, etc. I've never done fork seals on a motorcycle before, so it's semi-intimidating.
 
If that mark in the last photo is a nick as @Chris09 mentioned then that may be a serious issue. A good spot Chris, I thought that it was a felt pen mark but it does look deep. It also coincides with the last streak of oil to be dragged up. I doubtif that can be repaired - but don't know.
The black rubber seal that you can see on the top of the fork leg is the dust seal. That can be released and slid up the fork a bit - there's a tongue and slot arrangement to allow it to be lifted - the actual main fluid seal is buried just down from the top of the fork leg.

But if it is a nick, and the forks do compress so that the nick goes past the actual fluid seal - then its no good just putting new seals in, they will not seal and will be destroyed in no time - that nick has got to be sorted out. A new chromed fork pipe (stanchion) may be required. The polished bit of chrome above the dust seal is kept nice and clean and shiny by the action of the fork. All of the muck of the road is wiped up by the dust seal as the fork legs compress. So that shiny bit is an indication of how far the fork leg is pushed down. I would guess that 'nick' - if it is a nick - will just about go past the oil seal inside the top of the fork leg.

As for intimidating - well - I have done it, so it can't be that bad. Do it methodically. You have to make sure that the brake pipes that cross the mudguards are well supported, otherwise you will have those to repair. I supended a bar from the handlebars with guys to the frame to stop and cable tied them to that - with the calipers suspended from the same bar so that the weight was not placed on the brake lines.

The fork legs themselves come out easily. Michael did an excellent photgraphic report on this and described the tools that he acquired / made from the local DIY plastic plumbing section. I'll post a link if I can find it. Honestly, read this, print it. They really do not come any better than this brilliant bit of work. I had the manual and Michael's document. I followed the manual but then thought - yeah, but what does Michael say ? His was much more helpful.1739896675127.png

You need a stable jack - a scissor platform jack is what I use under the sump. Best thing that I ever bought. (Apart from the bike). See right. Dropped down, it is very slim - 84mm. The bike isn't going anywhere on the centre stand with the rear wheel in and the front wheel out. But I'm a belt and braces sort of guy. I can easily not notice and trip over the odd motorbike lying around in the garage.

The biggest problem that I had was removing the hex socket allen bolt from the bottom of the fork leg. They were stuck fast, and I could feel the hex driver starting to slip.

Pan full of boiling water to the rescue, replaced 3 times in rapid succession. It expands the leg slightly and it also releases the thread locker that is applied to those threads. Thread locking agent turns to chewing gum with a little heat.
Also a tip from Larry @Igofar - something that I didn't know. (I make that sound like I know most things. Far from it. Most of the things that Larry tells me are things that I didn't know. ) If a bolt wont move, the answer is not to press harder. The answer is to maintain the same pressure and within half a minute or so it will yield. But brand new bolts went back in. When you remove the springs, note which way they come out. There as a tapered end. I believe that some manual has them going in the wrong way ? It's easy enough to keep them the correct way round - you will be holding the top end, and the bottom end will be dripping oil all over the place.

It's really very satisfying working on one fork leg, following the instructions and putting it back together. And when you have done one, you get the satisfaction of doing the second one as a newly qualified expert. (The expert is the person who has the ceiling hook, the cable tie and the drip pan all ready prepared before they remove the fork spring.)

Michael @CYYJ 's link: https://www.st-owners.com/forums/th...-overhaul-an-illustrated-bibliography.167855/
 
Last edited:
These are pretty easy to change the seals, having the right tools helps. This guy shows a straight up way to do it with little BS: (get good seals OEM or SKF IMHO)

 
Last edited:
If that mark in the last photo is a nick as @Chris09 mentioned then that may be a serious issue. A good spot Chris, I thought that it was a felt pen mark but it does look deep. It also coincides with the last streak of oil to be dragged up. I doubtif that can be repaired - but don't know.
The black rubber seal that you can see on the top of the fork leg is the dust seal. That can be released and slid up the fork a bit - there's a tongue and slot arrangement to allow it to be lifted - the actual main fluid seal is buried just down from the top of the fork leg.

But if it is a nick, and the forks do compress so that the nick goes past the actual fluid seal - then its no good just putting new seals in, they will not seal and will be destroyed in no time - that nick has got to be sorted out. A new chromed fork pipe (stanchion) may be required. The polished bit of chrome above the dust seal is kept nice and clean and shiny by the action of the fork. All of the muck of the road is wiped up by the dust seal as the fork legs compress. So that shiny bit is an indication of how far the fork leg is pushed down. I would guess that 'nick' - if it is a nick - will just about go past the oil seal inside the top of the fork leg.

As for intimidating - well - I have done it, so it can't be that bad. Do it methodically. You have to make sure that the brake pipes that cross the mudguards are well supported, otherwise you will have those to repair. I supended a bar from the handlebars with guys to the frame to stop and cable tied them to that - with the calipers suspended from the same bar so that the weight was not placed on the brake lines.

The fork legs themselves come out easily. Michael did an excellent photgraphic report on this and described the tools that he acquired / made from the local DIY plastic plumbing section. I'll post a link if I can find it. Honestly, read this, print it. They really do not come any better than this brilliant bit of work. I had the manual and Michael's document. I followed the manual but then thought - yeah, but what does Michael say ? His was much more helpful.1739896675127.png

You need a stable jack - a scissor platform jack is what I use under the sump. Best thing that I ever bought. (Apart from the bike). See right. Dropped down, it is very slim - 84mm. The bike isn't going anywhere on the centre stand with the rear wheel in and the front wheel out. But I'm a belt and braces sort of guy. I can easily not notice and trip over the odd motorbike lying around in the garage.

The biggest problem that I had was removing the hex socket allen bolt from the bottom of the fork leg. They were stuck fast, and I could feel the hex driver starting to slip.

Pan full of boiling water to the rescue, replaced 3 times in rapid succession. It expands the leg slightly and it also releases the thread locker that is applied to those threads. Thread locking agent turns to chewing gum with a little heat.
Also a tip from Larry @Igofar - something that I didn't know. (I make that sound like I know most things. Far from it. Most of the things that Larry tells me are things that I didn't know. ) If a bolt wont move, the answer is not to press harder. The answer is to maintain the same pressure and within half a minute or so it will yield. But brand new bolts went back in. When you remove the springs, note which way they come out. There as a tapered end. I believe that some manual has them going in the wrong way ? It's easy enough to keep them the correct way round - you will be holding the top end, and the bottom end will be dripping oil all over the place.

It's really very satisfying working on one fork leg, following the instructions and putting it back together. And when you have done one, you get the satisfaction of doing the second one as a newly qualified expert. (The expert is the person who has the ceiling hook, the cable tie and the drip pan all ready prepared before they remove the fork spring.)

Michael @CYYJ 's link: https://www.st-owners.com/forums/th...-overhaul-an-illustrated-bibliography.167855/
Providing the springs were put in correctly:rofl1:
 
Fork seals like to leak on bikes that have been sitting unused for a while, I think it is the bike's way of telling you to keep riding often.

A fork seal change should take a couple of hours. I use a length of PVC pipe 50mm OD about 600mm long as a driver, I made longitudinal cuts in this so it spreads out over the 45mm fork tube nicely, and still works on my 41 and 43mm forks.
My tips:
1. Break loose the axle bolt, brake calliper bolts. Support the bike (jack under the sump) and remove the brake calliper, brake hose brackets, mudguard and wheel, hang the callipers on wires to keep weight off the hoses
2. Loosen the top and bottom triple clamps, slide the forks down so the top is in between the clamps and then reclamp the bottom. Use a ratchet driver with long extension and 17mm hex bit to reach down past through the upper clamp to loosen the fork caps. I have bar risers and unless I lower the tubes in this way I cannot get a straight shot at the caps. Then carry on to remove the forks fully.
3. Now break loose (but don't remove) the bottom hex bolt with a long 6mm hex driver. May need to use a rattle gun and maybe some localised heat if it hasn't been out before. This is the hardest bit!
4. The fork cap (that you loosened earlier) can now be undone and will expose the locknut on the shaft which you can undo and remove the fork cap, spring, spacer and washer. At this point you will cover yourself, the floor and any nearby pets with oil. I set out a few old newspapers and have rags to hand.
5. Now tip out the old oil (not onto your dog) and hang the forks upside down to drain for a bit
6. Remove the bottom hex bolt, the damper unit and oil lock piece should slide right out.
7. Pry up the dust seal being careful not to gouge your fork lower, I use a small flat blade screwdriver.
8. Pick out the circlip, now start to repeatedly forcefully extend the forks to drive the seal out. This may generate some sweat and garage words. Some heat around the fork leg adjacent to the seal may help.
9. Clean all the parts especially inside the forks and the area the seals fit into. Might be a good time to think about repainting the fork legs.
10. Inspect the fork tubes for nicks and gouges, If you find any crater rims projecting, file these carefully down and finish with 800 grit sandpaper as needed.
11. Inspect the bushings that support the sliding action and see if the teflon coating is all intact (inside the top bushing, outside the bottom bushing). Be prepared to replace these if needed.
12. Lubricate the seal parts (fork oil or red rubber grease), and reassemble the forks. Don't cut the new seal on the fork tube top, but the 1300 has a fairly rounded edge so not really an issue. The oil seal usually has text on the upper face, but you can usually work out the orientation by looking at the scraper ribs on the inside.
13. The oil seal needs to be driven into place until the circlip fits into the groove; my PVC pipe driver plus a rubber hammer makes that fairly easy, you can also place the old seal on top of the new one to protect it and carefully tap into place with a hammer and drift. Proper tools are also available,
14. You should use a new copper sealing washer on the damper rod bolt, but I have had success with annealing the old washer and reusing it.
15. I make sure the damper rod bolt and damper base threads are super clean so they don't bind up, using a tap and die. Then a drop of blue Loctite during assembly.
16. Refill the forks, pump the forks and the damper rods to purge air out (you will feel when the damper is properly filled). Set the oil height to the right mm from the top, forks fully compressed, springs out.
17. I retighten the fork caps in the same manner as step 2 above.
18. Set the fork legs to the same height so the axle will slip smoothly in. Tighten the bottom triple clamp, then fit the wheel, brakes, mudguard etc. Tighten the axle bolt, but leave the axle and upper triple clamps loose. Remove the jack support and set the bike on its wheels, then pump the fork vigourously to allow the axle/left fork to find the most aligned position, then tighte the remaining fasteners.
 
Try the simplest first. Clean up the forks really well and make sure there are no scratches, if there are then the advice above is great to fix things up. If forks are clean, try this method:

I was 2,500 miles from home and had a weepy seal, I've carries a seal mate for years and finally had a chance to put it to the test. It got me home without any further weeping. Hopefully it works for you.
 
I've done many forks seals works on almost all bikes I had. Just have done it recently on my ST13 at 43k miles. These are simple upside-up forks and easy to do just can be a bit messy.
Find a good not too long vid and follow it step by step.
With that said, try the "seal saver" first, or something similar. It probably just a temporary solution, but who knows, maybe will hold up for some while.
 
I know this is a fork thread, but if you found little time to ride last year, I'd bet you had even less time for regular preventative maintenance. ST's generally do not like to sit idle, and will throw a tantrum because of inactivity. They show this neglect by ruining your next ride or vacation. Read this article (below) for some ideas regarding what needs to be done. You might pick up a manual too...it is the single best tool for these bikes.
 
Link to a good fork seal article on this site


Link to Parts list that Igofar made some time back


I bought most of the parts on this list so I would have them on hand. It turned out that most of my original parts where still in good shape so I saved them for next time.

When I did my fork seals on the ST1300, it was easier than I expected and you get the bonus of fresh fork oil which I'm sure is needed.

Take your time and have plenty of big cardboard to lay the parts on.
 
Quick question, if I try to Seal Saver first, how do I tell how much fork oil is in the forks? Sorry if that seems like a dumb question, but honestly, I've never dealt with forks on a motorcycle before. As I stated, I've done tons of work on my cars and trucks, but motorcycle forks are foreign to me.

I know some fork oil leaked out because it pooled up on the wheel. So, how can I know how much is still left in there?
 
Back
Top Bottom