My bike won't start - where do I start diagnostics?

Joined
Apr 13, 2024
Messages
7
Age
33
Location
united Kingdom
Hi,

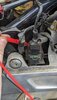
I have an issue where my bike won't start. This happened a few months back too and I was able to jump start it from a car to get home. I then bought a new battery and everything was good for a while, I have a feeling it's to do with the terrible rain we have been having in the UK recently as my bike is left outside all year round (ridden all year round too )

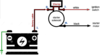
I have just ordered a multimeter but not really sure what I should be checking and in which order

Also I have been having some other issues the last week before this happened which I'm not sure is related or not, The bike seemed to skip fuel, I don't know how else to explain it. But it felt like the throttle stopped working for a second before the engine jumped back into action and started working again and the handling felt off when i turned.

And also the bike would stick in the morning and be very hard to move out of my parking spot, it would make a loud screech as I pulled it back. I'm not sure if it was the brake sticking or something to do with the clutch, I checked the oils and they were both quite full.

That seemed to happen every morning when it was super cold, it hasn't happened the last couple of days it's been warmer and no rain

So what should my first steps be? I'm also thinking of ordering a battery charger for the meantime until I can fix this because the bike is my only vehicle I only need to use it once every couple of weeks so if i could manually charge the battery between uses how many starts would I get before it runs out? Could I go to multiple shops in one trip and start the bike 4/5 times without worry for example?
 
Joined
Mar 13, 2012
Messages
5,077
Location
soCal
Bike
'97 ST1100
STOC #
687
when you get your multimeter you will be able to measure the battery voltage under various conditions, which will answer some questions about the state of your battery.

With the ignition off the voltage should typically be in the range of 12.7 volts. This will only tell you if the battery is totally shot, a good reading here doesn't guarantee a good battery, yet.

If you turn the key on but don't start the bike, it will drop a little, but I'm not sure how much because UK bikes are different than US models. I think UK models have a headlight switch, US models the headlight is always on. If you have the stock halogen bulbs, they present a fairly big load at the battery. With the bike not running and headlights on I think the voltage typically drops to 11.9-12.0 volts or so, but I haven't measured it recently so my memory isn't great. What you're looking for here is if the battery is capable of handling a load, if it drops down more than a volt, the battery is suspect.

Now hit the starter while monitoring the battery voltage. Same thing here, it will drop while the starter is turning, more than the headlight drop, but shouldn't drop to less than the high-10s.

If the bike won't crank the engine very well, you'll see the voltage drop significantly under the starter load, and that's a sign that your battery isn't holding a good charge. Since its a relatively new battery it should be able to hold a full charge for a couple weeks without being ridden. But, just in case, charge the battery with a charger until its fully charged and try to start the bike again.

once the bike is running, you should see high-13s to low-14s across the battery. If its in the 12s, then you may have an alternator issue and you will continue to kill the battery by running the bike without the alternator being able to charge the battery while running.

this should get you started, report back after you get your meter and perform these tests and we can give further advice from there.

BTW, which year/model bike do you have, that's good information for us to know because there are some differences.
 
Joined
Feb 25, 2016
Messages
4,789
Location
Northumberland UK
Bike
VStrom 650
If you are only using the bike infrequently and parking it up outside in old blighty then things will start to degrade. It could be the brakes are sticking on slightly, they do given half a chance and the battery will not stay charged if only used every now and then.
A battery charger is a good call and a bike tent if possible would be a good investment.
Good luck.
Upt.

Oh, and welcome aboard from Northumberland.
 
Joined
Sep 4, 2013
Messages
8,215
Location
Cleveland
Bike
2010 ST1300
I usually connect my bike to a battery maintainer/charger when the bike is not under me, and I park it in a heated garage. An ST parked outdoors in Merrie Olde England with a damp climate and some parasitic load from the clock sounds like a recipe for battery death. I admit I don't know the p load for an 1100, but you might seriously consider a battery maintainer like one of the Optimate models. If you are riding regularly (every week or two) for a decent distance, this might not be needed since the bike will charge the battery.

I don't know what common practice is in England, but if a lead acid battery is not slowly and fully charged when new before being put into service, you will sacrifice about 10% of its capacity.

For the screech, if the bike is on the center stand you can rotate the rear wheel before moving it, and then do the same for the front wheel. This will help you localize the sound. Also, visually inspect the discs.
 

jfheath

John Heath
Site Supporter
Joined
Mar 18, 2006
Messages
2,842
Age
70
Location
Ilkley, W Yorkshire, UK
Bike
2013 ST1300 A9
2024 Miles
000679
STOC #
2570
The screech - I am not bothered about too much if it only happens when you first move the bike and doesn't do it when you park it after a ride. Its outside. The discs rust very easily. Mine get a light coating sitting in a dry garage. It groans when I back it out of the garage. I don't think that I've had a screech before though. Its not a bad idea to pop out and rotate the wheel a fraction so that the pads don't rust themselves to the surface.

While you are waiting for a charger, inspiration and without a great deal of additional information, I would spend a little time on your earthing point. On the 1300, It is under the rear of the petrol tank and at the front of the seat. On the 1100 there is one on the frame behind the grab handle on the left hand side. Unbolt it. Make sure that both sides show shiny metal. Make sure that the frame where it bolts shows shiny metal. Make sure the bolt threads are cleaned up. Bolt it up again and smear some grease over the parts to stop water getting in.

Near the battery of both models there is a red connector. I would remove the battery before looking at this. It clips onto the starter solenoid, but it carries power to other components too. On the 1100 it is in a position where water can get at it. Unclip it, and look for any signs of melting of plastic. Look at the state of the wires and the condition of the 4 blade terminals inside. It is possible to clean them up with a thin modellers file or a nail file. You can clean up the famale part of the connector if you have a spare male / blade terminal.

When you put the battery back, make sure that the bolts are clamped tightly. Eye with suspicion any additional connections to the battery. There shouldn't be any, and uf there are, they have been added - often by someone who hasn't taken care to protect the wiring from wear, vibration, corrosion.

Battery charger - I can recommend something like the Optimate range of battery chargers which you connect to your battery and can leave on. They monitor the state of your battery and can start a sequence of charging techniques to fix numerous battery issues. When the battery is fully charged it sits doing nothing for half an hour and then checks that it has retained its charge. Over winter, I leave it connected all of the time.

Consider a bike tent or a cover. Something like the Oxford range of covers. The largest size will fit over the Pans with a top box. But you need to be wary of your paint - wind will rattle the cover around and it will rub on your tank and topbox.

Let us know which model you have - quote the white label on the frame under the seat. It will say something like ST1100AY; ST1100T; ST1300-2; ST1300A-9

Whereabouts in the UK are you ?
 
OP
OP
Joined
Apr 13, 2024
Messages
7
Age
33
Location
united Kingdom
Hi all,

Thanks for the replies s updates so far.

The bike is a 2002 model. under the seat it says:
ST1100Y
Color: B-162M
Code: B162

I drive it 4/5 days a week as it's my only vehicle but not very far. 10 mins to the gym and then 10 mins back home . Or occasionally weekly trips to the shops into town ect probably less than 10 mins each way.
However the night before it stopped working I had just driven back from a 24 mile round trip (30ish mins each way) so I think that should be charged. I live in north Oxfordshire to the west side of Oxford

It started up first thing in the morning, then at a roundabout I stalled and it wouldn't restart, I wasn't sure if the stall was due to some related issues because I haven't ever stalled this bike just riding it normally

The clock is still on, however when I turn the key the clock goes off. Pressing the start button does absolutely nothing, no noise at all. I tried turning the headlight dial all the way down too and it made no difference

The bike would not start with a jump either, using the same car and leads as last time I jump started did nothing. Turning the key with the jump leads attached and the clock would still go off and start button had no reaction.

I did some tests with the multimeter

Battery only: 12.79v

Battery only with key turned to ignition on position: 12.7v

Battery only with key turned and start button pressed 12.7v

Red wire to battery and negative wire to bike frame: 12.7v

I then followed the big cable from the battery to it's first fuse shown below and put the red wire around there and I got 12.7v on one bit and 0 on the other


This cable here
434694664_1661008657979989_2919204712887220303_n.jpg

Down to here
434283491_324553753635213_5465445220835952231_n.jpg

This was 0 volts
432484004_979699700332602_4050352908130821373_n.jpg


This was 12.7v
434720784_808831467339235_4845312184228701586_n.jpg

I wasn't sure how to continue testing past here as everything seems to be covered with black plastic, I assume I'm going to need to take more of the body work off other than the clip on side panel to continue? Do I also need to expose wire from the black plastic?


Finally, while I was doing all of this I noticed that I had forgot to put this bit in place when putting the new battery on - that little circle of metal attached to the red wire.

434411245_348878577655974_4404939328592286314_n (1).jpg

I have since re attached this behind the screw which I think is correct? I don't know what this is or what it should be doing but the it made no difference to any of the tests after reattaching
434754618_351557617890242_5907036714445304180_n.jpg
 

Attachments

Slydynbye

Will ride for Pie
Joined
Sep 3, 2007
Messages
1,618
Location
Fremont, California
Bike
2000 ABSII
STOC #
7331
You need to inspect the red wire on the starter solenoid
Red wire to inspect.jpg

You are looking for corrosion which can cause an intermittent connection

IMG_8170.PNG

Also notice the wire is showing signs of heat discoloration, the red plastic carrier is often melted by that heat.

Another point to inspect/clean is the kill switch on the handle bars, it is exposed to the elements. Cycling the switch many time can provide a temporary fix
 
Last edited:
Joined
Mar 13, 2012
Messages
5,077
Location
soCal
Bike
'97 ST1100
STOC #
687
I think post #7 describes where your problem is likely to be found, open up the connector and see how much corrosion you find. There are articles as to how to remedy the issue, including bypassing parts of that circuit. Google "st1100 red wire bypass" and you should find them.

Your clock symptom is indicative of a large voltage drop due to corrosion. The clock only draws 1-2mA, with everything else turned off that much current flowing through the corrosion causes very little drop, and the clock will operate. Turning the ignition switch on draws more current, causes a large voltage drop, and nothing works downstream of that drop.
 
OP
OP
Joined
Apr 13, 2024
Messages
7
Age
33
Location
united Kingdom
You are looking for corrosion which can cause an intermittent connection

So I think you were right, I took this off and it was completely green (I assume that's corrosion)

434736261_932333348435989_731514405392870523_n.jpg434394238_757847446113615_7735265122476609974_n.jpg434311036_1140880460401085_4789059965595185425_n.jpg434823167_1931408540609689_1366854443699172870_n.jpg


I then tried to wipe this down and decided to remove that fuse to replace it with the spare. The fuse was stuck hard and when I finally pulled it out of the bits snapped off and stuck in the housing

You can see it that second picture where it came from top left is completely black

434941217_343036232105473_5412606121482810944_n.jpg434402147_469609802073809_6004377468446688404_n.jpg

I assume I need to buy a new 'starter relay solenoid' now? I can see some on ebay for £10. Do I need anything else like new wires too?
 

Attachments

Joined
Jul 15, 2023
Messages
523
Location
Mesa, AZ
Bike
VFR750F, ST1300
Those additional external wires are for aftermarket accessories, such as USB charger or trickle-charger port. They don’t have anything to do with your problem. Follow wiring schematic and measure proper junctions in starter circuit. Know exactly what it is you’re measuring and why. For example, getting 0v at taillight globe doesn’t have anything to do with your no-start issue.

1. verify power-flow from battery to starter. Battery does have power, so good test there! Starter might not be getting power. So measure junctions in circuit along flow-path. It’s just like water flowing down stream. You’ll do series of measurements like this. Problem is between where you measured 0v and previous point that did have power.

battery 13v -> 13v -> 13v -> 13v -> 13v -> 0v AHAH !!! -> 0v -> 0v -> 0v -> starter

Measure following junctions:

- battery -> volts = ???

- red wire at solenoid connector -> volts = ??? this sends power to fusebox and start-button

- key ON, press START, yel/red wire at starter solenoid, volts = ?? this is power from start-button

- key ON, press START, big M terminal at starter solenoid, volts = ?? this is output to starter cable and should have power when pushing start button. If no power, you’ve found problem, no need for next step.

- key ON, press START, other end of starter cable where it’s bolted to starter, volts = ??? If you have power here, but starter doesn’t spin, then starter’s bad.

2. Corroded & burnt starter-solenoid connector is common due to Honda specifying low-quality bare-brass terminals. These corrode over time and increases resistance across joint. Highest-rating for 6,3mm terminal is 24a, while Honda uses it in 30a circuit!! :eek: 
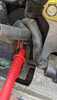
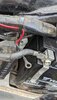
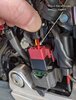
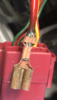
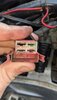
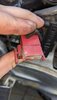
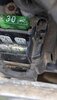
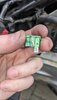
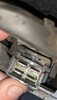
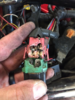
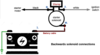
Sending more power than rating through corroded terminal with resistance just causes lots of heat and burning.

StarterSolenoidConnector.png

DON’T make same mistake Honda did and replace with same bare-brass terminals!! Exact same thing will happen! Red-wire-bypass mod is just making up for poor specs. Instead, improve on Honda’s low-specs by using tin-coated terminals.

StarterSolenoidKit-tinned.jpeg

Cut off old terminals and strip 5mm insulation off end of wire.. Clean exposed wire ends so bright metal is exposed. Use proper matching open-barrel crimping tool to create dual W-crimps onto wire.

CrimpGood3.jpeg

You may notice in @Slydynbye’s excellent close-up photo above that burning starts at wire-to-terminal interface due to low contact surface-area (not between terminal-to-teminal). We want to increase contact surface-area with solder since it flows electricity better than air between wire-strands and to outside terminal. Solder tip of wire where it pokes out from main crimp, but not so much it flows into strain-relief crimp. We want as much conductivity as possible since this teminal is overloaded. It’s done this way in pro-motorsports (F1/MotoGP), military and aerospace applications for performance, reliability and durability.

soldered-crimps.jpeg
credit: http://www.cycleterminal.com/crimp-tools.html

Coat terminals and pack air gap at back of connector with electrical contact-cleaning grease to seal against moisture and corrosion. I like this Deoxit grease as it’s actually conductive (unlike dielectric/silicone grease), dissolves corrosion and seals against future corrosion. Unfortunately not available in UK.
https://www.ebay.co.uk/itm/362924286852

Perhaps some of this outfit has similar product:
https://electrolube.com/products/contact-lubricants/

Also instead of grease, packing air gap at back of connector with high-strength aquarium-grade silicone will keep moisture out. Be careful to not push in so much it’ll insulate terminals from contact.
 
Last edited:
Joined
Sep 4, 2013
Messages
8,215
Location
Cleveland
Bike
2010 ST1300
Obviously, you are going to need another small fuse block. Your fuse fell apart due to excessive heat. I discovered that some of the cheap assortments of fuses that I purchased from Amazon left one of the stabs in my fuse box when I tried to remove the fuse to work on the circuit (the fuse fell apart). Guess I learned my lesson. Buss fuses from an auto parts store from now on.
 
Joined
Jul 15, 2023
Messages
523
Location
Mesa, AZ
Bike
VFR750F, ST1300
Should still work. Make sure B terminal goes to battery and M goes to starter.

Here's caveat:

StaterSolenoidTerminals.JPG

Starter-solenoids can have big terminals reversed!!!:eek: Had case where guy replaced it and had zero power. Swore up and down he put cables back in "correct" position. Well... he put cables back into original positions, but internally big terminals were reversed. Refused to make one measurement, that would've fixed problem in 5-minutes. B will always have battery power. M only when you push start-button.
 
Last edited:
Joined
Jul 15, 2023
Messages
523
Location
Mesa, AZ
Bike
VFR750F, ST1300
You need power to activate solenoid and you’re not gonna get it at all if you reverse big terminals.

Here’s proper wiring of solenoid (ignore wire colours, for different model). B gets power directly from battery and sends it across 30a main fuse to ign-switch. Which eventually comes back from start-button to activate solenoid’s coil. That closes switch and connects B battery power directly to M starter-cable and spins starter.

StarterSolenoid.png

Here’s what happens when you reverse big terminals. With battery cable connected to M, power goes to open end of of solenoid switch contacts and stops. B is then connected to starter motor. Other end of B goes through 30a main fuse to ign-switch just like before.

StarterSolenoidBackwards.png

So how does ign-switch and start-button get power to activate solenoid? When you turn key ON, you connect fusebox and headlights to starter motor. Is there any power coming out of starter motor to turn on headlights? Or to power start button? Effect will be completely dead bike with no power anywhere beyond where battery connects to M terminal of starter solenoid.
 
Last edited:
Joined
Jul 15, 2023
Messages
523
Location
Mesa, AZ
Bike
VFR750F, ST1300
I think I might have ordered the wrong part, it's due tomorrow but I just realised the part I ordered is for the ST1300 not the ST1100

I ordered this: https://www.amazon.co.uk/dp/B09Q1Z8CD8?psc=1&smid=AIF4G7PLKBOZY&ref_=chk_typ_imgToDp

Are they interchangeable or do I need to find the ST1100 specific one?

I ordered the red plug part posted above by DannoXYZ too off of ebay
Best to look up online parts-seller like Partzilla.com or cmsnl.com to get actual part# of solenoid you're looking for. In this case, it's # 35850-MR5-007 which has B terminal on right side. In general, black solenoids have B terminal on right and green ones has it on left. BUT... that's not always case, so you'll want to verify to be sure.

Here's one with B terminal on right like yours.

Usually it's not difficult to turn solenoid 180-degrees so big cables connect like before. Red 4-pin plug usually have more slack and can be turned around easier to fit.
 
OP
OP
Joined
Apr 13, 2024
Messages
7
Age
33
Location
united Kingdom
It worked!! The bike started first time as normal

Thanks for the help everyone

It could have gone a lot smoother though, I had to turn it around 180 as you expected to get the B and M on the correct sides, I also cut one of the green wires while trying to strip it so I had to re strip it higher up and there isn't a lot of give in the wire so now the entire thing is rested outside of the little rubber housing it was in before. I don't know how big of a deal this is?

It's basically resting on it, will it be safe riding like this or will it mov around too much?

434978426_691728306312282_5837564384273099557_n.jpg
 
Top Bottom