Highway Pegs - a way

Joined
Oct 20, 2020
Messages
38
Age
57
Location
Sacramento
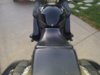
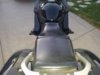
I borrowed an idea from this post: https://www.st-owners.com/forums/threads/a-little-40-mod-i-did.172794/
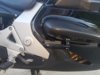
The trick is to clamp to the crash bars behind the unpainted and cheap/consumable tip-over protector/covers.

I ordered up some one-size-fits-most pegs from Amazon. 1" clamps would be about perfect, but 1.25" clamps work ok with 1/8" tube clamped around the crash bars. I used dense dishwasher hose from the big box hardware store.

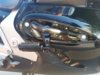
The peg/clamp kit I ordered has a clamp assembly, a short arm, and a footpeg.
* the clamp itself can rotate for alignment
* the clamp/arm junction allows clocking
* the arm/peg junction allows the peg to swing 90deg forward OR backward (not both)
* the peg can be loosened and rotated around it's own axis
This makes everything pretty adjustable, and you can fine tune your peg placement based on your needs... and your willingness to cut plastic.

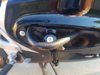
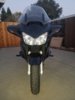
First picture is the tip over cover off and the clamp/arm loosely connected without the pedal.
 

Attachments

  • 20220807_192410.jpg
    20220807_192410.jpg
    104.1 KB · Views: 231
Next picture is the pedal added, pivoted around its axis until level, and everything snuggled up.
 

Attachments

  • 20220807_192454.jpg
    20220807_192454.jpg
    120.8 KB · Views: 179
Here's a picture with the plastic cover hacked a bit to clear. I had this on and off several times, and it looks like the picture shows a time when I didn't get the bottom aligned correctly. It is possible to finesse this into place.

There's also a picture which shows how much I needed to trim the cover -- not much. All cuts are on the bottom and nearly invisible unless one of us is tipped over.
 

Attachments

  • 20220807_193514.jpg
    20220807_193514.jpg
    98.6 KB · Views: 700
  • 20220807_192309.jpg
    20220807_192309.jpg
    130.8 KB · Views: 172
The pegs tuck back alongside the fairing. Adjustable stops can be set to keep them off the plastic and also to set their extended position.
 
They aren't particularly visible unless you're looking for them, but flip out easily enough when seated.

I opted for the shortest set I could make work: https://www.amazon.com/dp/B017YUZCYC
The same company has a longer pair, too, and you can get them in chrome or black powder coat, or with different floorboards. The short-pivot arm tucks the pegs up under the tip over bars pretty tight, so there's not a lot off foot room with this set. There's enough room for me to put my toes, the ball if my foot, my instep, or my heel on them, and it moves my knees out of "slightly acute" into "slightly obtuse" which really makes a difference to my knees. YMMV.
 

Attachments

  • 20220807_202506.jpg
    20220807_202506.jpg
    105.5 KB · Views: 119
  • 20220807_202328.jpg
    20220807_202328.jpg
    100.7 KB · Views: 119
  • 20220807_202409.jpg
    20220807_202409.jpg
    105.2 KB · Views: 115
All the adjustability makes for a pretty simple install. If you can find a 1" clamp variant, your install might be even easier. I used a shirt segment of a dense 1/8" wall dishwasher hose.it is pretty solid when clamped tight, but I will probably drill the clamp and crash bar for a roll pin to make extra sure that no rotation occurs.

The adjustability also means that you can clamp these in different positions on the engine guard/crash bars. I went with a setup that required light trimming on the bottom of the unpainted covers. A sharp knife worked well.
 
Since I attached these to the crash bar and the arm projects out through the bar itself, the pivot between the arm and the pedal is lower than the crash bar. If you tip over, these will likely break -- $50ish generic parts are unlikely made of the best grade of steel!

I'll run these for a bit and see how they work. Right now I'm pleased with them - especially for the cost and reversability.
 
Neat! does the side panel come off without removing the pegs? I had the Switchblade style before and they fit flush and the side panels could easily be removed. I would love another set of those for this ST....
 
This is great! I’m going to forward this page to my brother in CO with the 1300. He was considering highway pegs for that bike.

Edit: saw the link for amazon.
 
The side panel likely does NOT come off without removing the pegs. The opening in the side panel is pretty small.
 
I have these installed:
I can remove the side cowl without removing the pegs. You might be able to as well. At I'd think you'd be able to without taking off the arms.
 
Since I attached these to the crash bar and the arm projects out through the bar itself, the pivot between the arm and the pedal is lower than the crash bar. If you tip over, these will likely break -- $50ish generic parts are unlikely made of the best grade of steel!

I'll run these for a bit and see how they work. Right now I'm pleased with them - especially for the cost and reversability.
Thank you for the photos and information. Much appreciated. Now I just have to figure out where my feet want to be as I cruise the open road. Then I will be able to see if this is the direction I want to go. If I do anything differently than shown here, then I'll try to post it on here for you and others.
 
Thank you for the photos and information. Much appreciated. Now I just have to figure out where my feet want to be as I cruise the open road. Then I will be able to see if this is the direction I want to go. If I do anything differently than shown here, then I'll try to post it on here for you and others.

I'm in the same boat as far as foot placement. My feet appear to like being below that cover and maybe a little farther ahead?
I'll have to experiment as well. Post your ideas and any pictures of you can please.

I notice that the link provided above for amazon says "currently unavailable" Wonder if the op bought the last one? :)
I saw that as well. Canadian amazon has them however.
 
I'm in the same boat as far as foot placement. My feet appear to like being below that cover and maybe a little farther ahead?
I'll have to experiment as well. Post your ideas and any pictures of you can please.

I notice that the link provided above for amazon says "currently unavailable" Wonder if the op bought the last one? :)
That would be just my luck. ;)
 
From the pics, the placement looks like that of the Robert Kienlein STeed STicks from way back when:
Well, at risk of stating the obvious, that's an ST1100, not an ST1300. :p The burgundy ST1100 shown has the pegs mounted almost all the way forward on the tipover bar covers. Mine are mounted most of the way back, and maybe an inch lower. FWIW, you probably COULD mount these pegs as shown on the ST1100 above. The beauty of these generic bits is that you can install them on just about any straight section of tube that's long enough to fit the clamp. I installed mine where they made sense to me (where little cutting was necessary) and YMMV. Different horses for different courses!

Ya'll made me google: the tipover bar cover thingamajig is apparently better known as an engine guard cover.

For reference, the ST1300 engine guard cover is about 13" long, front to back, along its longest dimension. I installed the pegs on the straight steel bracing tube that runs fore-aft tucked well inside the engine guard cover and the pedal's arm exits this cover about 9" back from the forward edge of the engine guard cover where it meets the painted side cover. The outer curve of the the engine guard cover is about 2" higher than the relatively chunky rubberized top surface of the swing-out pegs, and viewed from the top, the swung-out pegs protrude about 3" beyond the outermost curve of the the engine guard cover. There high bolt on the lower side covers is just barely visible in the picture below, and if you look on your own ST1300, the pivot for the swing-out pegs is about an inch forward, and inch up, and two inches outboard from that screw, in the picture below.

20220807_193514-jpg.296934


This photo shows the bottom of the engine guard cover NOT in its appropriate slot. My bad! I have fixed this.
The photo also shows the main pegs with the lowering brackets installed but the brake pedal not adjusted. I will inevitably adjust the pedal down at some point in the near future.

I liked LukesDad's implementation on that other thread, and poking around Amazon, I saw that different lengths and different pivots were available, so I ordered two and kept the one I liked best. My suggestion is this: buy some parts from somewhere with a reliable return policy and try them on your bike. It wasn't difficult to try these on my ST1300, and the changes to the bike are basically invisible to most viewers, so I could change course.

In the meantime, put your trust STeed on the center stand and see if you like where your boots settle if you put your boots just outboard of the engine guard covers and a couple of inches lower.

I like the flexibility of having my knees less bent for longer rides -- YMMV!

Randii
 
Good job Randii

Your install looks good. I've ordered a set slightly longer and will attempt an install in about 8-10 days after they arrive.

Have you tried this position and found it to be ok yet? Can someone take a picture of you sitting on your bike with your feet on the pegs to give me/us a better idea of that foot position?

Thanks
 
From the pics, the placement looks like that of the Robert Kienlein STeed STicks from way back when:

9495AACE-77AD-427C-A879-F1440338E375.jpeg

I know the thread is for a 1300 and this is an 1100 but I've had 4 different brands of forward pegs and found these (Steed Sticks) the most comfortable on my 1100. Doubt there are any around for sale.

As a side note, I loaned mine to a guy doing the Iron Butt ride a few years ago. He said they really made a difference.
 
Back
Top Bottom