Bestem Top Box

Hey Gents,
I just fitted a Bestem 929 to my ST1100 find my story below:


I thought i would lay down my experince of mounting a Bestem 929 Top Box onto my 1996 ST1100.

I purchased mine from Cruiserback rest on EBAY:

http://www.ebay.com.au/itm/ST1100-Bestem-Top-Box-w-Backrest-Trunk-LED-T-box-BLK-/110721972438?pt=Motorcycles_Parts_Accessories&hash=item19c78b38d6#ht_1436wt_905

It arrived in a matter of days, I purchased mine from the USA, but they had one in Australia, so i got it quickly, and they refunded me the difference in the freight as well, so i was very happy with that!.

after unpacking it, i laid it out on the bench as you can see below in the photo, the 2 brackets on the left i think are for mounting on a scooter, i didint use them but i made use of the 4 bolts and the mounting bracket.

1.jpg


I started by making use of my mate across the road who has every tool known to man in his shed, it was quickly apparent that this brack would need some adjustment to be strong and effective, especially on the rear mounts as it lines up you have to drill though the plate where it is folded for strength, so we welded in some flat plate on both sides.

3.jpg

4.jpg


after lining up the appropriate holes, we decided against adding anything at the front as it would not have the stress the rear would have, I strongly recommend using a dril press or to drill your holes as it is very easy to make a mess if you are not careful!

when we mounted it we thought it best to use sleeves on the bolts as it made it very simple to set it ad the right height, we just used the sleeves that came with the gearsack rack that was on the bike when i bought it. i have tilted the back up slightly so the back rest comes into play for Teela on the back.

7.jpg

6.jpg

8.jpg


After that is was some killrust to make it all pretty

9.jpg


and you can see below the end result, very neat and tidy, and it is not going anyway where!

11.jpg

12.jpg


below is before and after


IMG_3980.jpg

14.jpg


for what i paid about $140, i think it is very good, it happily holds 2 helmets or a spare helmet and bits and peices, i didnt bother hooking up the brake light.

Cheers

Streak
 
Hey guys, just finished reading all 16 pages, and have a couple of questions. First of all I found a great deal on what looks to be a color matched new model for my 05 in the deep red. Has anyone bought one for their 05 recently? Here is a link on Amazon to the one I really like.

http://www.amazon.com/Bestem-T-Box-...UTF8&coliid=I2B2GK58CUW59G&colid=OD8EJEJH5C1Q

41%2BSShc3gSL._SS400_.jpg


Now here is another question. Here is a picture of my bike with the rack that a great member on here made me before my Grand Canyon trip back in August. It worked perfect!

IMG00564-20110407-1414.jpg


So I wonder how this base plate will mount up, I mean I'm sure I can figure it out, but your thoughts?

I plan on making a quick disconnect for the light, and will probably run the bike most of the time without the box, but ain't it purdy? LOL

Now onto another box. What's the opinion on something like this. It has that Goldwing look to it....let the opinions fly. hahahaha

http://www.amazon.com/Scooter-Motorcycle-Back-Trunk-Luggage/dp/B003W3R5LO/ref=pd_sim_sbs_auto_5

51OILkAaKdL._SS400_.jpg
 
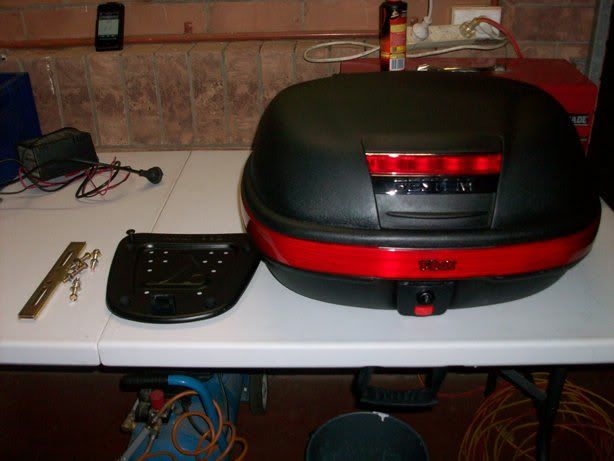
Here's the thread on my install for the Bestem 2012.
https://www.st-owners.com/forums/showthread.php?85807-Install-Bestem-2012-on-ST1100
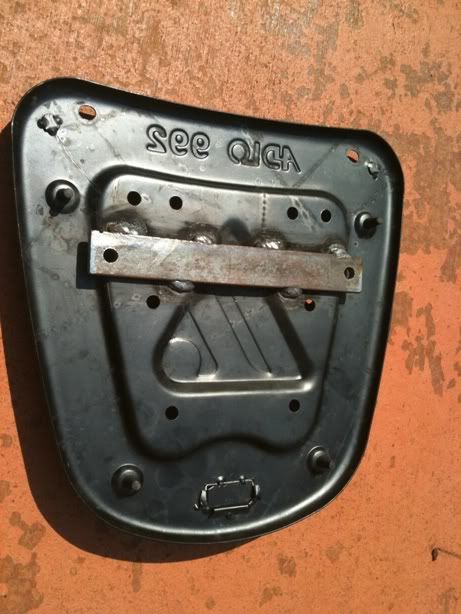
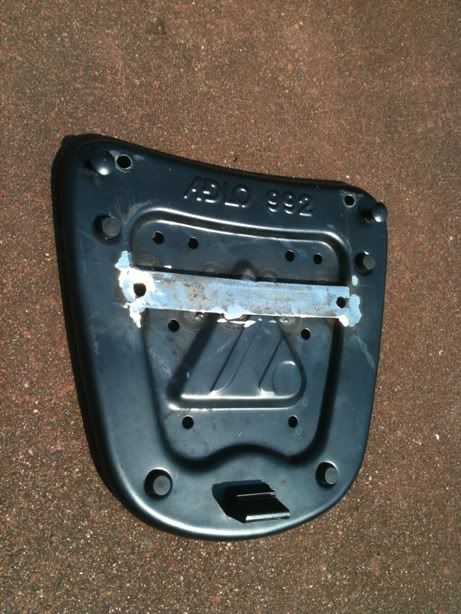
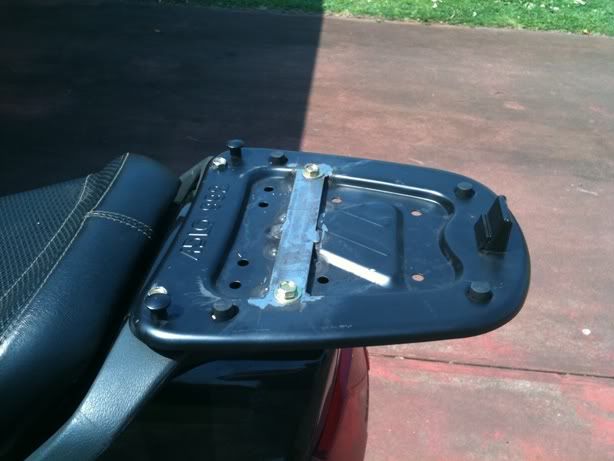
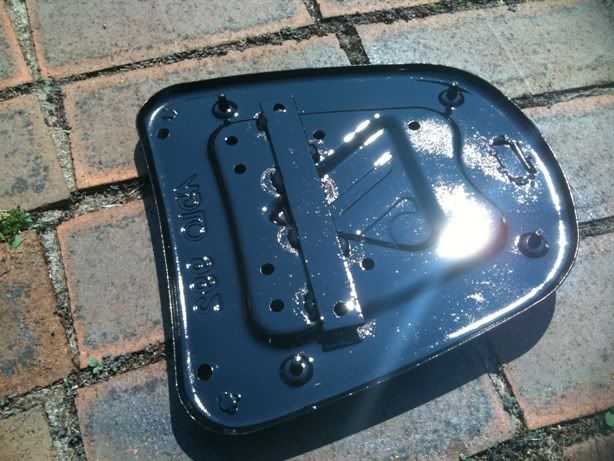
I used Valspar plastic spray paint for the cutting board/base plate bracket. Still looks good so the paint is sticking.

I modified this method a bit and installed my Christmas present from my Honey - a T-Box 929. The Bestem mounting plate for the 929 is slighly different (as you see in the pictures 3 posts ago) from the 2012 which I have on my Burgman. I mouted the cutting board to the bike and the plate to the cutting board. The metal rails extend almost to the edge of the cutting board so I'm not really worried about anything not being "attached". I'll keep an eye on the mount and screws and such, but it should be good. If all else fails, I'll break out a little glue for the threads - might do it anyway.
I guess I'll be wiring in the running and brake lights sometime soon - not real anxious for the electrical side - should be too tough though.

I know nothing EVER happens without pictures so I'll get some posted soon.
 
Here are some pictures, as promised;
Mount plate from above, I used 4 x m8x1.25x30 bolts for the plate to the board with fender washers on the underside of the board for more support.
attachment.php

Here's the underside of the board; fender washers again were used in mounting the board down to the bike and to the metal rails provided.
attachment.php

And finally, everything from the back. I bent the cutting board mounting the palte to it. Given that I used a lot of lock washers and lock nuts, I'm not too worried about it. Again, if they begin to loosen in any way I'll just put some glue on the threads.
attachment.php

And finally, the overall bike with the box;
attachment.php


It looks good to me. I'll be painting the orange strip - not sure if I'll go with the red of the cutting board, A little lighter red I found, or just paint it flat black - I guess we'll see.
Still don't have the lights hooked up; waiting for an email about a plug and play type hook-up.
 
I really wonder about the actual quality of this box. It might be too good of steal, if you know what I mean. "If it looks to good to be true...."

I have logged 30k+ miles with the Bestem 929 (I think), 46L box with no problems, nothing but perfect service. I mounted 4 bungy buddies at the corners and carry cargo topside as well. Can't see why anyone would go OEM, more that 10x the cost of the Bestem. The 46L is the largest Bestem makes and I would like to see a 55L or 60L.
 
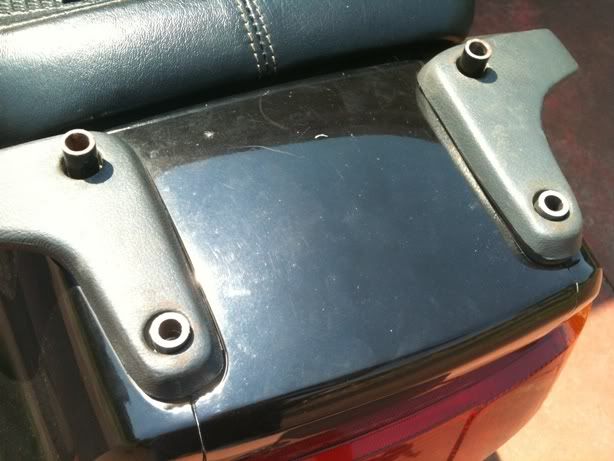
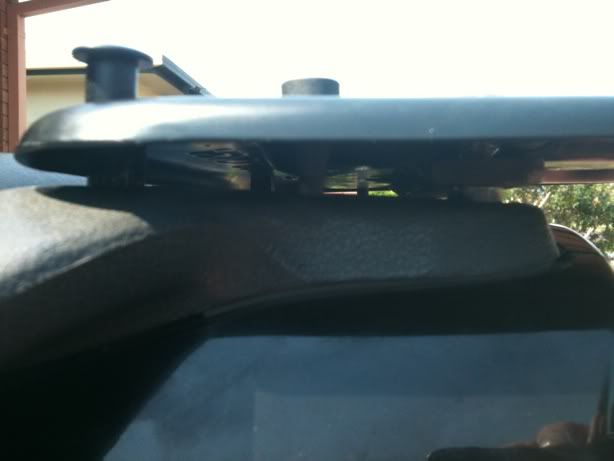
The mounting plate was installed too close to the seat. Redrill back a little and you'll be ok. I did the same thing.
 
Just installed a 2012 t-box on my red '05 St1300 .....colors are very, very close, if not identical; Try to give a step by step just in case someone needs a little help. Not saying my way is best. .....Started by taking the seat off (mine is a Sargent) .....laid a towel down in the hole near the tail light to catch my fumbles .......removed the factory plastic insert from the bike rack; .........I used the original spacers in the bike rack holes; I used the two brackets that came with the T-box ( I painted them black); I used lock nuts with the plastic inserts; I used 5/16 bolts,(two 1 1/4, four 1 1/2"), I found some black, allen wrench headed bolts (they might call them socket bolts) at Lowes (gives it a little factory look when the box is off); I painted my flat washers black.
I wanted to keep the new box mounting plate back for easy seat removal. I used the two brackets, mounting them parallel with the bike.......I drilled a 5/16 hole in one end of each bracket, as close to the end as I could & still have strength. I loosely bolted through this hole & through the bike rack with my 1 1/2" socket bolts; .........I marked the next holes in the brackets up from the bottom of the two holes in the bike rack. I offset these holes just a little to try and keep the the two brackets as far apart as I could .....I drilled the two 5/16 holes into the brackets, no bolts here yet; ..............I placed the mounting plate on the brackets, lining up the 2nd pair of bracket holes with the slotted holes of the plate(check seat clearance); .....I then marked the rear holes for the plate from up through the slotted hole of the bracket; ...I drilled 5/16 holes; I needed a couple of spacers at the rear, between the brackets & the mounting plate, to keep it level; I came up with a couple of 3/8" long nylon spacers with a 5/16 hole through them (could use washers); .......Remove the plate, tighten the front pair of bolts holding the brackets to the bike; ... Place mounting plates on brackets & install 1 1/2" socket bolts through slotted hole in plate, through drilled hole in bracket & through bike hole ; ..........install 1 1/4" socket bolts through the two holes at the rear of the plate, through the spacers, & through the bracket; tighten these four bolts; ...should be good to go ...box looks good, nice & low on the bike & easy seat removal..hope this helps someone......thanks to all who wrote before me, useful info ......great box for the price ....Doobie2 in Boynton Beach for the winter
 

Attachments

  • photo(3).JPG
    photo(3).JPG
    96.8 KB · Views: 63
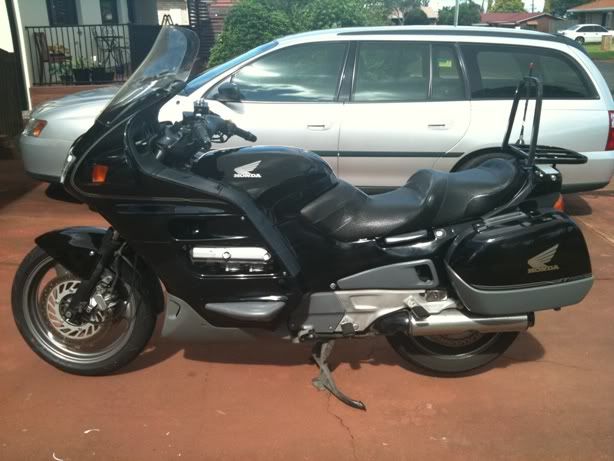
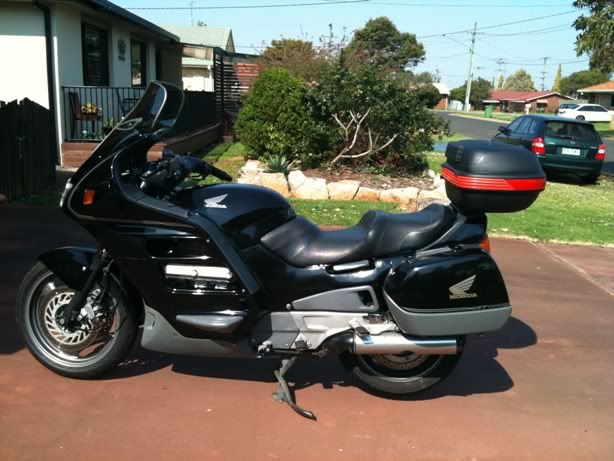
Can you post some good daylight pictures of the box on your bike? I have the 2005 and this will surely make the decision for me. Thanks. :)
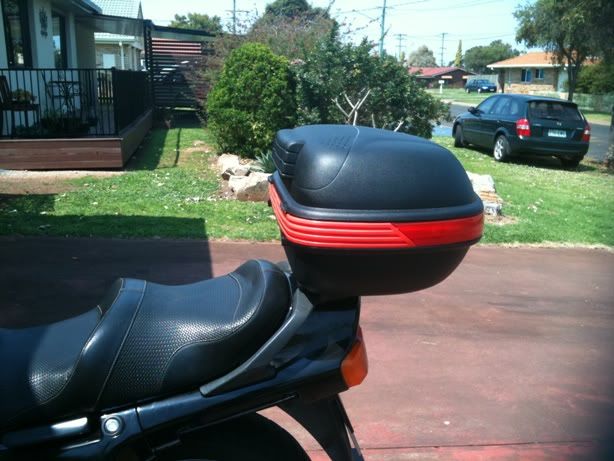
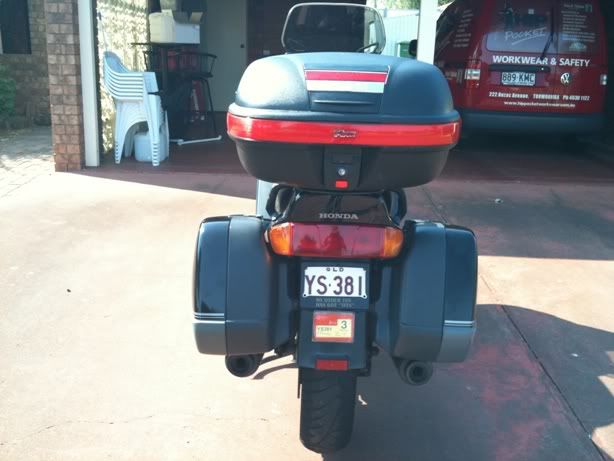
 
Here's a few for color match
 

Attachments

  • photo.JPG
    photo.JPG
    338 KB · Views: 40
  • photo(1).JPG
    photo(1).JPG
    259.8 KB · Views: 13
  • photo(2).JPG
    photo(2).JPG
    252.5 KB · Views: 45
  • photo(3).JPG
    photo(3).JPG
    214.7 KB · Views: 21
  • photo(4).JPG
    photo(4).JPG
    239.9 KB · Views: 24
I wonder why the red color on my bike looks so dark. Yours looks really red while mine looks dark cherry. Is it just the way the sun hits it?

IMG_0689.jpg


IMG_0425Large.jpg


photo-1.jpg


IMG00472-20110324-1356.jpg


IMG00173-20110208-0957.jpg
 
Be sure you order the right red. I have a 2008 and my T-Box matches the '08 very well.
BTW, I've had mine installed for 3 years and it still is in good shape and still matches the rest of the bike.

JohnConner
:rd13:
 
I purchased a Bestem 2012 T-Box from another member. It came in quick and a good buying experience. It was black and my STeed is candy glory red(08). I decided to fix the Bestem nipple on the lid. I block sanded it down with 80 grit. Applied automotive glazing putty to the voids. Sanded again and primed. Sanded and prepped the lid and painted base ground gold paint. Then I started putting coats of candy red on the lid until it looked like the cover from the ST. 3 coats of PPG clear and ready for the road.
 

Attachments

  • Bestem Mounting 9.jpg
    Bestem Mounting 9.jpg
    226.6 KB · Views: 27
  • Bestem Mounting 8.jpg
    Bestem Mounting 8.jpg
    314.3 KB · Views: 33
  • Bestem Mounting 7.jpg
    Bestem Mounting 7.jpg
    239.1 KB · Views: 28
  • Bestem Mounting 6.jpg
    Bestem Mounting 6.jpg
    423.5 KB · Views: 37
I purchased a Bestem 2012 T-Box from another member. It came in quick and a good buying experience. It was black and my STeed is candy glory red(08). I decided to fix the Bestem nipple on the lid. I block sanded it down with 80 grit. Applied automotive glazing putty to the voids. Sanded again and primed. Sanded and prepped the lid and painted base ground gold paint. Then I started putting coats of candy red on the lid until it looked like the cover from the ST. 3 coats of PPG clear and ready for the road.
MORE PICS
 

Attachments

  • Bestem Mounting 5.jpg
    Bestem Mounting 5.jpg
    380.9 KB · Views: 66
  • Bestem Mounting 10.jpg
    Bestem Mounting 10.jpg
    189.3 KB · Views: 31
  • Bestem Mounting 21.jpg
    Bestem Mounting 21.jpg
    297.4 KB · Views: 28
  • Bestem Mounting.jpg
    Bestem Mounting.jpg
    366 KB · Views: 32
HERE ARE SOME PICS OF HOW I MODIFIED THE MOUNT TO CLEAR THE SEAT. I WELDED A 3"X8" PLATE TO THE BOTTOM OF THE BKT. I DRILLED THE HOLES BEFORE WELDING AND MOVED THE MOUNTING POINTS FORWARD ABOUT 1 1/2 INCHES. A LITTLE SPRAY PAINT AND READY TO MOUNT. I USED 1X3/8X3/8 NYLON SPACERS(PART #880448) BETWEEN BRKT AND THE RACK. THIS MADE THE BOX INSULATED FROM THE HONDA PLASTIC. NYLON SPACERS AT LOWES.
 

Attachments

  • HPIM0638.jpg
    HPIM0638.jpg
    395.7 KB · Views: 41
  • Bestem Mounting 18.jpg
    Bestem Mounting 18.jpg
    311.7 KB · Views: 36
  • Bestem Mounting 16.jpg
    Bestem Mounting 16.jpg
    430.3 KB · Views: 42
  • Bestem Mounting 15.jpg
    Bestem Mounting 15.jpg
    402.9 KB · Views: 37
Last edited:
Back
Top Bottom