Air Chamber/ Duct Assembly - Why is there a screw in this hose?

Joined
Nov 11, 2024
Messages
20
Age
63
Location
The Netherlands
Bike
ST1100S
Hi all,

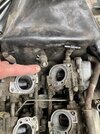
I was working on the bike of a neighbor (Honda ST1100S) and because the bike won't start after a long period of standing idle in a shed (of garage as we call that here in The Netherlands) I was removing the carbs for inspecting and cleaning. When I removed the air chamber / duct assembly I noticed, when removing the tube attached to the air chamber, a big screw inside the tube. Now, as this tube is connecting to the engine I'm wondering why there is a big screw pushed into that tube (or hose)? Why would a manufacturer push a screw into that hose? I think it's a vacuum hose, but I'm not sure and also I'm not sure why the screw is inserted? It's very hard to get the screw out of the hose and I think it's cheaper to replace the hose. But .... I can't find the hose on any of the pictures in the manuals. As yoiu are all very knowledgeble people I'm requesting your help to identify the purpose of the screw in the hose and what if I replace the hose with no screw in it (or remove the screw)? Please check the attached picture. Thanks!
 

Attachments

  • IMG_5542.jpg
    IMG_5542.jpg
    192.1 KB · Views: 76
That ain't factory - somebody before you put the screw in there. ;)
Pulling the entire carb 'set' off is not a big deal.
You have to loosen the 2 carb insulator brackets beneath each carb.
Then you gently pry upward with a broom handle or a hammer handle and they pop off.
It is easier if you remove the gas tank first as it gives you a lot more working room (beware of the tank connector buried on the left side - red connector).
 
That ain't factory - somebody before you put the screw in there. ;)
Aha! Thanks. Now I know it's not factory (Yes, I believe you Uncle Phil!) can you shed a light on the purpose of this screw insert? Is this to solve another (hidden) issue? I just can't imagine that a dealership (or someone else) pushes a screw in a hose, just for fun ... :(
There must be a reason and since I can't find the purpose of that hose (I think it is a vacuum hose) it's hard for me to understand the purpose of the screw.
 
Obviously it is to block off that vacuum line since it is clamped.
With carb mat in place, it's hard to tell what it should be going to.
Plus on this side of the pond we have the 'Pair' system which has a bunch of plumbing and hoses around the carbs.
 
That is a common way of blocking off a vacuum hose when the (shade tree)* mechanic is too lazy to remove the hose and block it at the source.

*Term describing a do it yourself mechanic
 
Could it be a hose that went to the vacuum operated fuel valve that someone has removed, or bypassed, a common practice on ST1100s when they stop working properly.? You then have to blank off the hose, usually with a 6mm screw or bolt.
 
Could it be a hose that went to the vacuum operated fuel valve that someone has removed, or bypassed, a common practice on ST1100s when they stop working properly.? You then have to blank off the hose, usually with a 6mm screw or bolt.
no
Hi all,

I was working on the bike of a neighbor (Honda ST1100S) and because the bike won't start after a long period of standing idle in a shed (of garage as we call that here in The Netherlands) I was removing the carbs for inspecting and cleaning. When I removed the air chamber / duct assembly I noticed, when removing the tube attached to the air chamber, a big screw inside the tube. Now, as this tube is connecting to the engine I'm wondering why there is a big screw pushed into that tube (or hose)? Why would a manufacturer push a screw into that hose? I think it's a vacuum hose, but I'm not sure and also I'm not sure why the screw is inserted? It's very hard to get the screw out of the hose and I think it's cheaper to replace the hose. But .... I can't find the hose on any of the pictures in the manuals. As yoiu are all very knowledgeble people I'm requesting your help to identify the purpose of the screw in the hose and what if I replace the hose with no screw in it (or remove the screw)? Please check the attached picture. Thanks!
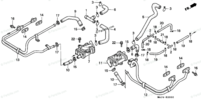
need the year of the bike, makes a difference. does t still have pair valves?
1731378955097.png
 
need the year of the bike, makes a difference. does t still have pair valves?
He wrote ST1100S, which would ID it as a '95...
PAIR was present in all EC spec models from '91/'92 onward...

Unless its an import I assume this fiche will cover it:

Likely someone attempted to disable the PAIR system over a vacuum leak, hence plugged that hose...
 
Yes I can confirm that the PAIR system is on this bike. So, that leaves me to think that PAIR system can be:

1. Left alone and leave it as is;
2. Check if the PAIR system can be repaired (are the valves available in EU?);
3. Remove the complete PAIR system;

If 3 is chosen, do I just cutoff and close the valves?

Simple question: what is the best way to progress? I'm tempting to choose option 1.
Thanks for your advice!
 
1. only if all diaphragms are still airtight (re: vacuum leak)
2. AFAIK not serviceable; source used replacements from eBay or breakers
3. eliminate vacuum tube from carbs, their air-supply from the filter-box plus install blocking plates at the head ports (loc 14 in above fiche)
 
Pair valves are not going to cause a running problem but , for now seal that hose better. Screws in vacuum hoses leak thru the treads. There was a myth that you would get better gas mileage, not true. IMO get the bike running properly before adressing the pair valve issue. You don't know what else is wrong. 95 may have the 28 amp alternator so there may be other more important things to do.
 
This something that some mechanics believe must be done to any motor vehicle. Remove or disable all emission control, a bit of research as to the operation of the component helps to know what is going to be the outcome.
The one thing that comes to mind is the very old Rotary engine in the very old Mazda, taking off the controls destroys the second rotor, recommendations were not to buy one that has been modified. EGRs are another one, the intent was to introduce inert gas into the combustion chamber to keep the combustion cool, which helps in the early fuel injection since the mapping allows for it. Disconnecting it raises the temp and I have run into it causing detonation in high mileage engines.
Since the map is hard wired into the ECM, you pretty much get a trouble code and not much else
 
This is the filtered fresh air intake hose for the PAIR system as mentioned above. Being plugged like this, will not create any sort of vacuum leak, or drivability problems. The bolt is only preventing filtered fresh air into the PAIR valves themselves. Even if the bolt/plug were missing, "unfiltered" fresh air would be drawn in and pumped into the exhaust system, without any drivability issues. Personally, if it were my bike, I'd take them out. The carbs are out and everything is exposed. Why not?

I also see that you've removed the upper aluminum carburetor plenum/snorkel assy before removing the carbs (I've seen your other thread). Bad move. You'll never get it back together easily and it will fight you every inch of the way. It'll be virtually impossible to get everything back into alignment and assembled. After you've cleaned and rebuilt the carbs, be sure to re-assemble the entire carb bank before reinstalling (upper plenum/snorkel assy).


Hi afrymoyer,

I'm very happy that I joined this group. You have a sharp eye which helps me very good. When I removed the Air Chamber/Duct Assy and I had it off I knew: Bad move! Why? Because I saw that it will take a lot of time and swearing to get it assembled again. My bad. First time ever I removed the Carbs of an ST1100 and this is exactly why I joined a team like this. So, thank you very much as it helps me a lot on my next endeavor on ST's (because I'm starting to like them, hmm maybe because of my age...)

Thank you for explaining the PAIR system as that also helps me in decision to leave it or take it out. It's not my bike but I'll discuss this with the owner and as I like the chrome pipes I think I leave it where it is and unblock the tube. I read that the PAIR system is pushing fresh air into the exhaust for emission purposes and some say it can be identified it works if you hear plopping sound from the exhaust when decelerating. So I think I leave it where it is. It is harmless if the valves doesn't work anymore and it is harmless if the valves work correctly. So, I'm in favor of leave it as it is.

Thanks again for your help and sharp eye! I'll rebuild the carbs with a set of All Balls Carburetor Rebuild kit that can be obtained here in The Netherlands.
 
...some say it can be identified it works if you hear plopping sound from the exhaust when decelerating.
Its actually more of a soft grumble while coasting....
Hard pops could be an indication of a vacuum leak...
I'll rebuild the carbs with a set of All Balls Carburetor Rebuild kit that can be obtained here in The Netherlands.
Based on experience (also/especially on 70ies & 80ies retro bikes) I would advise against aftermarket carb kits and prefer OEM...
Pattern kits stand out by sloppy finish, wide tolerances, sometimes won't fit or don't seal properly in the case bore, jets and gaskets/O-Rings included are just plain wrong for the model/version at hand, and the used alloys just love to corrode...
(on a 70ies SOHC the old but thoroughly cleaned OEM brass worked fine, attempts to use the Keyster kit only gave headache...)
 
That ain't factory - somebody before you put the screw in there. ;)
Pulling the entire carb 'set' off is not a big deal.
You have to loosen the 2 carb insulator brackets beneath each carb.
Then you gently pry upward with a broom handle or a hammer handle and they pop off.
It is easier if you remove the gas tank first as it gives you a lot more working room (beware of the tank connector buried on the left side - red connector).
Thanks @Uncle Phil

I removed the carbs without removing the fuel tank. Finding all the four screws to loosen up the carb brackets was a bit of a puzzle (for me).
They came off easily (lift them from the engine with my bare hands).

Thanks
 
Its actually more of a soft grumble while coasting....
Hard pops could be an indication of a vacuum leak...

Based on experience (also/especially on 70ies & 80ies retro bikes) I would advise against aftermarket carb kits and prefer OEM...
Pattern kits stand out by sloppy finish, wide tolerances, sometimes won't fit or don't seal properly in the case bore, jets and gaskets/O-Rings included are just plain wrong for the model/version at hand, and the used alloys just love to corrode...
(on a 70ies SOHC the old but thoroughly cleaned OEM brass worked fine, attempts to use the Keyster kit only gave headache...)
You convinced me @ST1100Y !

I'll replace the seals with OEM seals and clean the other stuff thoroughly.
We'll see how that will work as I have some confidence in my own cleaning skills (I'll do this for the first time, so I think I can do it :))

Thanks!
 
Thanks @Uncle Phil

I removed the carbs without removing the fuel tank. Finding all the four screws to loosen up the carb brackets was a bit of a puzzle (for me).
They came off easily (lift them from the engine with my bare hands).

Thanks
Yes, the screws can be a bit of a 'hunt' to find - especially if the previous 'remover' did not put them where they should be.
They can be right or be 180 degrees off ... ;)
 
Back
Top Bottom