I installed keyless ignition on my st1300 and someone requested info on how it was done so i have put together this instructional to help anyone who may be interested in doing something like it.
How to install Bluetooth ignition on your ST
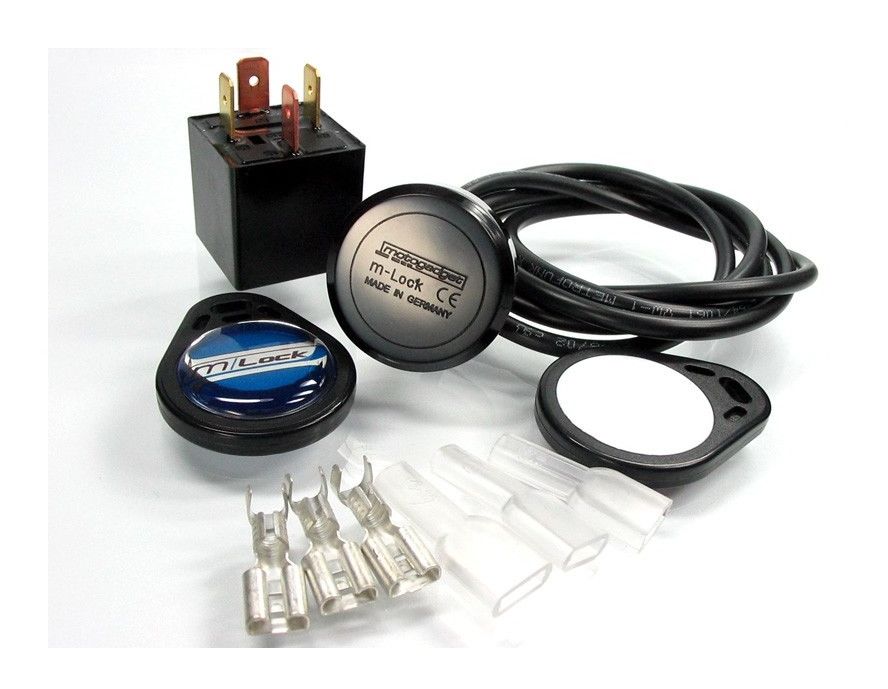
Parts needed:
1)Bluetooth relay module- Here is the one I got but the internet is full of similar items http://www.tinyosshop.com/index.php?route=product/product&path=141_144&product_id=906
I got a 2 relay board because it was the smallest they had and I figured I could come up with something else to control with the second relay. This board only has 10 amp relays which is not enough for the ignition, so I used the small relay on the board to trigger a larger external relay that can handle the current. Some of the other boards I referred to that are available had much larger relays but were much more expensive, along the lines of 5x the cost.
2)These boards run on 5 volts so I needed a step down converter http://www.tinyosshop.com/index.php?route=product/product&product_id=625
3)I got a small project box to house the module
4)Relays- Amazon has lots of relays. I bought a pack of 5 for 20 bucks and used 3, 2 for the ignition system and 1 for a garage door switch. I will carry the other 2 as spares. I only needed SPST but got SPDT in case I wanted to utilize the NC function for future use. The relay for the ignition must be 30 amp
5)wire- 12 gauge- approx. 15 feet
16 gauge for everything else
6)misc. items like connectors, solder, shrink tube, fuses, grommets, etc,
How it Works
The St gets a 30 amp feed directly to the ignition switch which then, when turned on sends the power to fuses A,B,D,E and F through 3 wires coming from the ignition. I piggybacked a relay to do exactly the same thing as the ignition switch so the bike will come on with either. Then I used the Bluetooth relay to trigger the ignition relay.
Install
First, a schematic:
Sorry this was the best I could do but it does explain the system. The black wires are original wiring, the red are the added wires. I was unable to explain the “ghost†relay just above the kill switch in this schematic, but I will explain it later. It involves modifying the factory kill switch
Start with the factory fuse for the ignition. It is a 30 amp fuse just aft of the battery. Here is a pic with the boot pulled up for clarity
Fortunately there was an empty, fused terminal beside the ignition wire that I was able to just slide a blade connector onto (yellow circle). No need to cut into the factory ignition wire. The 12 gauge wire goes to terminal #30 on the 30 amp relay. From terminal #87, I ran another 12 gauge wire to the ignition switch harness at the steering head. I looked at going shorter but it is so cramped behind the factory fuse blocks. It was just so much easier to do it up front and it all accomplishes the same goal. I tapped the 12 gauge wire into the 3 wires coming from the switch heading for the fuse block. When that relay fires, it replicates turning the key on. Now to make the Bluetooth module trigger the relay. I installed a secondary fuse block, but you could run the power for the BT module from an inline fuse or tap into the quartet harness. It is a very low draw. Power goes to the 5volt converter and to terminal #30 of the onboard relay. It is a double throw relay so I wired in an led to the normally closed terminal, #87a (this led in the dash tells me the system is armed but goes out when activated so im not looking at a red led all the time im riding) and from terminal #87 run a wire to the coil of the 30 amp relay, terminal #85. Ground terminal #86 of the 30 amp relay and its ready to go. Install the app on your phone and you are pretty much done.
Now, as it stands, the system is always on and armed because it has always-on power. I wanted a way to shut the system off when not using the bike. I wanted to wire it up to the kill switch. Problem is, the kill switch doesn't get power until the ignition is on. The only way to do that is to separate the switch from the system, feed constant power to it and have it trigger a relay which would then perform the function that the factory switch did.
The above pics show the before and after switch cluster wiring. I hope the original author of this schematic doesn't mind me using a snippet of it. It is a really well done schematic. The keyless ignition system will now shut off with the kill switch. One potential problem I could see happening is that if the kill switch relay were to fail, the bike will not run. it would simply mean replacing it… a simple 2 minute job, except I installed the relay on the frame near the coil. It would take an hour to remove the Tupperware to swap the relay. Nobody wants to do that in a parking lot. So as an added safety, I installed a jumper across terminals 30 and 87 and ran the wires out to underneath the seat and put an inline fuse holder. If the relay ever fails, I just need to remove the seat and install a fuse in the holder and it will bypass the relay until I can get home and replace it. This doesnt show in the schematic because I didnt think of it until after I did the schematic online and I couldnt bring it back online to edit it
While I was in the switch, I added a pushbutton for my garage door opener…
This switch is run through another relay that is triggered by switched power, so the garage door remote can only operate with the bike on. This way nobody can open my garage if my bike is sitting in the driveway but im not around.
This pretty much covers everything I did. This is the first time I have done any kind of instructional or tried to transfer what is in my head into print. I hope it is understandable. Any questions, dont hesitate to ask
How to install Bluetooth ignition on your ST
Parts needed:
1)Bluetooth relay module- Here is the one I got but the internet is full of similar items http://www.tinyosshop.com/index.php?route=product/product&path=141_144&product_id=906
I got a 2 relay board because it was the smallest they had and I figured I could come up with something else to control with the second relay. This board only has 10 amp relays which is not enough for the ignition, so I used the small relay on the board to trigger a larger external relay that can handle the current. Some of the other boards I referred to that are available had much larger relays but were much more expensive, along the lines of 5x the cost.
2)These boards run on 5 volts so I needed a step down converter http://www.tinyosshop.com/index.php?route=product/product&product_id=625
3)I got a small project box to house the module
4)Relays- Amazon has lots of relays. I bought a pack of 5 for 20 bucks and used 3, 2 for the ignition system and 1 for a garage door switch. I will carry the other 2 as spares. I only needed SPST but got SPDT in case I wanted to utilize the NC function for future use. The relay for the ignition must be 30 amp
5)wire- 12 gauge- approx. 15 feet
16 gauge for everything else
6)misc. items like connectors, solder, shrink tube, fuses, grommets, etc,
How it Works
The St gets a 30 amp feed directly to the ignition switch which then, when turned on sends the power to fuses A,B,D,E and F through 3 wires coming from the ignition. I piggybacked a relay to do exactly the same thing as the ignition switch so the bike will come on with either. Then I used the Bluetooth relay to trigger the ignition relay.
Install
First, a schematic:
Sorry this was the best I could do but it does explain the system. The black wires are original wiring, the red are the added wires. I was unable to explain the “ghost†relay just above the kill switch in this schematic, but I will explain it later. It involves modifying the factory kill switch
Start with the factory fuse for the ignition. It is a 30 amp fuse just aft of the battery. Here is a pic with the boot pulled up for clarity
Fortunately there was an empty, fused terminal beside the ignition wire that I was able to just slide a blade connector onto (yellow circle). No need to cut into the factory ignition wire. The 12 gauge wire goes to terminal #30 on the 30 amp relay. From terminal #87, I ran another 12 gauge wire to the ignition switch harness at the steering head. I looked at going shorter but it is so cramped behind the factory fuse blocks. It was just so much easier to do it up front and it all accomplishes the same goal. I tapped the 12 gauge wire into the 3 wires coming from the switch heading for the fuse block. When that relay fires, it replicates turning the key on. Now to make the Bluetooth module trigger the relay. I installed a secondary fuse block, but you could run the power for the BT module from an inline fuse or tap into the quartet harness. It is a very low draw. Power goes to the 5volt converter and to terminal #30 of the onboard relay. It is a double throw relay so I wired in an led to the normally closed terminal, #87a (this led in the dash tells me the system is armed but goes out when activated so im not looking at a red led all the time im riding) and from terminal #87 run a wire to the coil of the 30 amp relay, terminal #85. Ground terminal #86 of the 30 amp relay and its ready to go. Install the app on your phone and you are pretty much done.
Now, as it stands, the system is always on and armed because it has always-on power. I wanted a way to shut the system off when not using the bike. I wanted to wire it up to the kill switch. Problem is, the kill switch doesn't get power until the ignition is on. The only way to do that is to separate the switch from the system, feed constant power to it and have it trigger a relay which would then perform the function that the factory switch did.
The above pics show the before and after switch cluster wiring. I hope the original author of this schematic doesn't mind me using a snippet of it. It is a really well done schematic. The keyless ignition system will now shut off with the kill switch. One potential problem I could see happening is that if the kill switch relay were to fail, the bike will not run. it would simply mean replacing it… a simple 2 minute job, except I installed the relay on the frame near the coil. It would take an hour to remove the Tupperware to swap the relay. Nobody wants to do that in a parking lot. So as an added safety, I installed a jumper across terminals 30 and 87 and ran the wires out to underneath the seat and put an inline fuse holder. If the relay ever fails, I just need to remove the seat and install a fuse in the holder and it will bypass the relay until I can get home and replace it. This doesnt show in the schematic because I didnt think of it until after I did the schematic online and I couldnt bring it back online to edit it
While I was in the switch, I added a pushbutton for my garage door opener…
This switch is run through another relay that is triggered by switched power, so the garage door remote can only operate with the bike on. This way nobody can open my garage if my bike is sitting in the driveway but im not around.
This pretty much covers everything I did. This is the first time I have done any kind of instructional or tried to transfer what is in my head into print. I hope it is understandable. Any questions, dont hesitate to ask
Attachments


Last edited by a moderator: