Snowed in, project time.

sirbike

Site Supporter
Joined
Feb 26, 2007
Messages
879
Location
Cleveland OH
Bike
2006 ST1300A
This is the longest that I’ve been snowed in in a while. About six weeks now. I rode a thousand miles in January a few years ago.

When I’m not riding I think buying.
For better or worse I just missed the opportunity to buy a 5th gen VFR. 877cc.

I put the buying momentum into the ST1300 budget.

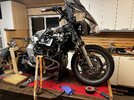
I wanted to do my 2006 but they way they were parked the 09 involved less moving around on the ice sheet. I screwed plywood to the ground to make a halfway safe path.

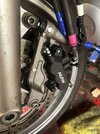
First stop Galfer. Stainless brake and clutch lines. Apparently no one has asked them or I got lucky that they took it on. If all goes as planned there will be a sku for 2008+ ABS in a few weeks.

Getting to the brake lines required this except air box and except for removing the front wheel which was still needed anyway for a clear view for pictures for Galfer.
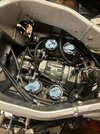
As I understood it they wanted a neat progression from the master cylinder to the calipers and I couldn’t really figure out how to do that. The 50 pictures were too much to digest. I was concerned about the line that goes from above, wraps by its fitting on the SMC and continues to the caliper. There is no room for error. For the level of accuracy that they are looking for, and to make for easy spatial orientation, I mounted the parts and sent a simplified set of corresponding on bike pictures.
IMG_8305.jpegIMG_8306.jpegIMG_8303.jpegIMG_8301.jpeg


I’d be curious if anyone changed rear lines without taking the lower gas tank. If nothing else, it was easy to access this way. IMG_8207.jpegIMG_8201.jpegIMG_8198.jpeg

At this point of disassembly I noticed the clutch slave cylinder lines will be easier to see and install if I take off the swing arm.
The pivot grease is 15 years old and probably fine for another but we’ll do it anyway. Who knows we might see something else along the way.

Getting the pivot bolt loose took a lot of effort. Once loose it still took too much effort by my feel. No undo resistance once pressure came off the bearings. Pull it out, no corrosion.
Bring the bolt to the torque spec and fall quite short of where it was. IMG_8288.jpeg
 
Clutch slave. Who needs to take the engine out when you can just do this? ;)
IMG_8363.jpeg

Being in it for the long run, I am replacing a lot of rubber bits.

Leaking coolant was a motivation.
Four hoses leaking on this 23,000 mile bike. When I thought to check on the last two leakers, the torque didn’t seem that low and the hoses looked crimped down pretty tightly.
IMG_8319.jpeg

There was coolant in the valley.
I put compressed air to the square hole. No air seemed to reach the valley hole. Now after a look I don’t think there air was blocked, just not strong enough to get there. Even with that I am glad to clean out some debris partially blocking the drain path.
The gasket was rather flat and some surface needed cleaning.
IMG_8349.jpeg
IMG_8355.jpeg

I was extra careful this time working into the valley.
Stuffed bodies as usual.
Blew out as much as debris I could before taking out throttle bodies. Then spent time gently prying the boots while lubing them. Did plenty light effort pry on the bodies to exercise the lube in.
Then final pry was about the easiest I’ve done. Maybe the same amount of time, patience vs brutality.
Stuffed then capped the boots.
Vacuumed then blew out more debris.
Lift rubber mat. More cleaning careful not to get the alternator involved.
IMG_8362.jpeg

The steering bearings felt brinelled at this low mileage in part due to me thinking I want a different spring than DMR specified. The DMR cartridges are a huge improvement damping but I do need the springs that he specified to avoid kissing bottom out.

The SMC wasn’t activating properly when I bought this bike.
I rode it home like it would lock up anytime. 400 mile to home.
While doing errands to get it licensed and such it abruptly started working fine. I got comfortable with it over time but it is getting replaced now.
Fluid in the calibers was light grey. Must have been changed somewhere along the way.
Front brake and clutch master cylinders were weeping.
IMG_8351.jpegIMG_8350.jpeg

These pans were $1.25 at a dollar store. Handy.
IMG_8357.jpeg
Turning the corner of tear down to assembly was installing seals in the calipers followed by a rebuild kit in the rear MC.

Then we go on a ten hour detour.
A complete inventory missing and present wrenches and sockets. I had a bicycle shop with multiple sets.
These drawers were ok but IMG_8360.jpegIMG_8359.jpegIMG_8364.pnglooking tattered a couple days ago.
I boxed all the extras.

I see more parts arriving.
 
Any bets i'm calling Galfer in a few weeks :). Looks like you're doing a thorough job there sir!
He sounded a little concerned about it being a one off.
He also sounded like a let’s get it done guy.
I said I hope not, I going to tell some st owners about this.
 
I made it back to working on the bike for a few hours.
New steering bearings installed.
Having handlebars attached to the triple clamp via rubber, I don’t know about that. Now they are hard bolted.
I prefer a shorter reach to the clutch lever. I disassembled it, ground a little off by the adjuster wheel, installed new brass bushing and master cylinder rebuild kit.
It’s nice to see a little bit coming back together.
IMG_8416.jpeg
IMG_8410.jpegIMG_8419.jpegIMG_8412.jpeg
 
Last edited:
Well dang, that's quite the project!
And here I thought swapping engines was a PIA!

As far as you had it stripped down, you probably could have gotten to the Clutch Slave. I've replaced a couple with it in place.

DSC03706.JPG

DSC03732.JPG

But this time, it will be easier to get to:

20250224_EngineDolly2.jpg

Along with replacing a bunch of seals and orings. I also picked up a new harness to the knocks sensors. I'll get it all installed before I put the engine in the 2005 frame.

It looks like you're having some fun, I'll have to keep watch here, never know, I might learn something new! :unsure:
 
@SupraSabre I’m watching what you are doing. Great timing.
Followed your lead using fuel injector line clamps on the smaller lines. I don’t think the ST 1300 elbows leak like the 1100 elbows but “if he did it I’ll do do it”

Look at the shape of the little worm drive clamps.

I had a perfect few hours to put into the project. Drove to McMaster-Carr to pick up some constant tension clamps for the bigger hoses. The springs on these are huge. Took some organizing to fit well but all looks good including a test fitting of the throttle bodies.

Installed all new water pipe hoses. Removed and replaced one at a time to keep track of routing easily.

Got the water pump cover with new gasket installed.

Thinking about the thermoplastic clamps, I realize that assembling the elbows, hoses to thermostat and upper radiator hose together off the bike would allow easy access with heat gun. I may do that on the next bike with constant tension clamps at the radiator.

Getting the radiator mounted was visually satisfying.

IMG_8442.jpegIMG_8440.jpegIMG_8443.jpeg
 
@SupraSabre I’m watching what you are doing. Great timing.
Followed your lead using fuel injector line clamps on the smaller lines. I don’t think the ST 1300 elbows leak like the 1100 elbows but “if he did it I’ll do do it”

Look at the shape of the little worm drive clamps.

I had a perfect few hours to put into the project. Drove to McMaster-Carr to pick up some constant tension clamps for the bigger hoses. The springs on these are huge. Took some organizing to fit well but all looks good including a test fitting of the throttle bodies.

Installed all new water pipe hoses. Removed and replaced one at a time to keep track of routing easily.

Got the water pump cover with new gasket installed.

Thinking about the thermoplastic clamps, I realize that assembling the elbows, hoses to thermostat and upper radiator hose together off the bike would allow easy access with heat gun. I may do that on the next bike with constant tension clamps at the radiator.

Getting the radiator mounted was visually satisfying.

IMG_8440.jpeg

Dang, those are LARGE clamps!

My son that has my original 2005, is the one that turned me on to the Gates Thermo clamps & the injector clamps, when he chased down a leak he had back in 2014.
 
Well dang, that's quite the project!
And here I thought swapping engines was a PIA!

As far as you had it stripped down, you probably could have gotten to the Clutch Slave. I've replaced a couple with it in place.
Oh yeah, I got that. Easiest one that I have done.

When I saw the new slave seal I thought it was the wrong size.
IMG_8429.jpegIMG_8430.jpeg

I am expecting new throttle body insulators too next week.

Usually I strip the fork legs completely down but at 8000 miles since doing that, I opted to drain, fill to flush, drain and refill.
A homemade tool that came with an ST that I bought is very handy for stroking the damper rod.
IMG_8461.jpegIMG_8458.jpegIMG_8451.jpegIMG_8457.jpeg
 
Excellent progress!

I'll probably have to do the forks also, we'll see after I get it back on the road! :)
 
I’ve been in the shop a little bit between maple syrup tasks.
Exhaust came back from Jet Hot.
Yeah I bought the ticket for that ride. I am sure that I will be able to add to the pool of opposing opinions.
Now the calipers have new pads, pad springs, rubber boots and bushes, and piston seals along with new SMC.
Nice to get the upper fairing and mirrors on.
Upper radiator hose came to complete all new hoses.

Last night I wanted to install the throttle body assembly. Being tired I just did the easy task to install the insulators.
Putting all new TB tubing on today.

I caught myself reaching to set a tool on the back of the bike. Oops, it’s not there.
 

Attachments

  • IMG_8474.jpeg
    IMG_8474.jpeg
    199.7 KB · Views: 11
  • IMG_8470.png
    IMG_8470.png
    1.2 MB · Views: 8
  • IMG_8488.jpeg
    IMG_8488.jpeg
    172.6 KB · Views: 8
  • IMG_8480.jpeg
    IMG_8480.jpeg
    259.5 KB · Views: 8
  • IMG_8489.jpeg
    IMG_8489.jpeg
    152.3 KB · Views: 8
  • IMG_8472.jpeg
    IMG_8472.jpeg
    289.7 KB · Views: 8
  • IMG_8494.jpeg
    IMG_8494.jpeg
    218.8 KB · Views: 11
Looking good. I hope you found that missing tool! :unsure:

When I install the throttlebody insulators, I use a little dab of plumber's grease on the insulators. Makes it easier to get them on.
 
Back
Top Bottom