Setting Up A Camping Tarp Shelter

Uncle Phil

Site Supporter
Joined
Feb 26, 2007
Messages
10,755
Age
71
Location
In The Holler West Of Nashville, Tennessee
Bike
4 ST1100(s)
2024 Miles
021635
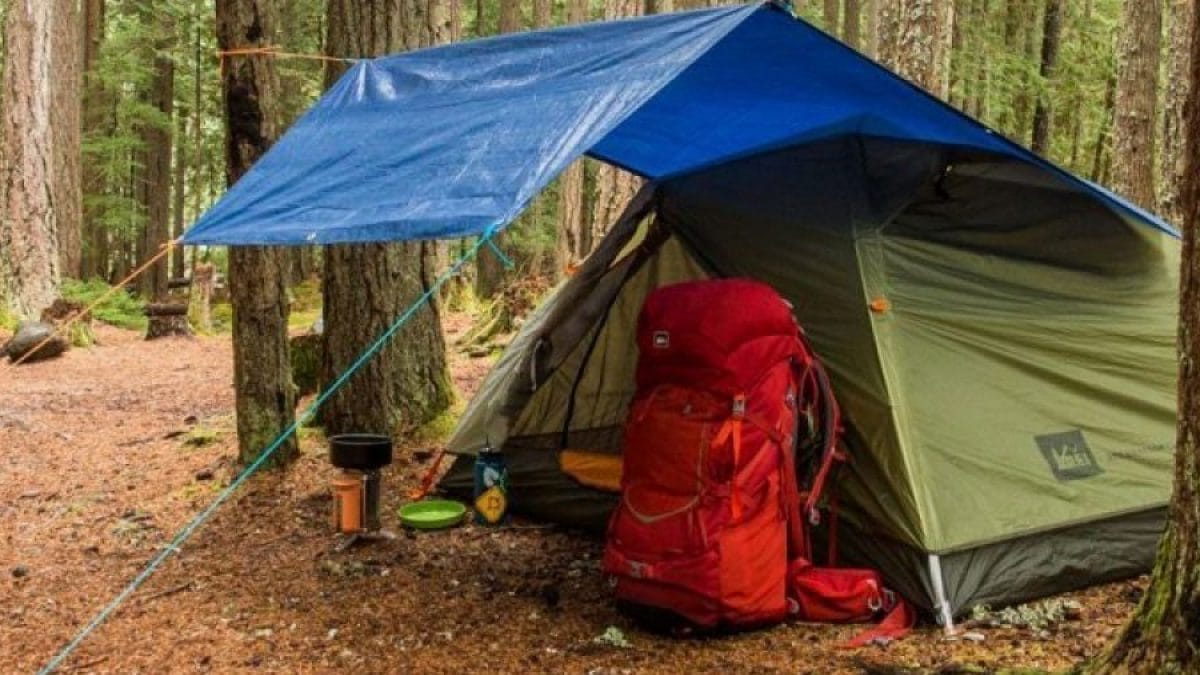
Working on my tarp setup for Newfoundland -

Tarp Total View Small.jpg

The problem is trying to figure out how to get rid of the middle 'sag' which will become
a rain 'bucket' when it rains -

Tarp Middle Sag Small.jpg

I've tried to move the poles out as far as I can, tightened the guy ropes as much as can, etc.
Ideas from this august assembly? :biggrin:
 
One more adjustable pole in the middle. With a tennis ball on top of it to prevent poking through the tarp. Or you could add another grommet in the middle...
Or just lower the back side so the water runs off instead of laying on top.
 
Phil, you need something underneat the middle, that is, a piece of rope, from one pole to the other one, in diagonal.
You can join the 4 corners with two piece of ropes, that will intersect in the middle.
Then, a piece of something light, that will act as a spacer, just to create a small bump in the middle of the tarp.

Other possibility, use only 2 poles to create a two slope roof.
 
I think you need a ridge line in the middle.

Here is what I have set up over my hammock.
it could be better, with two pieces of rope to keep it taught, but for now it’s good enough.
 

Attachments

  • D6B68CED-E6E0-4B2B-BEE9-0E755CB85FA8.jpeg
    D6B68CED-E6E0-4B2B-BEE9-0E755CB85FA8.jpeg
    249 KB · Views: 39
Possibly a couple poles arched diagonally across top of poles. Sounds like a bit more trial and error.
 
Phil, you need something underneat the middle, that is, a piece of rope, from one pole to the other one, in diagonal.
You can join the 4 corners with two piece of ropes, that will intersect in the middle.
Then, a piece of something light, that will act as a spacer, just to create a small bump in the middle of the tarp.

Other possibility, use only 2 poles to create a two slope roof.
Already tried the ridge lines - straight across and corner to corner.
The problem is because the poles are 'free standing' I just can't seem to get enough slack out of the lines to do any good.
I'm beginning to think that Schlep's idea of a center pole may be the only fix.
But keep the ideas coming as I hate to have to carry another pole if I don't have to.
I plan to leave it up for a few days to see how it reacts the wind, rain, etc.
 
But keep the ideas coming as I hate to have to carry another pole if I don't have to.

OK. Another possibility, keep 4 poles, but with a single slope roof. So, have a shorter "wall". Like this, no wather will get trapped in the middle. Instead, it will get trapped on the lower side of the tarp.
Then, a short rope tied from the middle of that lower side, to the ground, will create a groove and a dripping point.

Test it with your water hose.

Also, you will need the heavier ground stakes. And... I would make a square the same size of my tarp, with rope, with a small one inch loop in each corner, to hold firmly the top of each poles against the 2 other ropes that hold your poles.

Ahhh, a picture worth a thousand words, right ? So, maybe this hand drawing worth a dozen. A dozen words, not a dozen thousand.
20220624_170550.jpg
 
Last edited:
IMG_0041.JPG
My take on this is that your tarp is too small for what you want to do and you don't use enough tie-downs. I wish I had a pic of the whole set-up.(the trailer and tent wasn't mine.
This tarp has 4 poles and 10 tie-downs. no center rope across the peak. I had a picnic table large enough for 8 adults and room for chairs at each end. Granted one side of the table was close to the tarp but people could still on that side of the table and not be bothered with any movement from the tarp. Hope this helps your dilemma.
 
Last edited:
This issue is exactly why I preferred to set up my tarp with tall poles in opposing corners and very short poles in the other opposing corners to create a high diagonal ridge with plenty of run off to either lower corner. Unless you can find a way to fix a center pole to stay centered and straight up then that won't work very well. I know it's a convenience to have the tarp high enough to stand up everywhere under it but that's not always realistic without really tall poles or some kind of framework like found with the Easy-Up kind of canopies.

IMG_20200806_095718.jpg
 
My take on this is that your tarp is too small for what you want to do and you don't use enough tie-downs.
The tarp is a 10X8 which is exactly what I want - (tent is 8 feet wide).
Just enough space I can stand up under it and pack up when it is rainy with the back edge just over the tent entrance.
I've played around with more tie-downs but it does not seem to solve the 'sag' problem.
I've currently got 8 tie-off points right now (you said you use 10).
The key is it has to be freestanding - no trees, vehicles, tables, etc. to tie off to.
I'd like to see a 'full' picture of your 'rig' to get an idea where you put your tie-offs (angles and placement and such).
 
Last edited:
Right now I've got a 'center pole' (1 1/2" PVC pipe) that improved the set up.
It's cut in the same lengths as the metal poles and I am hoping I can 'store' a couple of sections of metal poles inside each one.
That would save a lot of 'toting' space for sure.
My big concern now is how it will 'perform' with wind and rain.
A storm is supposed to come in Sunday night so I guess I'm fixin' to find out!
 
well, I wish I had one. The lower edge on the left side of the tarp I used a tie-down in each hole
and the ones you can see are duplicated out of sight.
 
2 tall poles and a ridgeline between the 2 and keep 2 prusiks on the ridge line to pull your tarp taught. Don't rely on using the ridgeline rope to tighten the tarp...use the prusiks tied to the ridgeline and to the either end of the tarp. Loooooong piece of cord made with dyneema for your ridgeline. Just my 2 cents. I'd also skip the shorter two poles in the photo if it was my setup...the height advantage for the effort is minimal. I have to admit thought the photos in the thread with the kelty tarp show a sweet setup which obviously works well for that individual.
 
Back
Top Bottom