Has anyone used a rattle can to repaint any body panels. I can get the correct color coded paint at a body supply store but am wondering how good and smooth it will come out. I dropped the bike and scuffed the mirror housing and want to repaint it but don't know good it will look. They can match the paint. Any suggestions

You are using an out of date browser. It may not display this or other websites correctly.
You should upgrade or use an alternative browser.
You should upgrade or use an alternative browser.
Rattle can paint
- Thread starter bignslo
- Start date
It should work out okay . I have done a few with this paint and results where very good . Take time to put on many thin coats and you may need to wetsand in between .
Uncle Phil
Site Supporter
What color? If it is the 96/97 R158P (Pure Pearl Red), it has an undercoat, a top coat, and a clear coat.
If you get really good quality paint and are patient, you can get it right.
I always use Colorite for my paint as they are dead on for color match.
They are expensive but high quality.
I've used their rattle cans to repaint a faded tail piece (in the above red) and you can't tell it from factory.
If you get really good quality paint and are patient, you can get it right.
I always use Colorite for my paint as they are dead on for color match.
They are expensive but high quality.
I've used their rattle cans to repaint a faded tail piece (in the above red) and you can't tell it from factory.
I've used spray cans mixed to the factory paint code from an auto body and paint supplier on a couple of cars. They were spot on color. Of course it is best if you are painting an area that can be masked at a seam or trim line.
If I every scratch up the panniers on my 2004 ST1300, I would definitely do it if they can mix the Honda motorcycle paint codes.
If I every scratch up the panniers on my 2004 ST1300, I would definitely do it if they can mix the Honda motorcycle paint codes.
Uncle Phil
Site Supporter
Colorite provides the Honda matching colors in rattle cans, touch up kits, and bulk if you need it - and it is always dead for color match.If I every scratch up the panniers on my 2004 ST1300, I would definitely do it if they can mix the Honda motorcycle paint codes.
I did the top box with the 3 part Color Rite system. Most people can't tell the difference. It took 6 coats of the red before I got the right match.
Did it take 6 coats because it got darker each coat?I did the top box with the 3 part Color Rite system. Most people can't tell the difference. It took 6 coats of the red before I got the right match.
I have found that the paint chemistry and delivery systems in modern aerosol spray cans has really improved over the years. And with vendors like ColoRite providing base, color, and clear coats that perfectly match the factory paint, pretty amazing results can be achieved in a home garage or work space that rival what a professional paint/body shop can do IME.
But the secret (to the extent it really is a secret) is that preparation of the parts for paint is the key to great results and the most time-consuming part of the entire job. Actually laying down the top coats of paint is the fun part compared to the all the priming, sanding, and more sanding that needs to be done before getting to that point.")
But the secret (to the extent it really is a secret) is that preparation of the parts for paint is the key to great results and the most time-consuming part of the entire job. Actually laying down the top coats of paint is the fun part compared to the all the priming, sanding, and more sanding that needs to be done before getting to that point.
OP
OP
thanks for the quick replys. I'm only painting the mirror/signal housing, but if it turns out great I'll also do the pannier. most of it buffed out. I'm working on a 2005 color code R151CU Candy Graceful Red, single stage.
ST1100Y
Site Supporter
Nothing "single" on Honda's Candy colors...... color code R151CU Candy Graceful Red, single stage.
As UP already pointed out a 3-layer color...
Gray primer, metallic base layer, a dyed metallic(!) clear coat...
Many variations in/due flake shade, size, numbers... shake very well before applying...
jfheath
John Heath
Yes - the candy reds are quite awkward to get right. They require a layer of sparkly silver paint, layers of the translucent (candy) red colour and then a waterproof clear lacquer. The clear lacquer changes the appearance of the finished coat quite significantly. You will not be able to guess the colour that you need before you apply the lacquer.
I took a plastic spectacle case and sprayed it - a single 'stroke of spray from left to right' - and let it dry. Repeat until the glasses case was completely covered.
By a single stroke I mean I pressed the nozzle to the left of the glasses gas and kept it down as I wafted it quickly from left to right, only letting go when I had passed the end of the case.
What you get is a fine dusting and it might take 4-6 of these passes to cover completely. It dries quite quickly though.
Then I did the same with one pass of red. Let it dry.
I placed a strip of broad masking tape over the left hand end.
Then repeated a second dusting of the entire glasses case. Let it dry, and placed a second strip of masking tap to the right of the first.
Repeat, gradually masking off additional strips from the left hand end. I stopped at 7 times - but the first few wafts were so obviously wrong that I didn't start masking until the third pass.
In the end, when you take the masking tape off, you have 7-12 strips showing the colour when you have sprayed it with one, two, three, etc coats.
So in my case I had strips that showed the colour after 3, 4, 5, 6, 7, 8 , 9 spray passes. What you should have is a darkening red colour - tending toward purple, which still shows the glint of the silver. There is no point in continuing if the final coat makes the layers so opaque that the silver cannot be seen trhough the red.
None of these colour strips will match the colour of the bike. They will not even be close. Don't be alarmed.
Then take some newspaper and tape down a strip of newspaper to cover the top half of the glasses case. So you can see the bottom half of the 7-12 strips that you have just spray-painted.
Waft these exposed strips with 3 or 4 passes of lacquer. Again just one pass at a time - until you are happy with the finish. (You may wish to mask off a long strip to see if there is any difference between 3 and 4 passes of lacquer). I didn't.
Remove the masking tape so that you can see the unlacquered half strips and the lacquered half of the strips.
Match the lacquered half against your bike. Now you know how many coats you need to apply. The unlacquered colour will look wrong. It will look very wrong. In my case, the colour before the lacquer looked to be purple. But as you spray the real part, with each successive pass of the red you will see it getting closer to the unlacquered strip on your spectacle colour chart. That is a real confidence boost - because you know when you apply the lacquer to that colour it will lighten to the correct colour of the original.
In some lights, you could not tell the difference, in other lights I could tell, but no one else noticed. The shiny nature of the paint tends to reflect light and dark. The right hand mirror is the one that was completely re-painted. (The left of the photo). The left hand mirror (the right of the photo) is the original, but due to different reflected light, that is the one that you might choose as being the re-sprayed one !

The technique of using quick passes to give small dusting of the paint and then letting it dry was the only way that I could make sure that when I painted the mirror itself, I could reproduce the thickness of paint that I had applied to the spectacle case. It also ensures that there is no chance of any paint running.
I took a plastic spectacle case and sprayed it - a single 'stroke of spray from left to right' - and let it dry. Repeat until the glasses case was completely covered.
By a single stroke I mean I pressed the nozzle to the left of the glasses gas and kept it down as I wafted it quickly from left to right, only letting go when I had passed the end of the case.
What you get is a fine dusting and it might take 4-6 of these passes to cover completely. It dries quite quickly though.
Then I did the same with one pass of red. Let it dry.
I placed a strip of broad masking tape over the left hand end.
Then repeated a second dusting of the entire glasses case. Let it dry, and placed a second strip of masking tap to the right of the first.
Repeat, gradually masking off additional strips from the left hand end. I stopped at 7 times - but the first few wafts were so obviously wrong that I didn't start masking until the third pass.
In the end, when you take the masking tape off, you have 7-12 strips showing the colour when you have sprayed it with one, two, three, etc coats.
So in my case I had strips that showed the colour after 3, 4, 5, 6, 7, 8 , 9 spray passes. What you should have is a darkening red colour - tending toward purple, which still shows the glint of the silver. There is no point in continuing if the final coat makes the layers so opaque that the silver cannot be seen trhough the red.
None of these colour strips will match the colour of the bike. They will not even be close. Don't be alarmed.
Then take some newspaper and tape down a strip of newspaper to cover the top half of the glasses case. So you can see the bottom half of the 7-12 strips that you have just spray-painted.
Waft these exposed strips with 3 or 4 passes of lacquer. Again just one pass at a time - until you are happy with the finish. (You may wish to mask off a long strip to see if there is any difference between 3 and 4 passes of lacquer). I didn't.
Remove the masking tape so that you can see the unlacquered half strips and the lacquered half of the strips.
Match the lacquered half against your bike. Now you know how many coats you need to apply. The unlacquered colour will look wrong. It will look very wrong. In my case, the colour before the lacquer looked to be purple. But as you spray the real part, with each successive pass of the red you will see it getting closer to the unlacquered strip on your spectacle colour chart. That is a real confidence boost - because you know when you apply the lacquer to that colour it will lighten to the correct colour of the original.
In some lights, you could not tell the difference, in other lights I could tell, but no one else noticed. The shiny nature of the paint tends to reflect light and dark. The right hand mirror is the one that was completely re-painted. (The left of the photo). The left hand mirror (the right of the photo) is the original, but due to different reflected light, that is the one that you might choose as being the re-sprayed one !
The technique of using quick passes to give small dusting of the paint and then letting it dry was the only way that I could make sure that when I painted the mirror itself, I could reproduce the thickness of paint that I had applied to the spectacle case. It also ensures that there is no chance of any paint running.
Last edited:
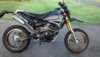
Rattlecan paint jobs can run the gamut from horrible to quite good. There are no mistakes only quitting early. If you make a mistake sand until smooth (wet sanding preferred) and try again. In general, sand until smooth and clean thoroughly before beginning. I clean with alcohol and a cloth that doesn't leave fibers. Heat the primer and spray paint cans with water to the desired temp and shake thoroughly. Spray with long and moderately fast arcs. With primer, cover until the underlying panel color is obscured. I use a heat gun between layers to accelerate the process often doing primer then 3 - 4 color coats in an hour. Color coats should be thin enough that it takes at least 3 or 4 to cover. If you can be patient enough, wait a couple of weeks after your final color (to allow paint to harden) and polish to a shine. The final step is clear coat and some even polish that. Watch some YouTube videos and better yet practice before you commit to your ST panels. Good luck and enjoy because it can be very satisfying. The little supermoto in the picture was sprayed with a semi-gloss paint and was quite easy with no clear coat and no polishing.Has anyone used a rattle can to repaint any body panels. I can get the correct color coded paint at a body supply store but am wondering how good and smooth it will come out. I dropped the bike and scuffed the mirror housing and want to repaint it but don't know good it will look. They can match the paint. Any suggestions
Attachments
John OoSTerhuis
Life Is Good!
Wow, John… juST WOW!
Great work! Respect.
John
Great work! Respect.
John
About the only thing useful I can ad is to give the paint time to cure. I always allow a few days. A few years back I repaired the left side mirror housing on our ST1100. Local paint shop rattle canned primer, color and clear from their PPG paint for plastics line. Excellent results but I only let it cure over night. Reassembled the next day and tossed over the cover....which stuck to the clearcoat overnight. Sand and repeat.
This all reminds me of 45-50 years ago, when a friend and I were bored, so we spent a weekend building a model car. It was a Mopar, with options and decals to build it as a family car, a police car, or a hot-rod.
Of course, we made it a hot-rod police car. I was in charge of painting, so I separated the parts, and sprayed the body parts a deep medium blue, misting lightly enough to require three or four coats for coverage.
I used brown for wood-grain on the door panels and center console, and a toothpick to color the red and yellow side marker lights, silver on the locks and door handles, white dots on the bumps in the dash gauges, etc.
We used the large wheels and tires and jacked-up suspension, as well as the high-performance engine accessories, and side exhaust, but we also used the police lights and decals. It was a fun weekend after all.
Sorry for the side-track.
Yes. I used 3 coats of silver base, 6 of the red and 3 of the clearcoat. The instructions call for only 15-20 minutes between coats so the paint blends pretty well.Did it take 6 coats because it got darker each coat?
The previous owner of mine, did the rattle can tango and made a total cockup. I would like to get it presentable somehow but rattle cans are not my thing.Rattlecan paint jobs can run the gamut from horrible to quite good. There are no mistakes only quitting early. If you make a mistake sand until smooth (wet sanding preferred) and try again. In general, sand until smooth and clean thoroughly before beginning. I clean with alcohol and a cloth that doesn't leave fibers. Heat the primer and spray paint cans with water to the desired temp and shake thoroughly. Spray with long and moderately fast arcs. With primer, cover until the underlying panel color is obscured. I use a heat gun between layers to accelerate the process often doing primer then 3 - 4 color coats in an hour. Color coats should be thin enough that it takes at least 3 or 4 to cover. If you can be patient enough, wait a couple of weeks after your final color (to allow paint to harden) and polish to a shine. The final step is clear coat and some even polish that. Watch some YouTube videos and better yet practice before you commit to your ST panels. Good luck and enjoy because it can be very satisfying. The little supermoto in the picture was sprayed with a semi-gloss paint and was quite easy with no clear coat and no polishing.
I understand completely since I am the owner of the worlds ugliest ST1100. It came to me with original panels severely faded or rattle can painted in primitive fashion. Somehow it fits a 30 year old bike circa 1992 and I've become eye blind to the look at least for now. I'm waiting for this new to me ST to prove itself before I proceed with paint.The previous owner of mine, did the rattle can tango and made a total cockup. I would like to get it presentable somehow but rattle cans are not my thing.
Motorcycle Dave
Vendor
If you got the paint at a professional auto body and paint supplier mixed to your paint code and put in the spray can then you have professional paint.Has anyone used a rattle can to repaint any body panels. I can get the correct color coded paint at a body supply store but am wondering how good and smooth it will come out. I dropped the bike and scuffed the mirror housing and want to repaint it but don't know good it will look. They can match the paint. Any suggestions
Everything now depends on preparation of the part you want to paint. you will need to remove all wax and dirt using a Prepsol wax and grease remover
washing the area or part, sanding depending on the condition of the surface with 600 wet dry paper then 1000. I would check with your paint supplier
for more prep information. is your paint a 2 stage paint? or did you get one that you do not have to put a coat of clear over it.
Take your time when spraying smooth even strokes DO NOT try and rush it by putting to much paint at a time or you will have paint RUNS..
take your time do it right and it will look factory.... Good Luck
Share: