92 ST1100 fork seal replacement time

Joined
Sep 5, 2023
Messages
3
Age
71
Location
Pasadena MD
My son and I finished up a ride this past weekend down the Blue Ridge Parkway in Va this past week as a fun last trip to the season this year, and when I got home, noticed the left fork was leaking oil out of the seal and knew it was time to replace the seals. I found several well written articles about the steps as well as the excellent Youtube video provided by a Brit in his garage working on an ST set of forks. I have some work to do with regard to cleaning up some pits in the chromed tubes prior to installing the seals and will do so as part of the work. I wanted to ask if there was a loaner front fork seal kit in the ST-Owners group that provided any special tools like seal drivers for the work to help with disassembling and reassembling the each fork. If not I can make some up as shown by the Brit. If there is a kit, please let me know the means to send postage for its use.

Per the recommendations from the articles for ordering parts, current plans were to order: the following. Please comment and update the list as you see fit.

1. Fork Seals
2. Dust Seals
3. Hex Screws and washers for the screws at the bottom of the sliders in the event mine need to be drilled out.
4. O-Rings for the Fork Cap
5. Fork Bushings *
6. Slider Bushings *


Thanks very much.
Marc
 
1. the fork seal size is 41mm x 54mm x 11mm if you want to use generic seals. I've used only generic ones and they seem to last as long as the OEM seals.
2. dust seals aren't generally a wear item and can be reused unless there's obvious physical damage.
3. the screws at the bottom of the forks usually come out easily, don't want to jinx you, but very unlikely you'll need new ones. I think you'll need a bit longer than standard hex driver bit to reach the screw head.
4. never replaced the cap O-rings, don't think they wear out.
5/6. change if they are obviously worn, but depending on the mileage they may still be OK.

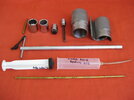
In place of the fork seal kit you can make your own from simple pipe fittings at Home Depot. A PVC bushing from 1-1/2" to 1-1/4" is perfect for driving back the metal bushing sleeve that goes into the lower fork tube, and driving the new seal into place. I put the old seal on top of the new seal, and drive them both into the lower fork tube, then pry the old seal off the top when the new seal is seated. A 2 foot length of 2" ABS pipe is placed over the PVC bushing for driving.
 
Last edited:
1. the fork seal size is 41mm x 54mm x 11mm if you want to use generic seals. I've used only generic ones and they seem to last as long as the OEM seals.
2. dust seals aren't generally a wear item and can be reused unless there's obvious physical damage.
3. the screws at the bottom of the forks usually come out easily, don't want to jinx you, but very unlikely you'll need new ones. I think you'll need a bit longer than standard hex driver bit to reach the screw head.
4. never replaced the cap O-rings, don't think they wear out.
5/6. change if they are obviously worn, but depending on the mileage they may still be OK.

In place of the fork seal kit you can make your own from simple pipe fittings at Home Depot. A PVC bushing from 1-1/2" to 1-1/4" is perfect for driving back the metal bushing sleeve that goes into the lower fork tube, and driving the new seal into place. I put the old seal on top of the new seal, and drive them both into the lower fork tube, then pry the old seal off the top when the new seal is seated. A 2 foot length of 2" ABS pipe is placed over the PVC bushing for driving.
Great info, much appreciated. I'll shop for parts after disassembling the tubes, they only have 60K miles on them.
I think its been an easy 10 years since I did the alternator upgrade and you all were very helpful on that upgrade. being able to use heated gear makes riding more fun.
As always, thanks very much.
Marc
 
And I'd definitely check the (exposed) work-area (below lower clamp) on the fork tubes for wear, pitting or chips... grab an old pantyhose (for the Britts: nah! Fishnet stockings won't work...) and wipe over suspected surfaces, it'll catch on imperfections...

I mark the "outboard" orientation of my fork tubes, enabling proper placement of the gaps in the new fork bushings (facing either in- or outboard, never forward nor rear) during assembly.

Depending on mileage I'd also overhaul the anti-dive valve and linkage, O-rings, rubber cap, steel bearing & snap-ring, and the little nylon bushing (some are unaware it even exists...)
 
You might want to try one of these first:


I had a leaking seal halfway through this season and I thought, Ugh, another task for winter. I used that seal cleaner, followed the directions, and no more leak. Like nothing, not a drop. Unless you like taking stuff apart you might give it a shot.
 
Back
Top Bottom