I took advantage of the group buy of the
G2 Tamer Throttle Tube for the ST1300
I just got this in the mail last night, here are some
pics of the tube:


G2 Tamer Throttle Tube Install Steps
- Step 1
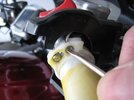
Remove Bar End Weights - This pic is showing me removing the
clutch side but but I was also installing some symtec heated grips so
I was taking both sides off and the approach is the same.


- Step 2
Remove grips w/compressed air - this is so easy it's not even funny
place the tip of the air tool between the bar and grip - bar and
throttle sleeve on the throttle side - then cup your hand to keep
air from coming out - when you hit the air and pull on the grip it
will balloon out a little and pop right off. If you have lots of glue
on the grip you might need to get a small thin and long screwdriver
and help break the glue loose.
Warning - if you have heated grips you might want to try a
different method as ballooning the grips could cause the heating
elements in the grips such as the OEM Honda heated grips to break
and fail.


- Step 3
Loosen/Remove Throttle Sleeve - There are two screws under
the right-side switch housing that will need to be removed.

Once the switch housing is loose, you can see the end of the
throttle sleeve where the two throttle cables are attached.

Now, the easiest thing to do is disconnect the upper cable first.
You want to be careful as to not nick or damage the cable and
have it break on you in the future. So, just use little effort when
messing with the cable - don't force anything. A small screwdriver
will allow you to position the cable to slide it out of the retention
part of the throttle sleeve.


Now that the upper cable is disconnected, you can rotate the sleeve
counter-clockwise and the lower cable will be easier to disconnect.

Now, just slide the OEM throttle sleeve off the handlebar.

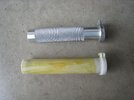
- Comparisons
Just a couple comparison photos.


- Step 4
Install G2 Tamer Throttle Tube - I decided to clean the handlebar
with some mineral spirits - the G2 doesn't need any lubrication, you
just slide it on.


- Step 5
Reverse order - As with most things, installation will be the reverse of
disassembly. Start with the cable retention holes at the 2 O'clock
position and use the top hole which is the lower cable retention
hole. Then, after the lower cable has been inserted, rotate the
sleeve clockwise until the holes are back to where they were on
the OEM sleeve.


Now, you just need to install the top cable into the top cable
retention hole and you're almost done - that small screwdriver
will come in handy again.


- Step 6
Reattach right side switch housing - This housing is tricky so you
will probably have to jiggle it a little but it will seat once you play
around some. In case you forgot - the small screw goes towards
the front of the bike.


- Step 7
Reinstall Grips/Bar End Weights - No pics here, apply grip glue
to the G2 tube, then you can use an air compressor to install the
grip in the similar manner used to remove it.
Evaluation:
Yes, as others here have stated, it does take the edge off the 'from a stop'
abruptness of the throttle. I think that for under $80 this is a good
addition to help make the ST1300 a smoother bike.
Last edited:

 :bow1:
